Overview
Brightcove has created an integration to deliver Video On Demand (VOD) and Brightcove Live events to Brightcove Players using the Kollective eCDN.
An eCDN solution helps with content delivery to corporate networks. They relieve network bottlenecks when you have a large number of concurrent viewers watching the same content, such as in corporate offices. With eCDN, you download video content from the origin server once for each eCDN server instance. Viewers in the corporate network receive the content from the eCDN server over the LAN.
Some of the benefits of using an eCDN include the following:
- Reduced WAN traffic for corporate locations
- Improved viewing experience at scale
- Reduced network costs
- Increased security since the eCDN is behind the corporate firewall
- Performance monitoring
Requirements
The following requirements apply to the eCDN plugin:
- You must use a Brightcove Player version 6.42.2+
- Videos must be ingested for Dynamic Delivery
- An HLSv3 stream is required for seamless delivery of the video stream for customers on legacy versions of the Kollective eCDN platform (v10.x)
Getting started
To use the kollective plugin, you will need some initial setup:
- Deploying server-side application
- Installing the player plugin
-
Now that you have completed the deployment steps, you are ready to synchronize your content and embed the player code. For details, see the following:
Deploying server-side application
The backend eCDN application needs to deployed on your server.
Server requirements
The following requirements apply to the hosting server for the backend application.
- NodeJS version 13+
- Hosting server: Linux or Windows server (The backend application can also be deployed to Heroku)
- MongoDB database
The MongoDB can be on the same server as the hosting server, on a different server, or using a MongoDB Atlas cloud database.
Setting configurations
You will make a few configuration changes for the backend application. Follow these steps:
- In the root directory for the backend application deployment package, open the config.env file.
-
Production mode - Set the mode to run the application in production or development.
Either
NODE_ENV=productionor
NODE_ENV=development -
Application port - Set the port for the application to run on.
Example:
PORT=3000 -
Database - The backend application requires a MongoDB database.
You can specify the database connection with the following format:
DATABASE=mongodb://{host}:{port}/{databaseName}Example:
DATABASE=mongodb://localhost:27017/BrightcoveIf you want to use a MongoDB Atlas cloud database, you can set it as follows:
DATABASE=mongodb+srv://{user}:{password}@{cluster}/{databaseName}?retryWrites=true&w=majorityExample:
DATABASE=mongodb+srv://myuser:mypassword@cluster0-xafsz.mongodb.net/MyDatabase?retryWrites=true&w=majority -
Email service - The backend application requires an email service setting to send notification emails.
SendGrid
To send emails using SendGrid email service, use the following with your SendGrid username and password:
# Send email using Sendgrid email service.
EMAIL_SERVICE=SendGrid

# Send email using Sendgrid email service.
SENDGRID_USERNAME=your SendGrid username
SENDGRID_PASSWORD=your SendGrid password
Other
To send emails using other email services, use the following with your email server host, port and username, password:
# Set EMAIL_SERVICE=Other to send email using normal email service using host and port EMAIL_SERVICE=Other # Send email using host and port EMAIL_HOST=your email host EMAIL_PORT=your email port EMAIL_USERNAME=your email username EMAIL_PASSWORD=your email password EMAIL_FROM=your email from address -
Kollective Publish API base URL - The server-side application calls the Kollective publish API to publish a video from Brightcove with video sources to Kollective and get back a content token. Here, you specify the Kollective publish API base url:
# Kollective publish API base url KOLLECTIVE_PUBLISH_API_BASE_URL=https://content.kollective.app/api -
Brightcove API Base URLs - The server-side application needs the following Brightcove API base URLs:
# Brightcove API base URLs BRIGHTCOVE_ACCESS_TOKEN_BASE_URL=https://oauth.brightcove.com/v4/access_token BRIGHTCOVE_CMS_API_BASE_URL=https://cms.api.brightcove.com/v1 BRIGHTCOVE_LIVE_API_BASE_URL=https://api.bcovlive.io/v1 -
Custom Field Names - The following custom fields name settings cannot be changed:
# Required custom field names for each Brightcove Account ID
CUSTOM_FIELD_KOLLECTIVE_CONTENT_TOKEN=kollective_content_token
CUSTOM_FIELD_KOLLECTIVE_IS_SYNCHRONIZED=kollective_is_synchronized
CUSTOM_FIELD_KOLLECTIVE_SYNCHRONIZED_TIME=kollective_synchronized_time
CUSTOM_FIELD_KOLLECTIVE_LAST_SYNC_STATUS=kollective_last_sync_status
Adding custom fields
Next, you are ready to define the required custom fields in Video Cloud Studio.
-
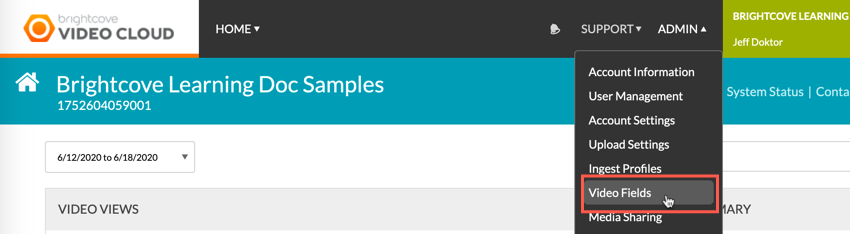
In Video Cloud Studio, click the Admin link, then select Video Fields in the left navigation.
Video Fields -
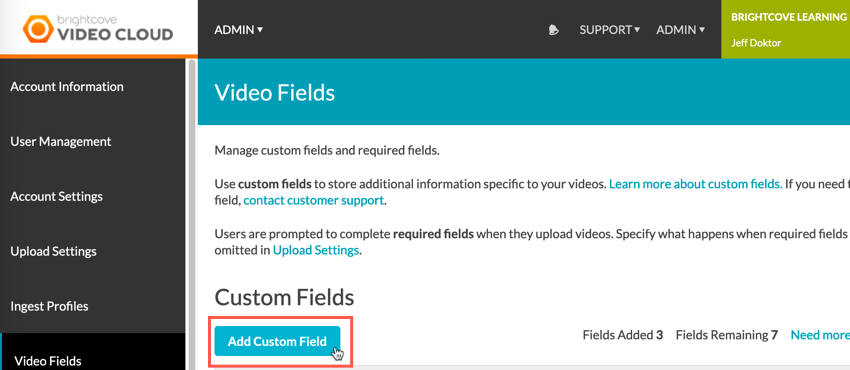
On the Video Fields page, click New + next to Custom Fields.
Add Custom Field -
Here, you will add custom fields required for Kollective.
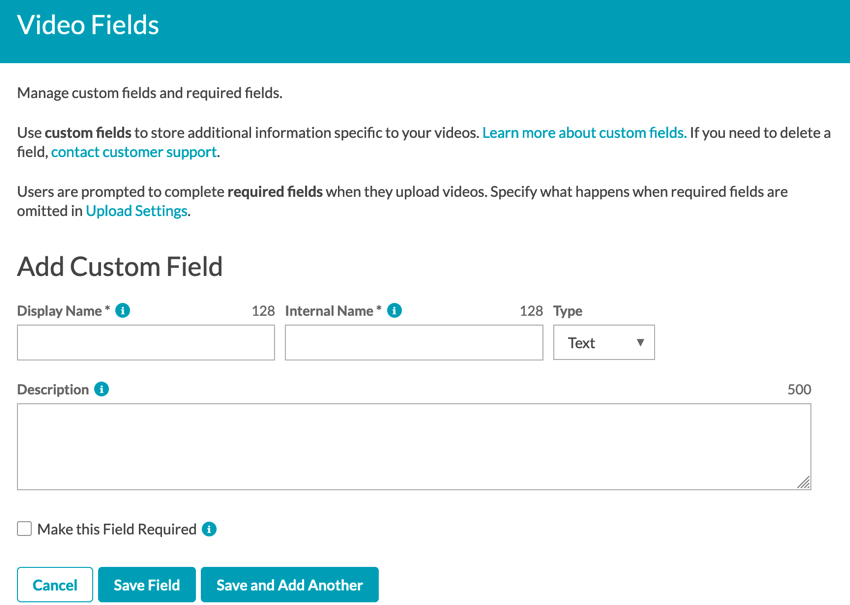
Custom field values Each Brightcove Account ID to be used for a syndicator account needs the following custom field names defined for the synchronization to work:
Brightcove Beacon Feature Summary Custom Field Name Type kollective_content_token text kollective_is_synchronized text kollective_synchronized_time text kollective_last_sync_status text In the Video Field details page, enter the following:
- Display Name - Enter the custom field names from the table above. Save each field separately.
- Internal Name - This is generated from the Display Name.
- Leave the Type as Text
- Enter a Description
- Leave the Make this Field Required option NOT selected
Deploying application
After making all the required configuration changes and adding the required custom fields, you are ready to deploy the backend application to your server.
- Copy the server-side application package to the targeted deployment folder on your hosting server.
-
Open a console application and go to the root folder of the application package in the previous step. Execute the following command to install all the required Node packages:
# npm install --production -
Execute the command below to import default super-admin user:
# npm run import-users -
To start the backend application, execute the following command:
# npm run start -
If everything is setup correctly, then you can open the application on a browser using the configured address.
Example:
http://localhost:3000/login -
Log into the application with the default super-admin user imported above.
- Username: super-admin@brightcove.com
- Password: Br1ghtC0ve

Server-side login