Introduction
Note that you must complete the installation and configuration of the Brightcove-Sitecore connector before performing the tasks described in this topic.
10.1.1 Release
The Brightcove Video Connect for Sitecore 10.2 or 10.1.x.1 includes exciting new features that allow you to achieve even more with the connector. This release includes the ability to sync Experiences and Players with your Brightcove Video Cloud account. You can also update as well as create new players from the connector and sync those to the Video Cloud.
Sitecore video (from YouTube)
The video below on setting up the Brightcove-Sitecore connection was created by Sitecore.
Syncing Experiences
To run the Sync Process for In-Page Experiences, follow the steps below.
- In Sitecore, select the Content Editor.
- In the Content Editor, select the System item.
- Expand Data Exchange > Brightcove Tenant > Pipeline Batches.
- Select the Sync Pipeline Batch item.
-
In the settings pane, ensure Pull Experiences Pipeline is selected (see figure below).
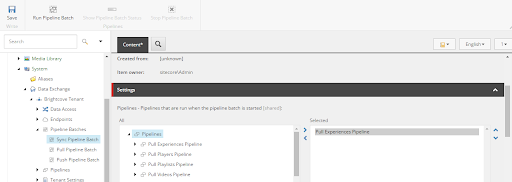
Settings Pane - Click the Save button.
-
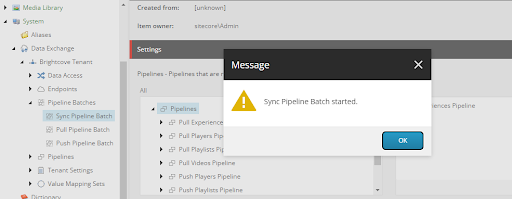
Click Run Pipeline Batch to start the sync process. The process starts and displays pop-up as shown below.

Pipeline Batch Running - Click Ok. The Show Pipeline Batch Status and Stop Pipeline Batch buttons are enabled while the process is running (and the Run Pipeline Batch button is disabled). When the sync is done, both buttons are disabled, and the Run Pipeline Batch button becomes enabled again. Note that the sync process can complete very quickly, depending on the number of items being synced - you may see just a blip in such cases and the Run Pipeline Batch button stays enabled.
- Confirm that the sync ran successfully by following the Confirm Synced Experiences steps below.
Confirm synced Experiences
- In Sitecore, select the Content Editor.
- In the Content Editor, select the Media Library.
- Expand the Brightcove > Brightcove Account items.
- Click the Experiences folder.
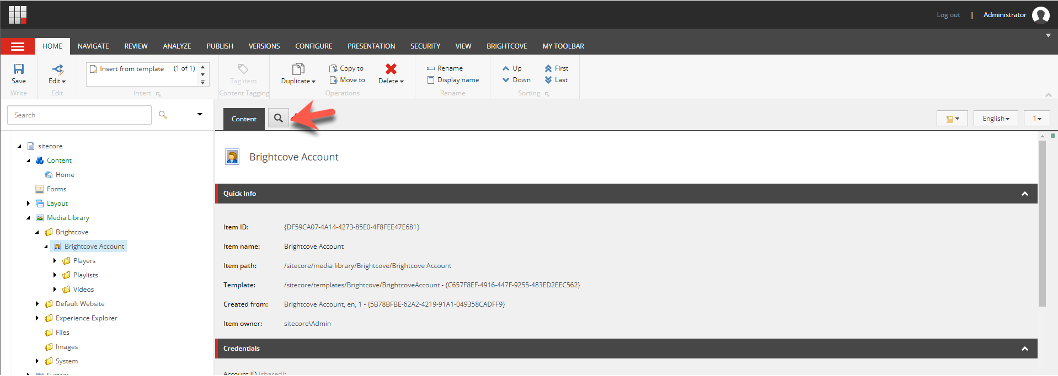
-
In the main pane, click the Search icon shown below.
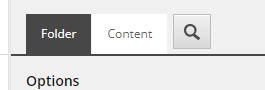
Search Icon -
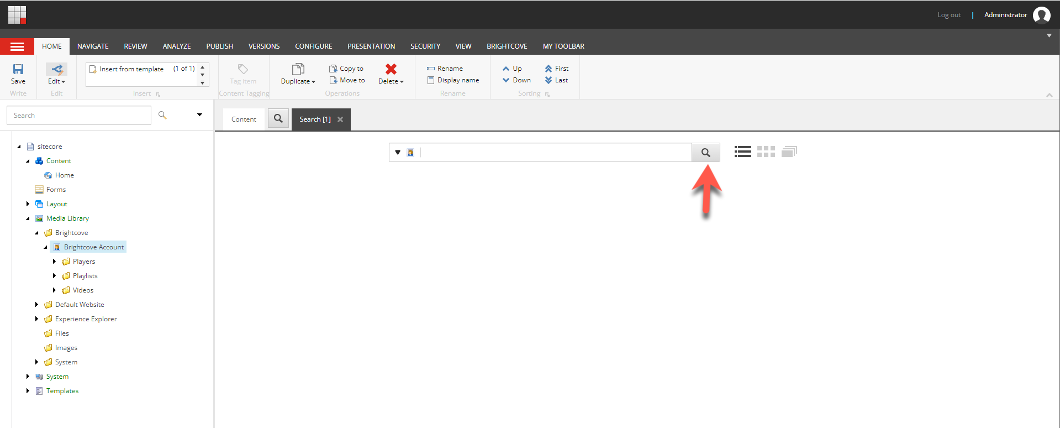
Click the Search button for the displayed search field (without entering any search term).

Empty Search Field -
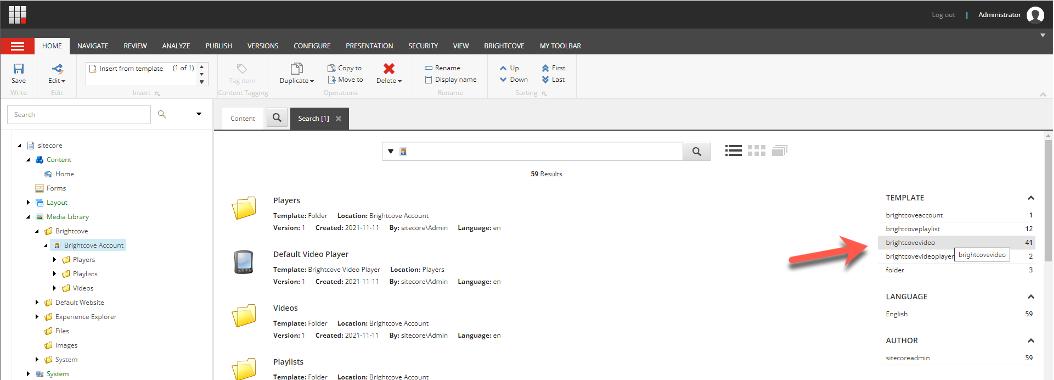
You should see all the synced video cloud experiences in the search results, including counts of how many of them were synced.
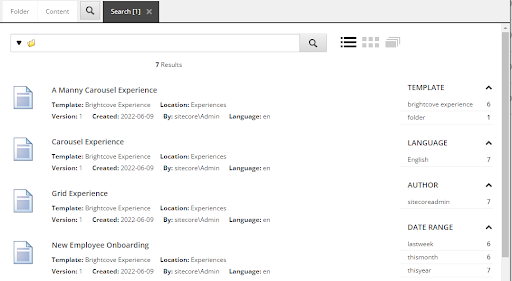
Synced Experiences
Syncing Video Cloud players
To run the Sync Process for Players, follow the steps below.
- In Sitecore, select the Content Editor.
- In the Content Editor, select the System item.
- Expand Data Exchange > Brightcove Tenant > Pipeline Batches.
- Select the Sync Pipeline Batch item.
-
In the settings pane, ensure Pull Players Pipeline and Push Players Pipeline are selected as shown below (see figure below).
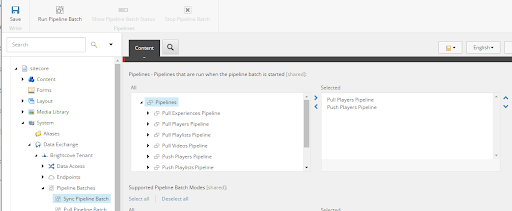
Sync Players Pipeline - Click the Save button.
-
Click Run Pipeline Batch to start the sync process. The process starts and displays pop-up as shown below.
Pipeline Batch Running - Click Ok. The Show Pipeline Batch Status and Stop Pipeline Batch buttons are enabled while the process is running (and the Run Pipeline Batch button is disabled). When the sync is done, both buttons are disabled, and the Run Pipeline Batch button becomes enabled again. Note that the sync process can complete very quickly, depending on the number of items being synced - you may see just a blip in such cases and the Run Pipeline Batch button stays enabled.
- Confirm that the sync ran successfully by following the Confirm Synced Player steps below.
Confirm synced players
- In Sitecore, select the Content Editor.
- In the Content Editor, select the Media Library.
- Expand the Brightcove > Brightcove Account items.
- Click the Players folder.
-
In the main pane, click the Search icon shown below.
Search Icon -
Click the Search button for the displayed search field (without entering any search term).
Empty Search Field -
You should see all the synced video cloud experiences in the search results, including counts of how many of them were synced.
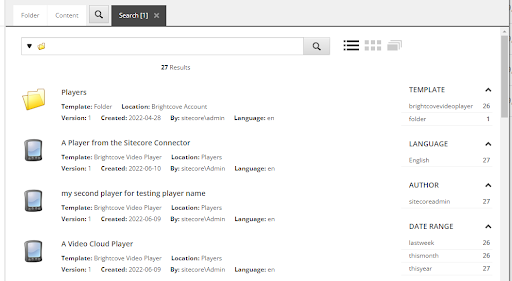
Synced Experiences
Updating players
Follow the steps below to update the properties of a player.
- In Sitecore, select the Content Editor.
- In the Content Editor, select the Media Library.
- Expand the Brightcove > Brightcove Account items.
- Click the Players folder.
-
Perform a search for a player.
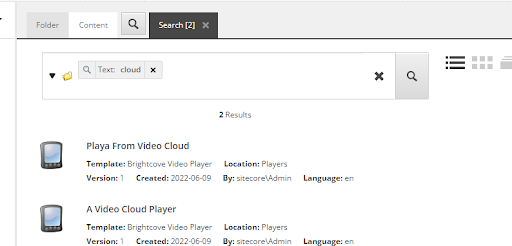
Search for Player -
Select the player you want to update, and make an edit to it (see edit in Short Description field below in this example).
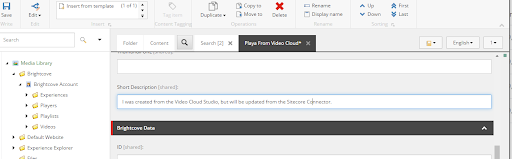
Edit Player - Click Save.
- Perform a Players Sync as described in Syncing Video Cloud Playerss section.
- Log into your Brightcove Video Cloud Studio and find the edited player.
- Confirm that your edit from the connector is reflected in the player in Video Cloud.
Adding players
To add a new Video Cloud player, follow the instructions below.
- In Sitecore, select the Content Editor.
- In the Content Editor, select the Media Library.
- Expand the Brightcove > Brightcove Account items.
-
Right-click the Players folder, then select Insert > Insert from template as shown below.
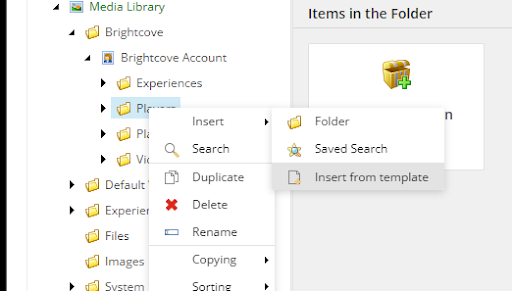
Insert Player from Template -
Ensure Brightcove Video Player is the selected template, then give the player a name ("I Am Connector Player" is used in the example below).
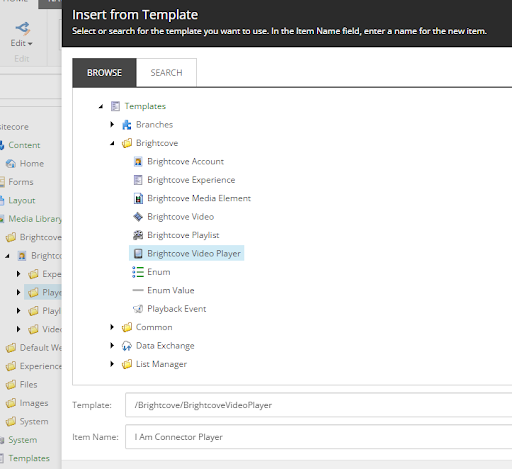
Brightcove Player Template - Click the Insert button.
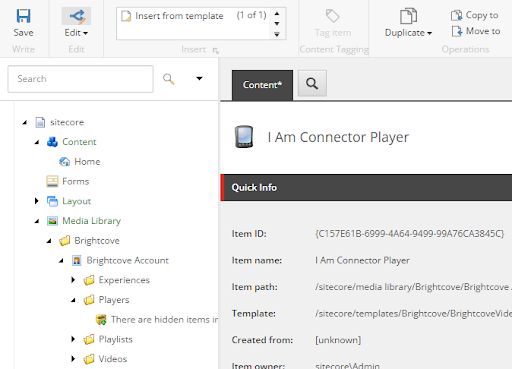
-
Click the Save button.
Save New Player - Perform a Players Sync as described in Sync Players section.
- Log into your Brightcove Video Cloud Studio and confirm that the newly added player is in the list of players in Video Cloud.
Defining Video Cloud Players
A player is needed to display a single video or a playlist of videos. A player defines what kind of capabilities are available to the visitor who wants to watch a video. Content authors can add new players, edit existing players and delete existing players.
Add Player
This section describes how to manually create the Sitecore item that corresponds to a player.
- In Brightcove Video Cloud, open the Players module from the left navigation.
- Select a player you want to create in Sitecore. Note the Player ID value displayed for the player. You will need to enter this into Sitecore in the following section.
- In Sitecore, in the Media Library, select the Brightcove Account item.
- Select the Accounts item.
- Select the Players item.
- Right-click Players and click the Insert and Brightcove Video Player
- Add a new Brightcove Video Player item. You will be prompted to enter the player ID. Enter the value from Brightcove Video Cloud.
- You will want to be sure you add both single video and playlist-enabled players.
Set Default Players
For videos and playlists to be previewed in Sitecore, the default players must be specified. This section describes how to set the default players.
- In Sitecore, in the Media Library, select the Brightcove Account item.
- Select the Accounts item.
-
In the Settings section, set the values for the Default Video Player field and the Default Playlist Player field.
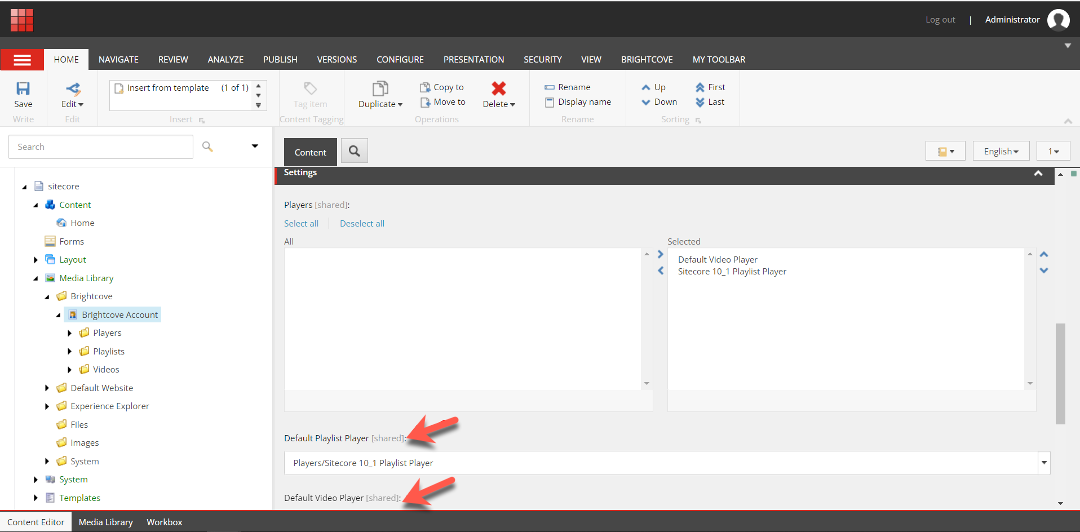
Set Default Players - Save the item.
Editing and Deleting Players
Player items can be edited or deleted just like any other Sitecore items.
Working with Brightcove videos
Importing, Adding, Previewing and Deleting Videos
Sitecore Data Exchange Framework is used to synchronize content between Sitecore and the Brightcove cloud. Content authors can also upload new videos to the Brightcove cloud using the upload option in the Brightcove ribbon in the Content Editor (see Add Video below).
Importing video
A Sitecore content author or administrator can trigger the video import process by running the pull or sync pipeline batches in the Brightcove DEF tenant. Note that the sync pipeline batch will export any pending edits to Brightcove as well as import pending changes from Brightcove.
Add Video
Brightcove Video Connect for Sitecore allows content authors to add new videos. Content Authors can upload a new video to the Brightcove cloud by clicking the upload button in the Brightcove ribbon in the Content Editor.
Edit Video
Video items are edited just like any other Sitecore items, but the changes must be synchronized with Brightcove using the push or sync pipeline batches.
Delete Video
Deleting a video item will NOT delete it from the Brightcove cloud. If you want to delete the video item as well as remove it from the Brightcove cloud you must check the Delete checkbox under the Synchronization tab on the video item and then run the push or sync pipeline batch.
Adding multi-lingual metadata
The Brightcove Video Connect for Sitecore 10.2 or 10.1.x.2 includes exciting new features that allow you to achieve even more with the connector. This update release adds the ability for video multi-lingual metadata to be defined in Sitecore and synced with Brightcove Studio. By doing so, video metadata in embeds will appear in the language associated with a user's browser language preferences or be set manually on the video embed
Define multi-lingual metadata for a video
- In Sitecore, select the Content Editor.
- In the Content Editor, select the Media Library item.
- Expand Brightcove > Brightcove Account.
- Click the Videos folder.
-
In the main pane, enter the name of the video you want to create multi lingual metadata for in the search field and click the search icon.
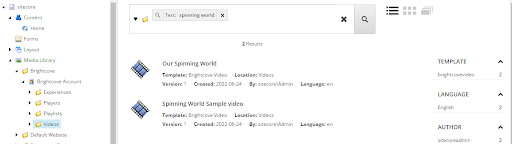
Search for Video - Click the video to select it.
-
In the HOME menu tab, select the Brightcove Video Variant menu item.
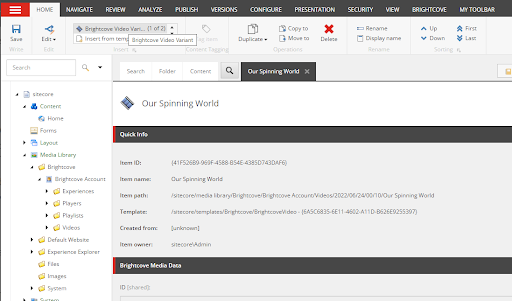
Brightcove Video Variant Item -
Enter a name for the new multi lingual metadata variant, and click ok.
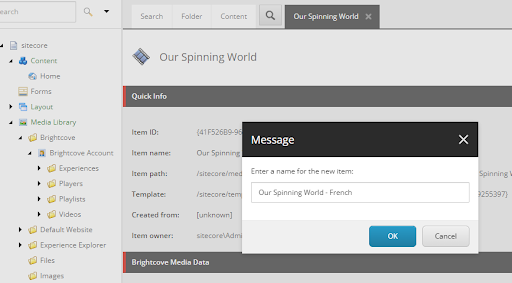
Add Name for Variant -
The new multi lingual metadata variant gets created and is shown as a child of its original as shown below.
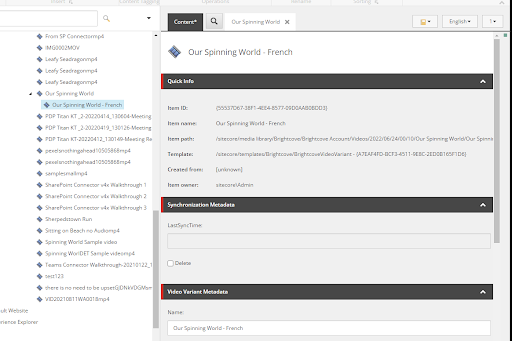
Variant as Child -
Populate the fields of the Video Variant Metadata section of the new variant as appropriate.

Variant MetaData Fields - Click on Save to save your changes.
- Perform a sync to sync your changes to the Video Cloud.
Sync your changes to Video Cloud
- In Sitecore, select the Content Editor.
- In the Content Editor, select the System item.
- Expand Data Exchange > Brightcove Tenant > Pipeline Batches.
- Select the Sync Pipeline Batch item.
-
In the settings pane, ensure the Push and Pull Videos Pipelines are selected (see figure below).
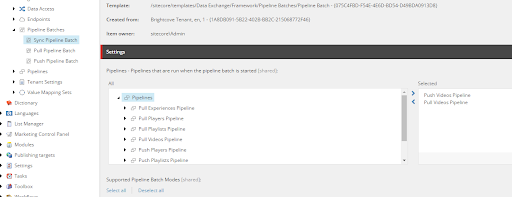
Push and Pull Videos Pipelines - Click the Save button.
-
Click Run Pipeline Batch to start the sync process. The process starts and displays pop-up as shown below.
Pipeline Batch Process Popup - Click Ok. The Show Pipeline Batch Status and Stop Pipeline Batch buttons are enabled while the process is running (and the Run Pipeline Batch button is disabled). When the sync is done, both buttons are disabled, and the Run Pipeline Batch button becomes enabled again. Note that the sync process can complete very quickly, depending on the number of items being synced - you may see just a blip in such cases and the Run Pipeline Batch button stays enabled.
- Confirm that the sync ran successfully by reviewing the Updated date and time for the video you just created the multi lingual metadata for. It should reflect the recently updated date and time.
Working with Labels
Create Labels
- In Sitecore, select the Content Editor.
- In the Content Editor, select the Media Library item.
- Expand Brightcove > {Brightcove Account of interest}. You should see a “Labels” folder underneath the expanded Brightcove account node.
-
Right-click the Labels folder, then select Insert > Brightcove Video Label as shown below:
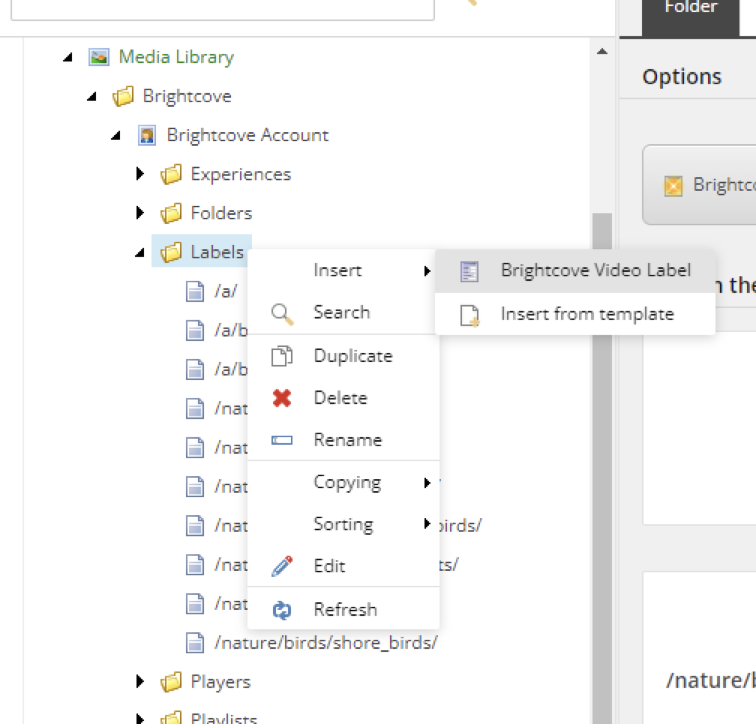
Labels Right-Click Menu - Enter a name for the label.
- Click the Save button.
- Perform a Push and Pull sync for the label (as described in using the push/pull pipelines).
Updating Labels
- In Sitecore, select the Content Editor.
- In the Content Editor, select the Media Library item.
- Expand Brightcove > {Brightcove Account of interest} > Labels.
- Click the label you want to update.
- Specify the new name as described next to the “New Name” field.
- Click Save.
- Perform a Push and Pull sync for the label (as described in using the push/pull pipelines).
Deleting Labels
- In Sitecore, select the Content Editor.
- In the Content Editor, select the Media Library item.
- Expand Brightcove > {Brightcove Account of interest} > Labels.
- Click the label you want to delete.
- Click the Delete icon on the menu bar.
- Click Save.
- Perform a Push and Pull sync for the label (as described in using the push/pull pipelines).
Working with Folders
Create Folders
- In Sitecore, select the Content Editor.
- In the Content Editor, select the Media Library item.
- Expand Brightcove > {Brightcove Account of interest}. You should see a “Folders” folder underneath the expanded Brightcove account node.
-
Right-click the Folders folder, then select Insert > Brightcove Video Folder as shown below:
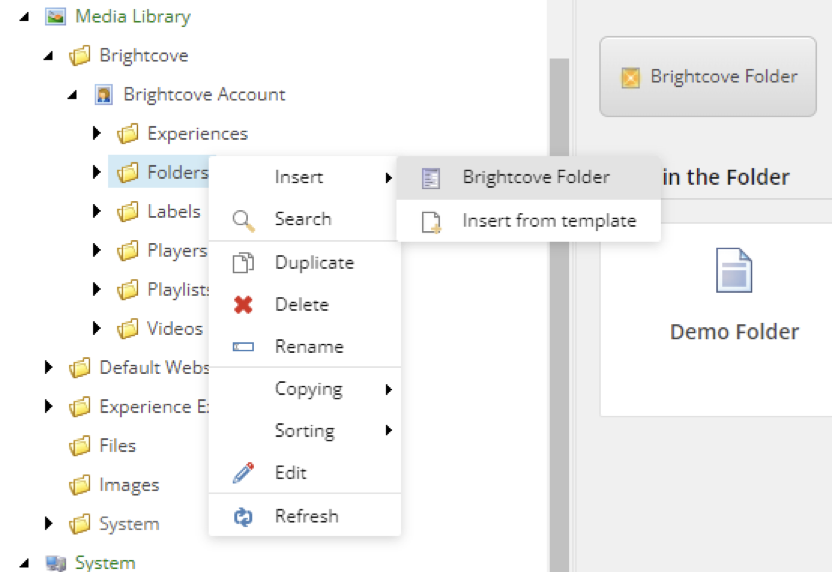
Folders Right-Click Menu - Enter a name for the folder.
- Click the Save button.
- Perform a Push and Pull sync for the folder (as described in using the push/pull pipelines).
Updating Folders
- In Sitecore, select the Content Editor.
- In the Content Editor, select the Media Library item.
- Expand Brightcove > {Brightcove Account of interest} > Folders.
- Click the folder you want to update.
- Specify the new name as described next to the “New Name” field.
- Click Save.
- Perform a Push and Pull sync for the folder (as described in using the push/pull pipelines).
Deleting Folders
- In Sitecore, select the Content Editor.
- In the Content Editor, select the Media Library item.
- Expand Brightcove > {Brightcove Account of interest} > Folders.
- Click the folder you want to delete.
- Click the Delete icon on the menu bar.
- Click Save.
- Perform a Push and Pull sync for the folder (as described in using the push/pull pipelines).
Associating Videos With Labels and Folders
- In Sitecore, select the Content Editor.
- In the Content Editor, select the Media Library item.
- Expand Brightcove > {Brightcove Account of interest} > Folders.
- Perform a search to find the video of your choice, open the video details.
- Scroll to the Brightcove Video Data section of the video details
-
You should see both Labels and Brightcove Folder fields:
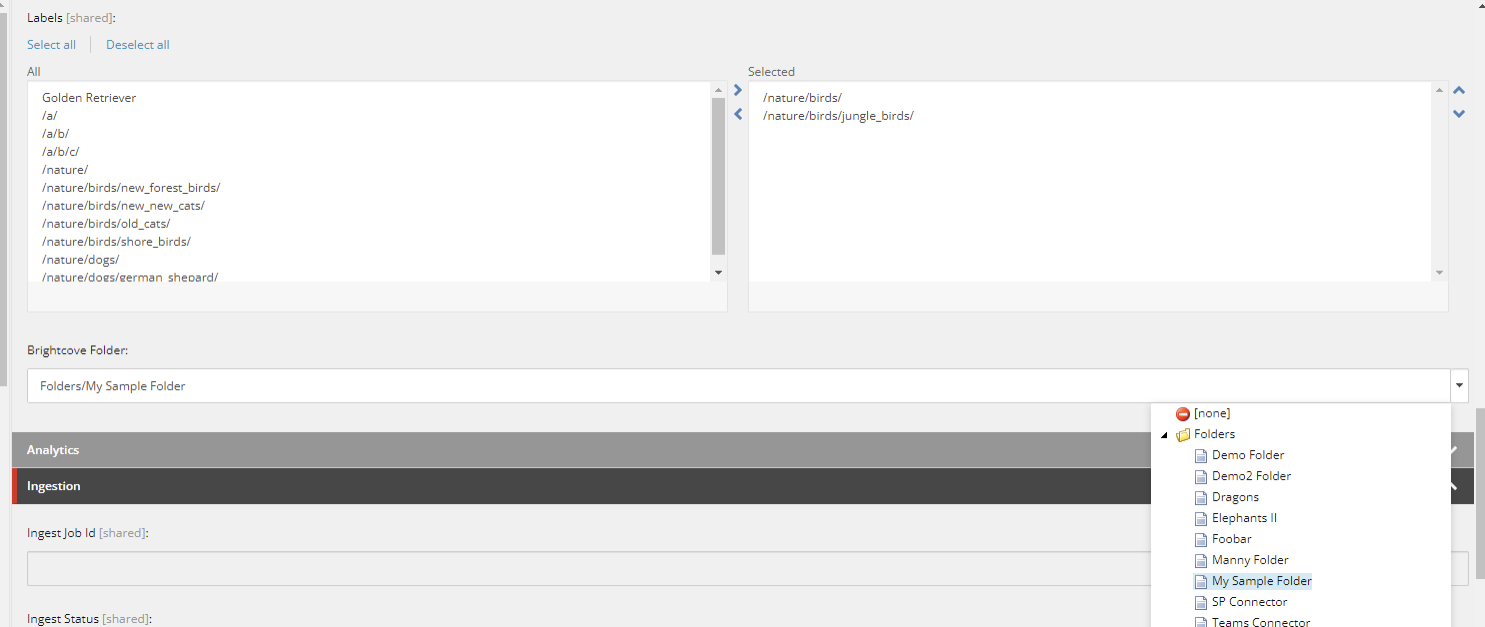
Label and Folder Fields for Video - Select the desired labels, or use the Brightcove folders dropdown to select a desired folder to associate.
- Click Save.
- Perform a Sync.
- After the Sync, open and view the video in Brightcove Studio. The associated folder is reflected in the Information section on the Overview tab of the video details page.
Searching for Videos and Playlists
To search for videos or playlists, click the magnifying glass icon to open the Search tab.
Enter search terms in the field and click the search icon.
You can select filters on the right to narrow the search results.
Importing, Adding, Previewing and Deleting Playlists
A playlist is a collection of videos in a single player. Sitecore Data Exchange Framework is used to synchronize content between Sitecore and the Brightcove cloud.
Add Playlist
Brightcove Video Connect for Sitecore allows content authors to add new playlists.
- Open the Sitecore Media Library.
- Navigate to the account with the videos you want to create a playlist for.
- Navigate to the Media Library item.
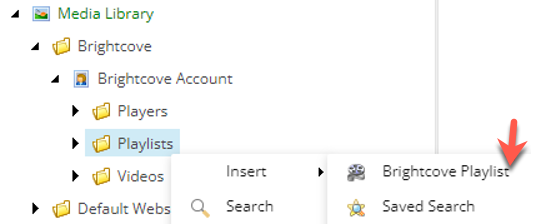
- Navigate to the Playlists folder and right-click on it.
-
Add a new Brightcove Playlist item.
Brightcove Playlist Item - For the Name field, enter a descriptive name for the video.
- For the Video Ids field, select the videos you want to include in the playlist.
Edit Playlist
Playlist items are edited just like any other Sitecore items.
Delete Playlist
Deleting a playlist item will NOT delete it from the Brightcove cloud. If you want to delete the playlist item as well as remove it from the Brightcove cloud you must check the Delete checkbox under the Synchronization tab on the playlist item and then run the push or sync pipeline batch.
Add Video to Pages
Brightcove Video Connect for Sitecore allows content authors to insert media into their pages in a variety of ways. This section covers the options that are available.
Rich Text Editor
Rich text fields allow content authors to insert formatted content into their pages. Content authors use the rich text editor to create and edit this formatted content. This section covers the features that Brightcove Video Connect for Sitecore adds to the rich text editor.
Embed Media
Media can be embedded directly in a rich text field.
- In the rich text editor, click the Embed Media button.
- Use the search screen to find the media you want to insert. Click the row that represents the media you want to insert. Click the Next > button.
- iii. Depending on the type of media you select, you will see additional options. For example, if you select a video, you must specify the player that should be used to display the video, along with the dimensions for the player. Click Finish.
- The media is embedded in the rich text field.
Rendering
Sitecore renderings allow content to be positioned at a specific location on a page. Sitecore allows two kinds of renderings: Brightcove Video Connect for Sitecore includes a rendering that allows content authors to insert media in pages.
- Use Page Editor to add a rendering to a placeholder.
- Select the Embed Media rendering.
- The rendering has been added to the placeholder. Now click the Embed Media Element button.
- Use the search screen to find the media you want to insert. Click the row that represents the media you want to insert. Click the Next > button.
- Depending on the type of media you select, you will see additional options. For example, if you select a video, you must specify the player that should be used to display the video, along with the dimensions for the player. Click Finish.
- The media has been selected for the rendering.
Synchronization Between Sitecore and Video Cloud
This section covers keeping videos and playlists synchronized between Sitecore for the following scenarios:
- When videos and playlists are deleted from Brightcove
- When videos and playlists added in Sitecore
- When videos and playlists are deleted from Sitecore
Importing from Brightcove to Sitecore was covered previously here.
Playback Event Analytics
The Brightcove Video Connect for Sitecore allows video playback events to be recorded for use in the Sitecore Digital Marketing System (DMS). This section covers the options that are available.
Playback Events
Playback events are used to record DMS page events as the result of video player actions. For example, when video playback starts, a DMS page event can be written.
Default Playback Events
Brightcove Video Connect for Sitecore comes with the following playback events:
- Playback Started
- Playback Completed
- Playbacd Error
Configure Playback Events for Account
By default, the playback started, and playback completed events are recorded. This is enabled on the Settings section of the Brightcove Account item.
By default, the playback started, and playback completed events are recorded. This is enabled on the Settings section of the Brightcove Account item.
Disable Playback Events for Account
All playback events can be disabled for a specific account.
- In Content Editor navigate to the account under Media Library > Brightcove > [Account Name].
-
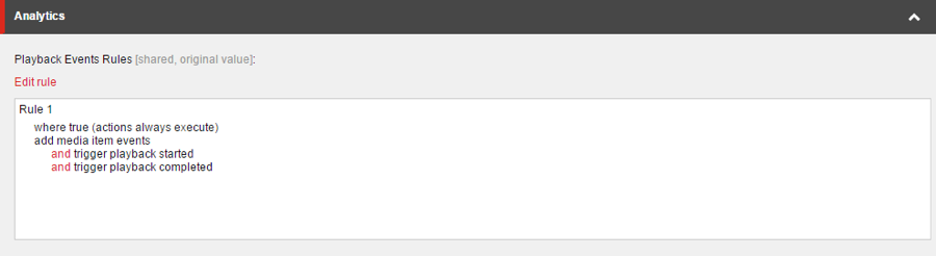
The Playback Events Rules field describes the conditions that must be met for playback events to be registered. By default, the condition is
where true, meaningalways. Click the Edit Rule button to change the condition, or to remove the existing rule.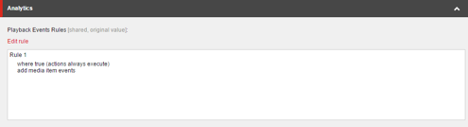
Playback Event Rules
Specify Playback Events for Media
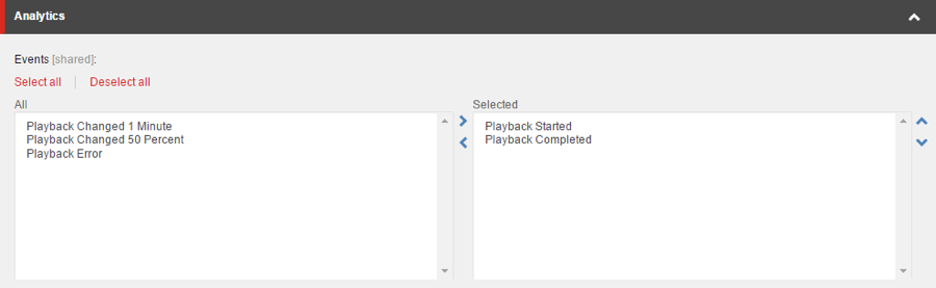
Each playlist and video item has a field named Events. This field determines which playback events will be handled for the specified item.
The following screenshot indicates that playback events have been specified for the video:
Create New Playback Events
You can add new playback events in order to capture more detailed information about video playback metrics.
- In Content Editor navigate to Media Library > Brightcove > [Account Name].
- Add a new item using the template Playback Event.
- For the Page Event field select Playback Changed
-
For the Parameter field you can enter a value in one of the following formats:
- Number - after the video is played this number of seconds, the page event is recorded. An example of a valid value is 15
- Percent - after the video is played this amount, the page event is recorded. An example of a valid value is 50%
- Save the item.
- Publish the item.
- Now you can add the new page event to your playlist and videos.
Reports
Brightcove Video Connect for Sitecore includes several reports that pertain to video playback.
Started Playback
This report shows a list of the videos that have triggered the video started event.

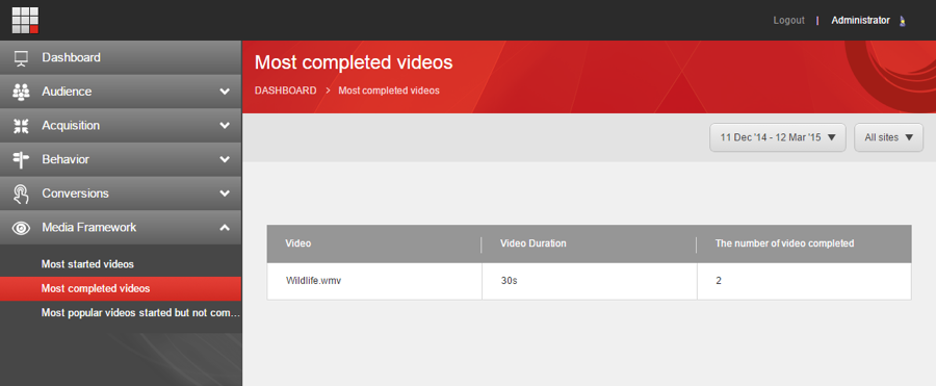
Completed Playback
This report shows a list of the videos that have triggered the video completed event.
Incomplete Playback
This report shows a list of the videos that have triggered the video started event but not the video completed event.