1. About this guide
This guide walks administrators through installing and configuring Brightcove M365 Connector for SharePoint in a Microsoft 365 tenant.
The connector consists of two deployable components:
- SharePoint Framework (SPFx) app — A tenant-scoped solution that provides web parts for embedding Brightcove videos, playlists, and experiences on modern SharePoint pages, plus provisioned site pages for connector configuration and content management.
- Proxy API (Azure Function App) — A secure server-side API layer that stores Brightcove API credentials in Azure Key Vault and brokers authenticated requests between SharePoint site instances and Brightcove. This eliminates the need to expose Brightcove API credentials within the SharePoint site.
Who should use this guide
- SharePoint Admin — Tenant App Catalog access; can upload SPFx packages and approve API permissions.
- Azure Admin — Can create resource groups, Function Apps, Key Vaults, and App Registrations in Microsoft Entra ID.
- Brightcove Admin — Can create API authentication credentials in Video Cloud Studio.
What's included in your package
| File | Description |
|---|---|
brightcove-video-connector.sppkg |
Compiled SPFx package to upload to the SharePoint Tenant App Catalog. |
functionapp.zip |
Compiled Azure Function (Proxy API) to deploy to your Function App. |
| This guide | Installation and configuration instructions. |
| User Guide | Separate document covering how to use the connector's web parts. |
What you'll do at a high level
- Create Brightcove API credentials in Video Cloud Studio.
- Provision Azure resources (Resource Group, Key Vault, Function App) and create an App Registration in Microsoft Entra ID.
- Deploy the compiled Proxy API (
functionapp.zip) to your Function App. - Upload the SPFx package (
brightcove-video-connector.sppkg) to the SharePoint Tenant App Catalog, enable it, and approve its API permission. - Add the app to a SharePoint site.
- Configure the Brightcove Connector Settings page (proxy connection + Brightcove account credentials).
- Verify the installation by accessing the content management page and separately adding a Brightcove web part to a page.
What this guide does not cover
- Creating Brightcove players or experiences in Video Cloud Studio.
- Customizing the web parts beyond the settings exposed in the UI.
- Configuring Azure resource monitoring, logging, access policies or cost controls
2. Prerequisites
2.1 Accounts and roles
- Brightcove Video Cloud account with Admin permissions to create API authentication credentials.
- Microsoft 365 tenant with SharePoint Online.
- Azure subscription within the same Microsoft Entra ID directory (or a different directory if using multi-tenant configuration — see Section 4.5).
- Microsoft Entra ID permissions to create and manage App Registrations and grant admin consent. Recommended role: Application Administrator or Cloud Application Administrator.
2.2 Who does what
| Role | Responsibilities |
|---|---|
| Brightcove Admin | Creates API credentials in Video Cloud Studio. |
| Azure Admin | Creates resource group, Function App, Key Vault, App Registration; configures authentication and CORS; deploys Proxy API. |
| SharePoint Admin | Manages App Catalog; uploads and deploys the SPFx package; approves API permissions. |
| Site Owner / Editor | Adds the app to a site; configures connector settings; adds Brightcove web parts to pages. |
2.3 Environment readiness
- A SharePoint Tenant App Catalog exists (or you have permission to create one).
- A modern SharePoint site where the connector will be used.
- An Azure region selected for hosting the Function App (choose a region close to your users).
2.4 Brightcove content readiness
- At least one published video, playlist, or In-Page Experience (IPX) in your Brightcove Video Cloud account.
- API credentials created for each Brightcove account you plan to expose in SharePoint (see Section 3). Each API credential should be associated with a single Brightcove account.
2.5 Decision points (capture before you start)
- Azure resource group name and region.
- Function App name (must be globally unique — becomes part of the URL).
- Key Vault name (must be globally unique).
- Tenant topology: Will the Azure subscription and SharePoint Online be in the same Entra ID tenant or different tenants? This affects how you configure the App Registration (see Section 4.5).
- Which Brightcove accounts (and corresponding API credentials) will be available to authors in SharePoint.
3. Create Brightcove API credentials
Before setting up Azure or SharePoint, create the API credentials that the connector will use to communicate with Brightcove Video Cloud.
3.1 Navigate to API Authentication
In Video Cloud Studio, go to Admin → API Authentication.
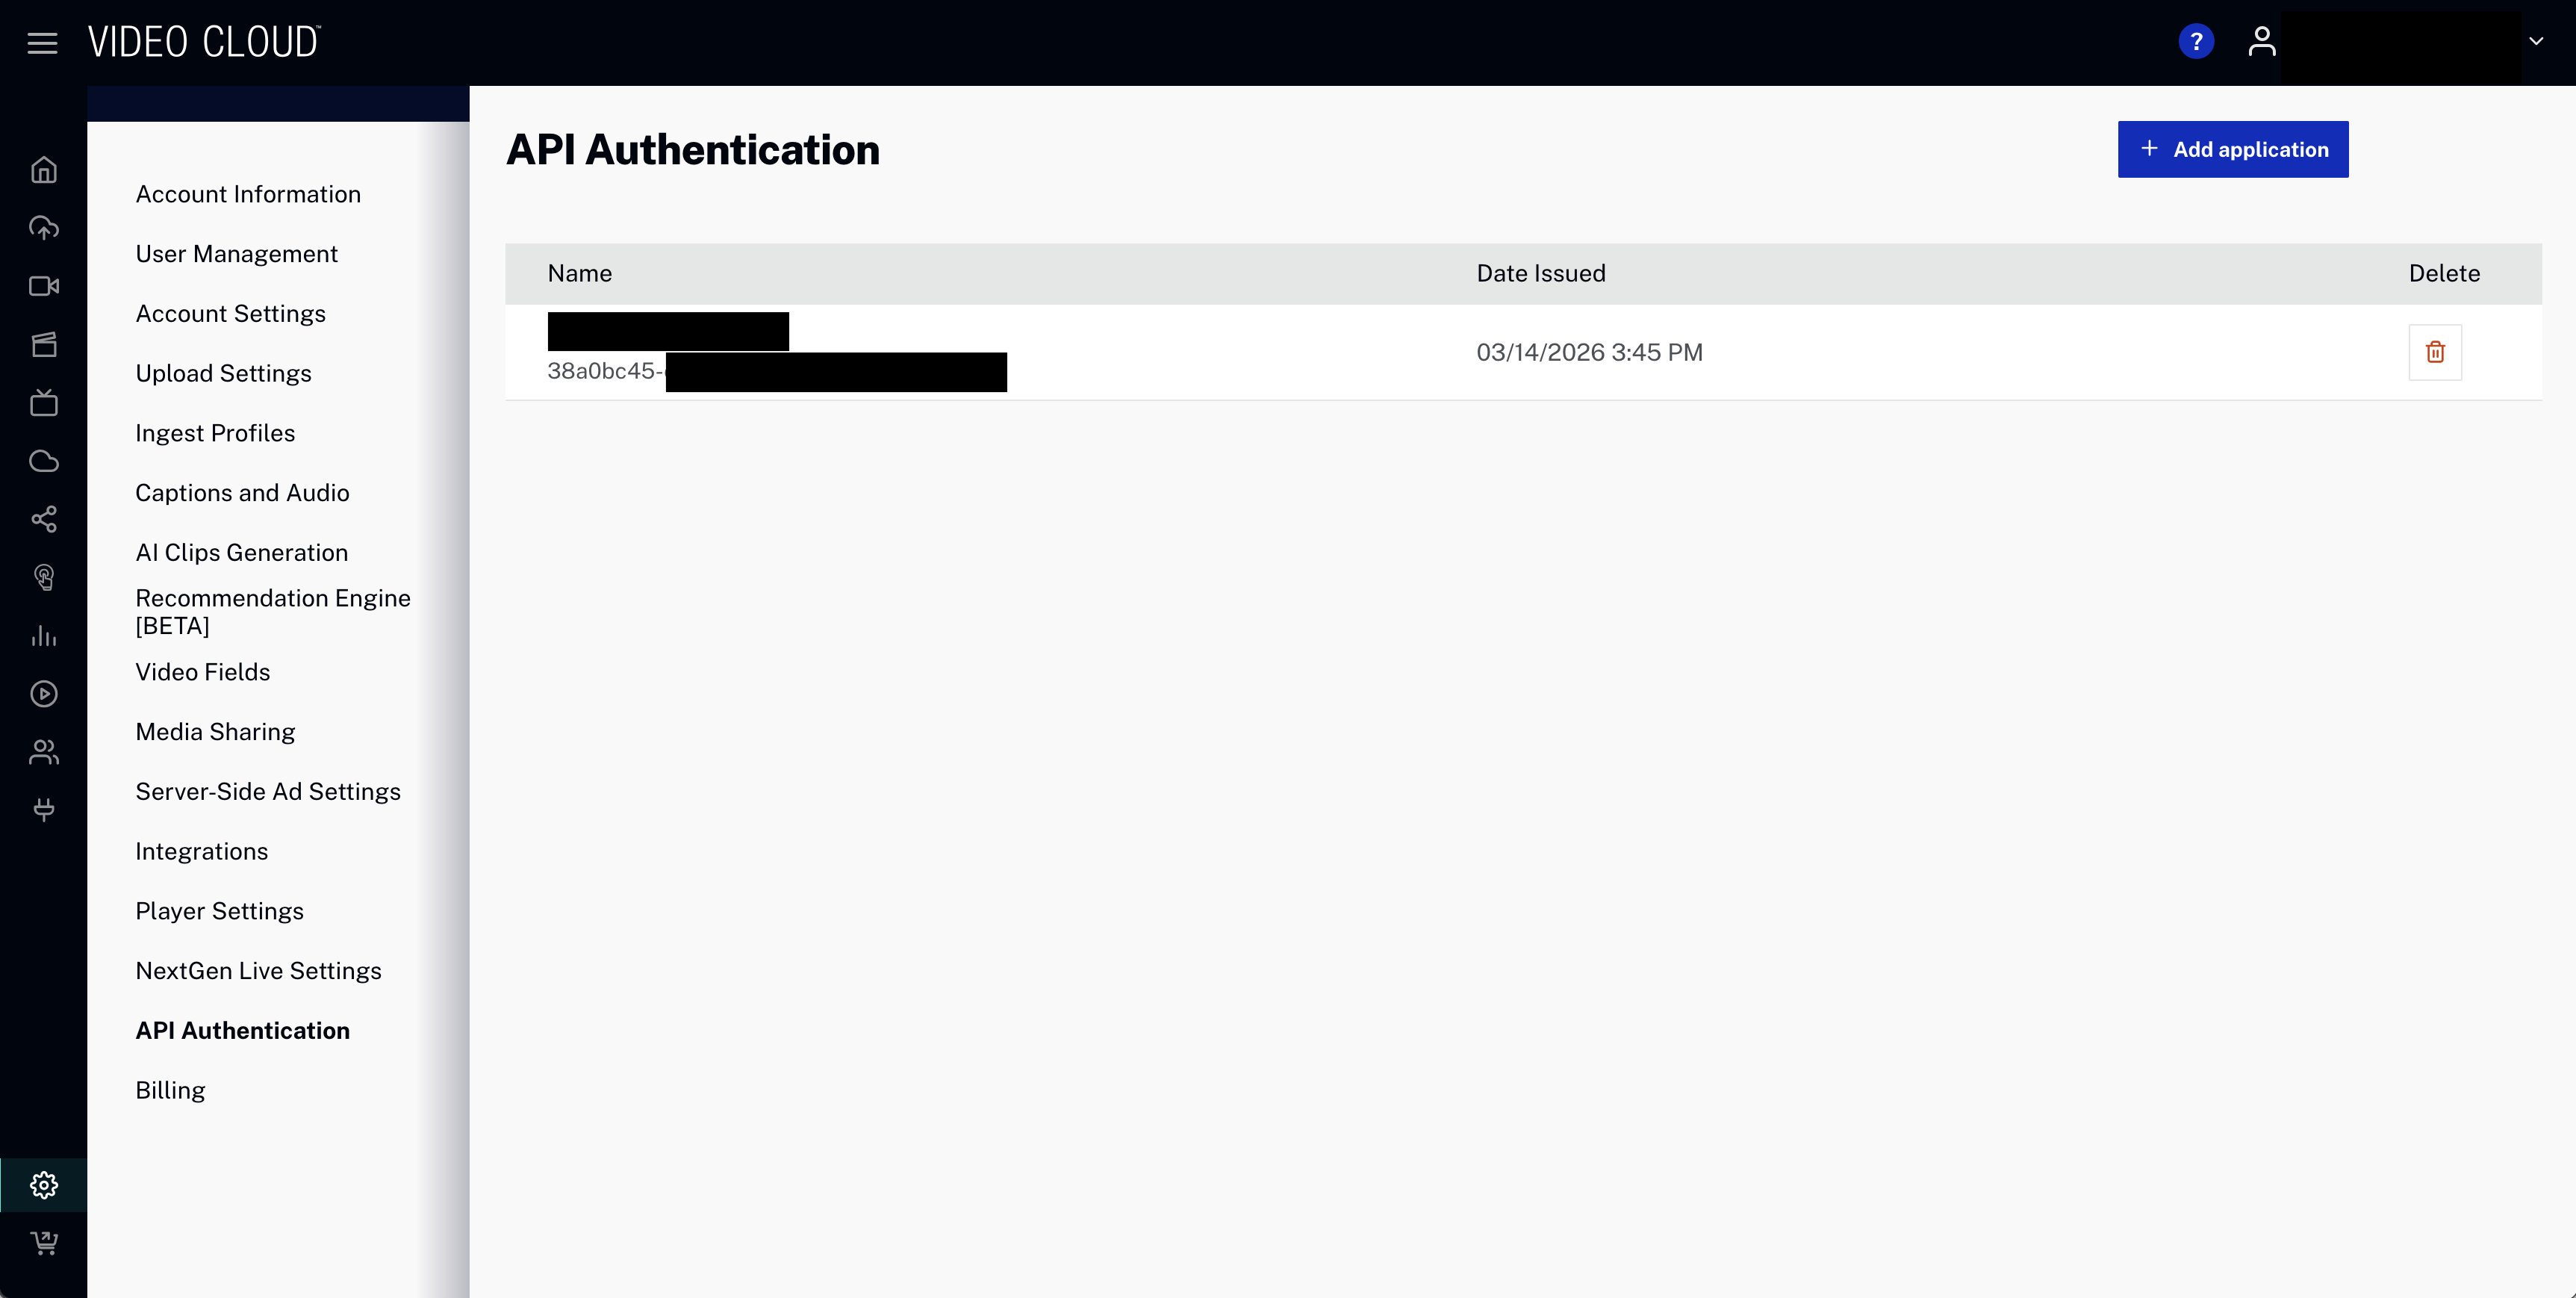
3.2 Register a new application
Click Register New Application and configure as follows:
- Name: A descriptive name (e.g.,
sp-connector-production). - Select Accounts for Authorization: Select the single Brightcove account this credential will be used for.
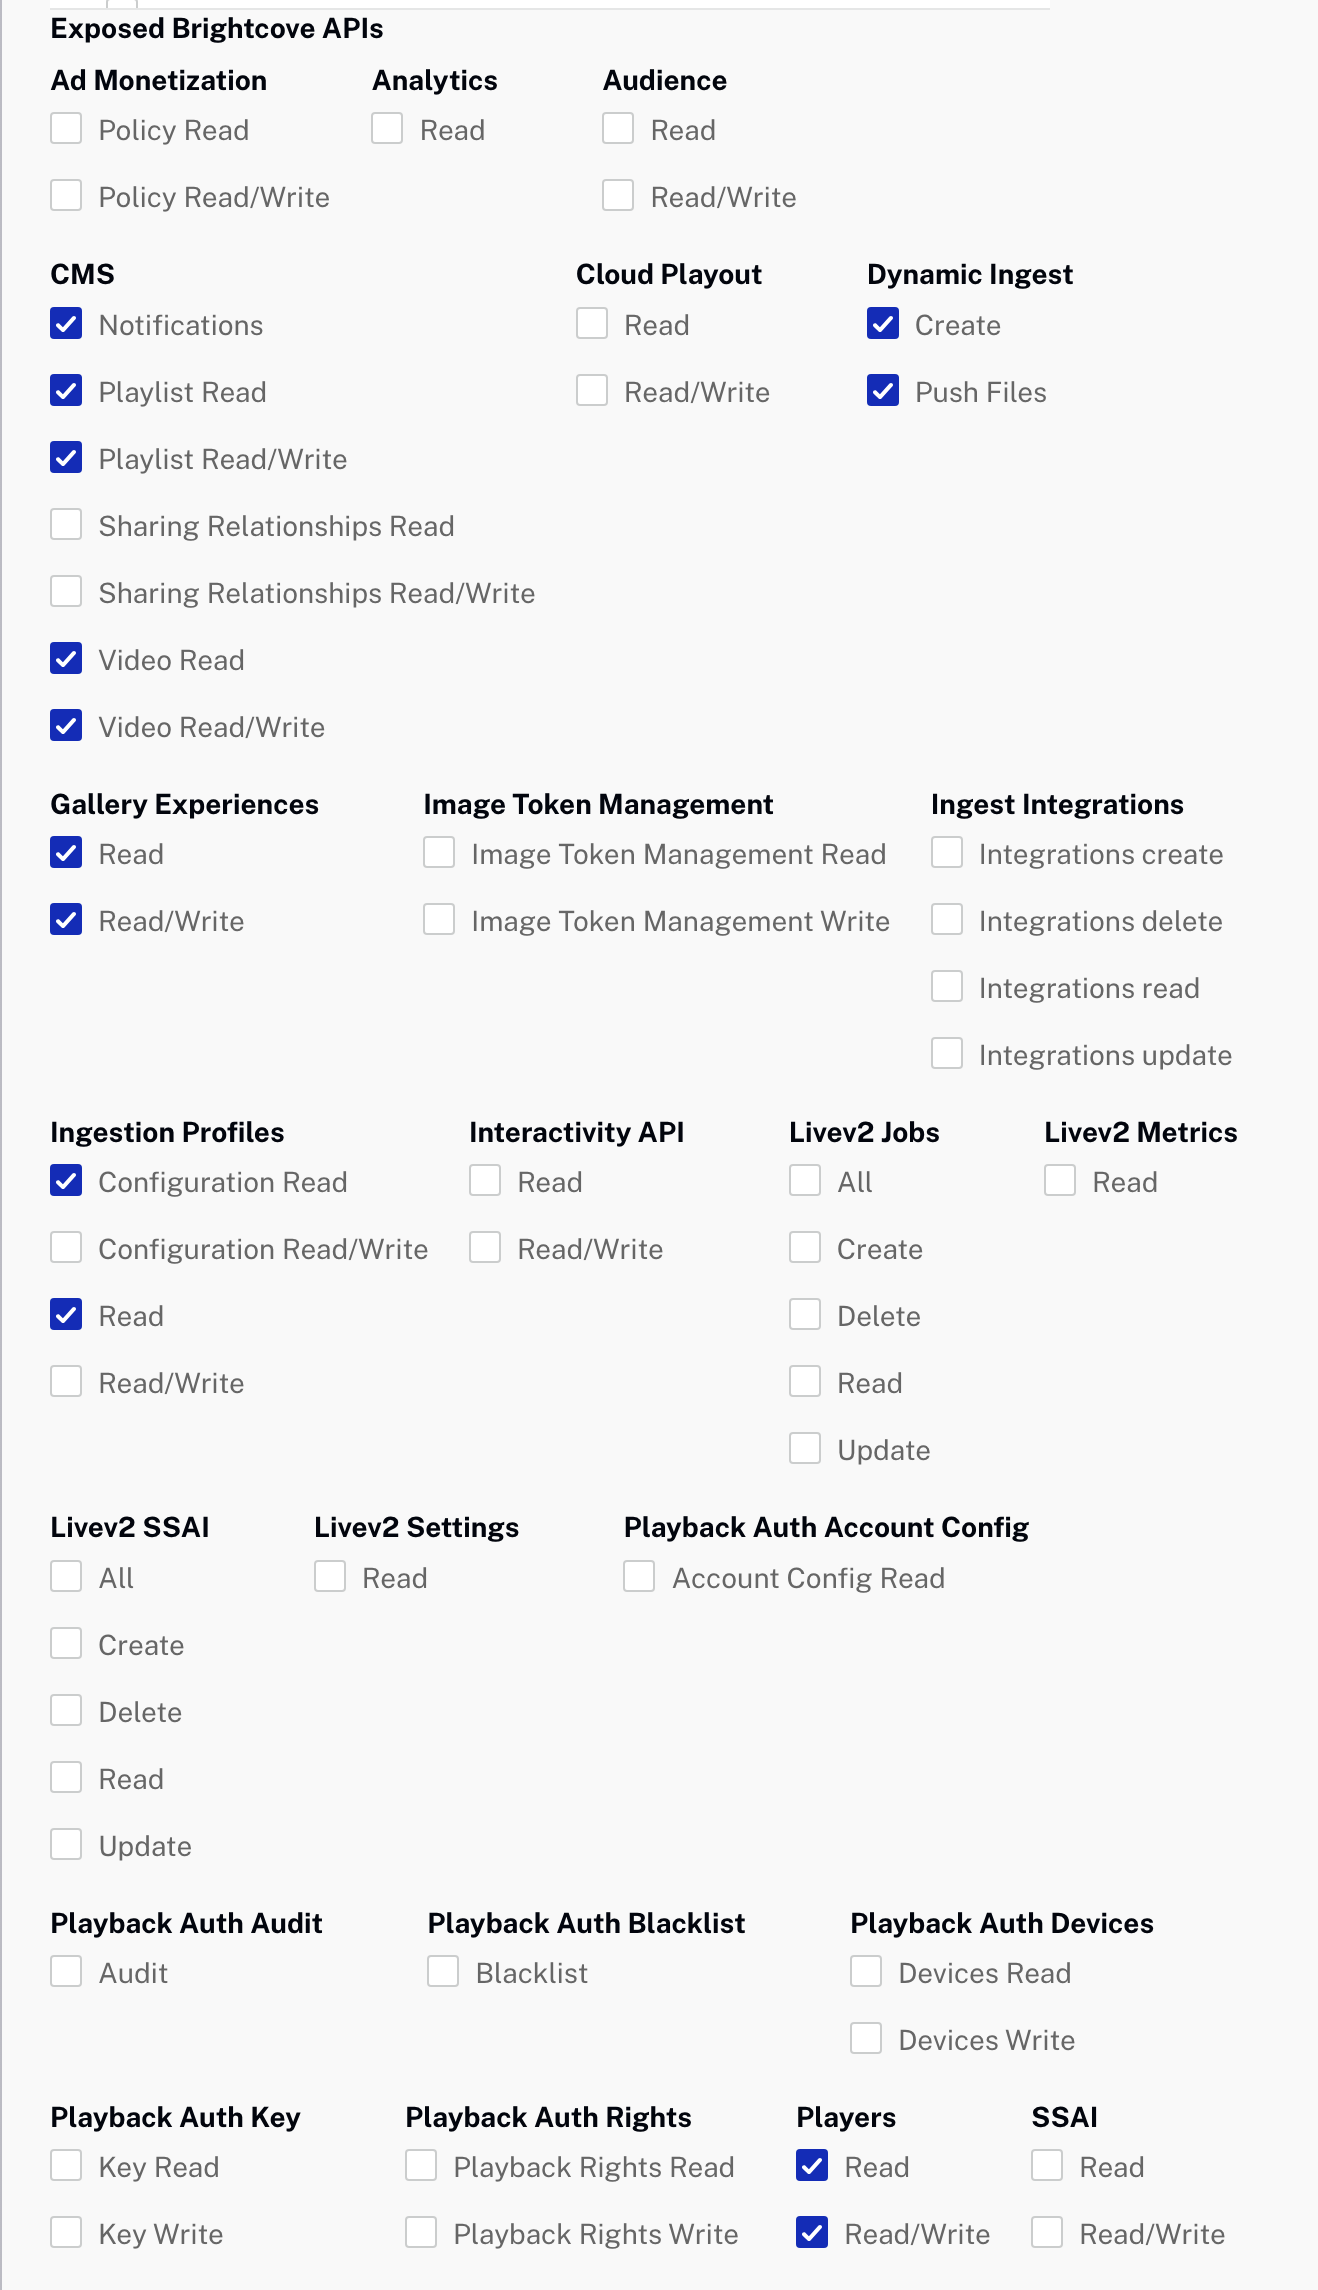
3.3 Required API scopes
Select the following permissions:
CMS
- Notifications ✅
- Playlist Read ✅
- Playlist Read/Write ✅
- Video Read ✅
- Video Read/Write ✅
Dynamic Ingest
- Create ✅
- Push Files ✅
Gallery Experiences
- Read ✅
- Read/Write ✅
Ingestion Profiles
- Configuration Read ✅
- Read ✅
Players
- Read ✅
- Read/Write ✅
3.4 Save and record credentials
Click Save. Record the following values — you will need them in Section 6:
- Account ID (numeric)
- Client ID
- Client Secret
4. Azure setup (one-time)
This section walks your Azure admin through provisioning and configuring the Azure resources required by the Proxy API. You will need administrative privileges in Azure to complete these steps.
Recommended naming convention:
${resourceType}-bcvc-${companyName}-${environment}-${region}
For example: rg-bcvc-acme-prd-eus (resource group), kv-bcvc-acme-prd-eus (Key Vault),
fa-bcvc-acme-prd-eus (Function App).
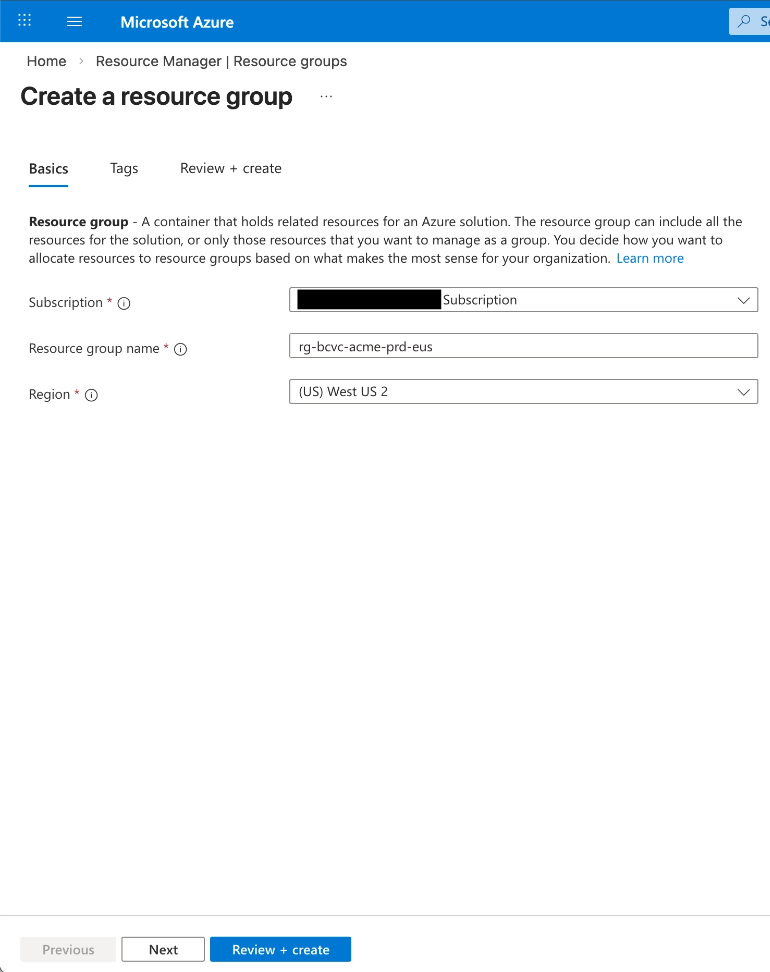
4.1 Create a resource group
Where: Azure Portal → Resource Groups → Create
- Name: Use your naming convention (e.g.,
rg-bcvc-acme-prd-eus). - Region: Select the region closest to your users.
- Click Review + create → Create
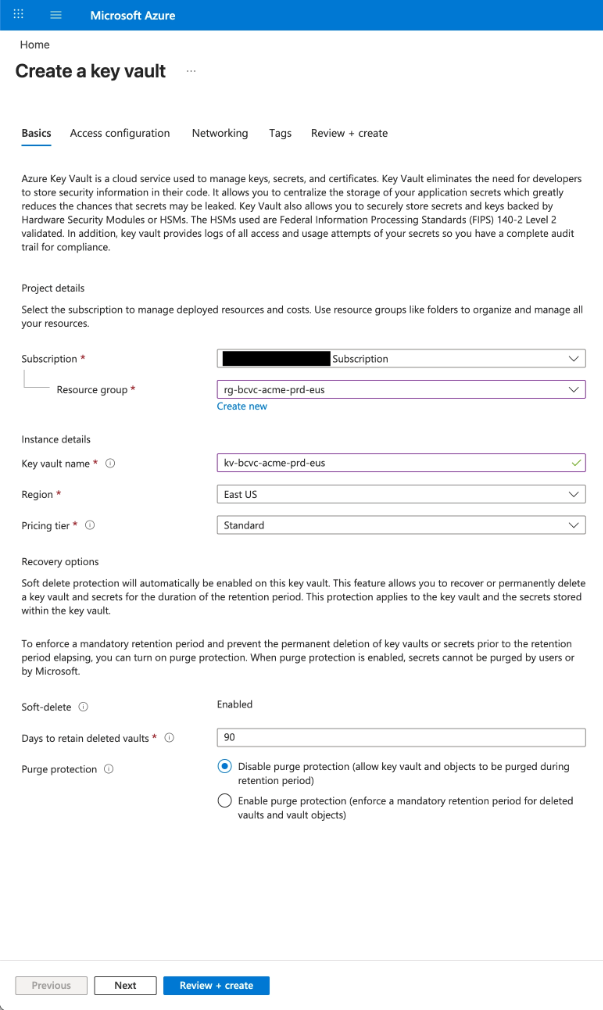
4.2 Provision a Key Vault
Where: Azure Portal → Key Vaults → Create
Configuration:
- Resource group: Select the resource group created in 4.1.
- Key vault name: Use your naming convention (e.g.,
kv-bcvc-acme-prd-eus). - Region: Select the region closest to your users.
- Pricing tier: Standard.
- Days to retain deleted vaults: 90
- Purge protection: Disable
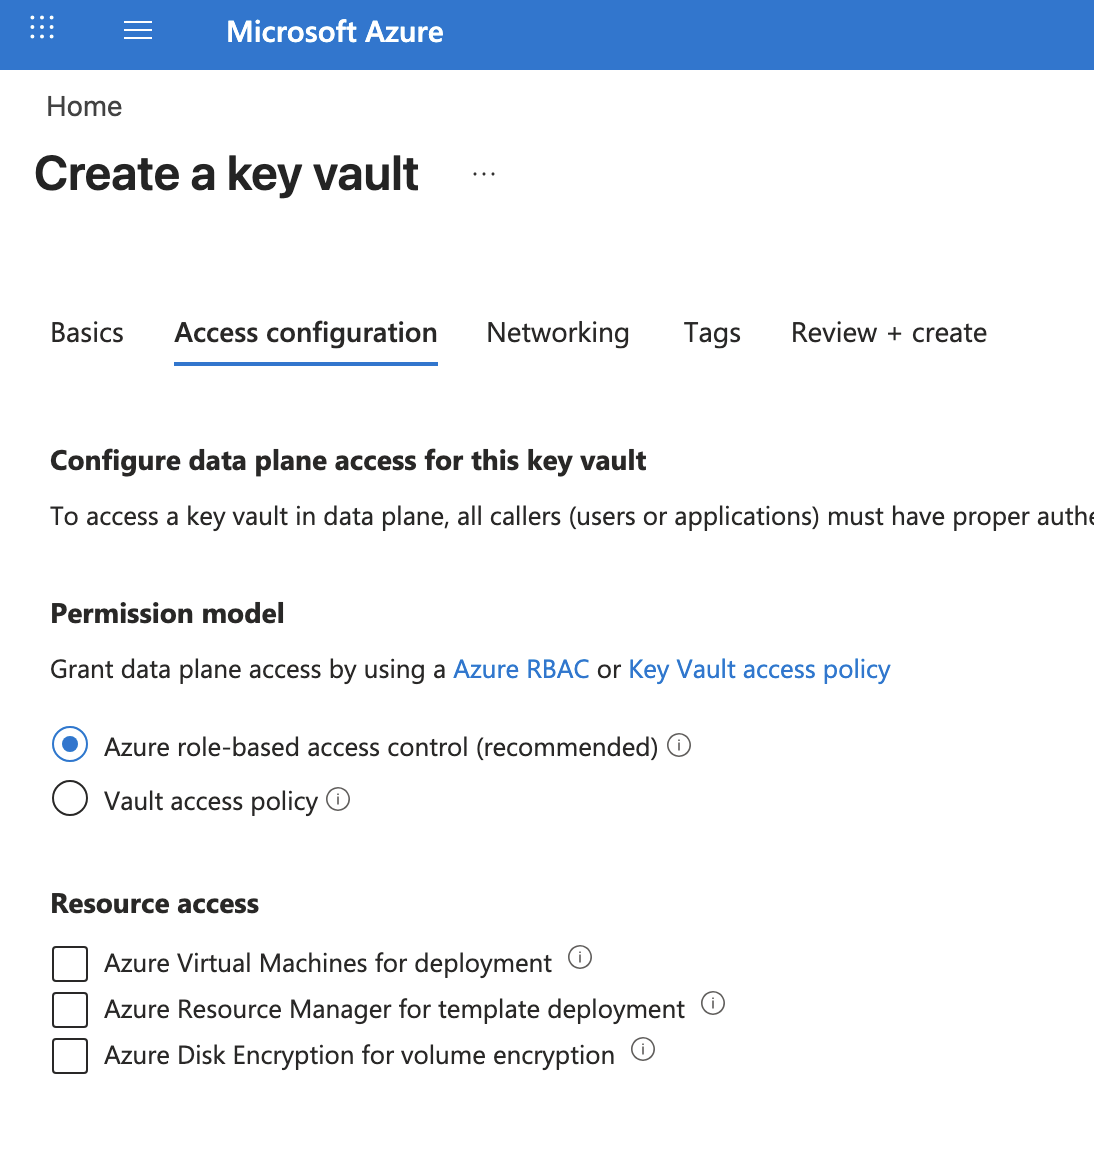
- Access configuration → Permission model: Azure role-based access control (RBAC).
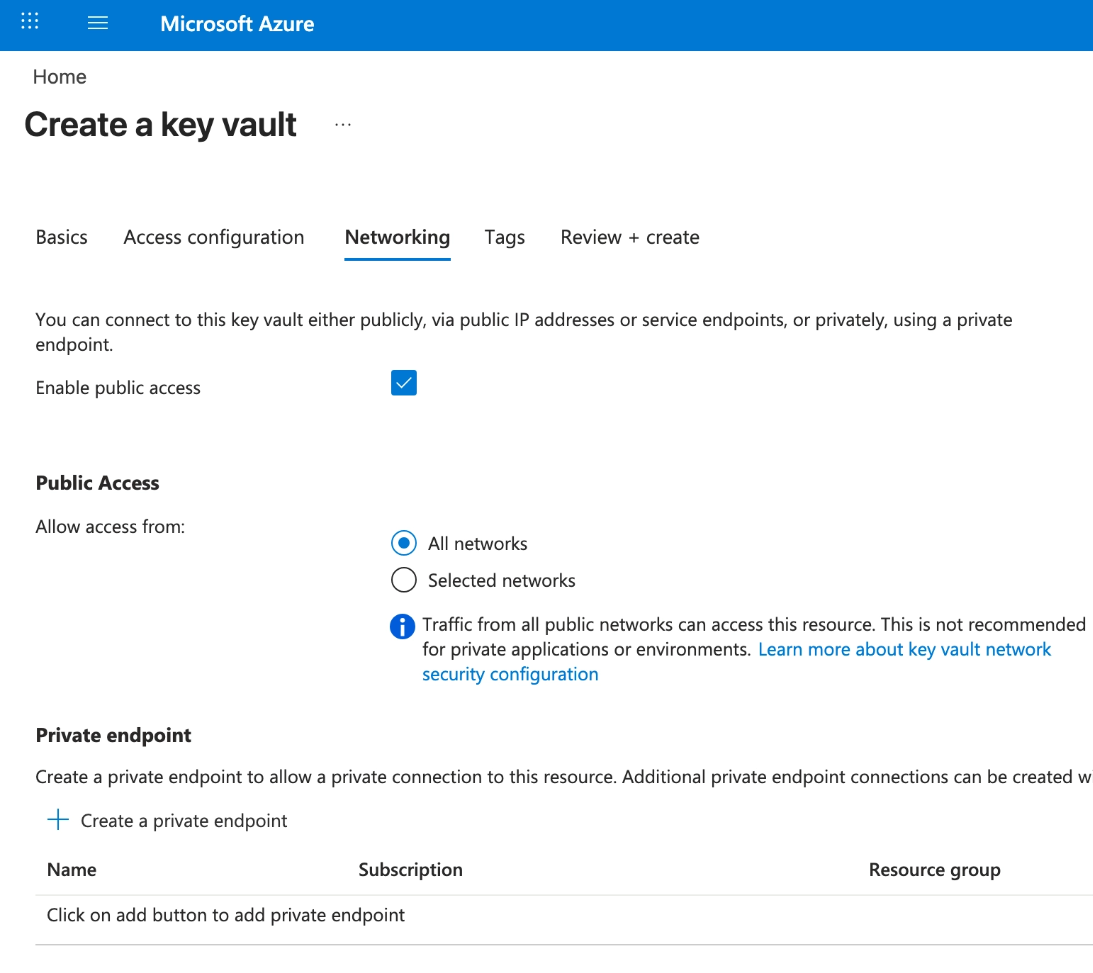
- Networking → Enable public access: Checked.
- Networking → Allow public access from: All networks.
- Click Review + create → Create
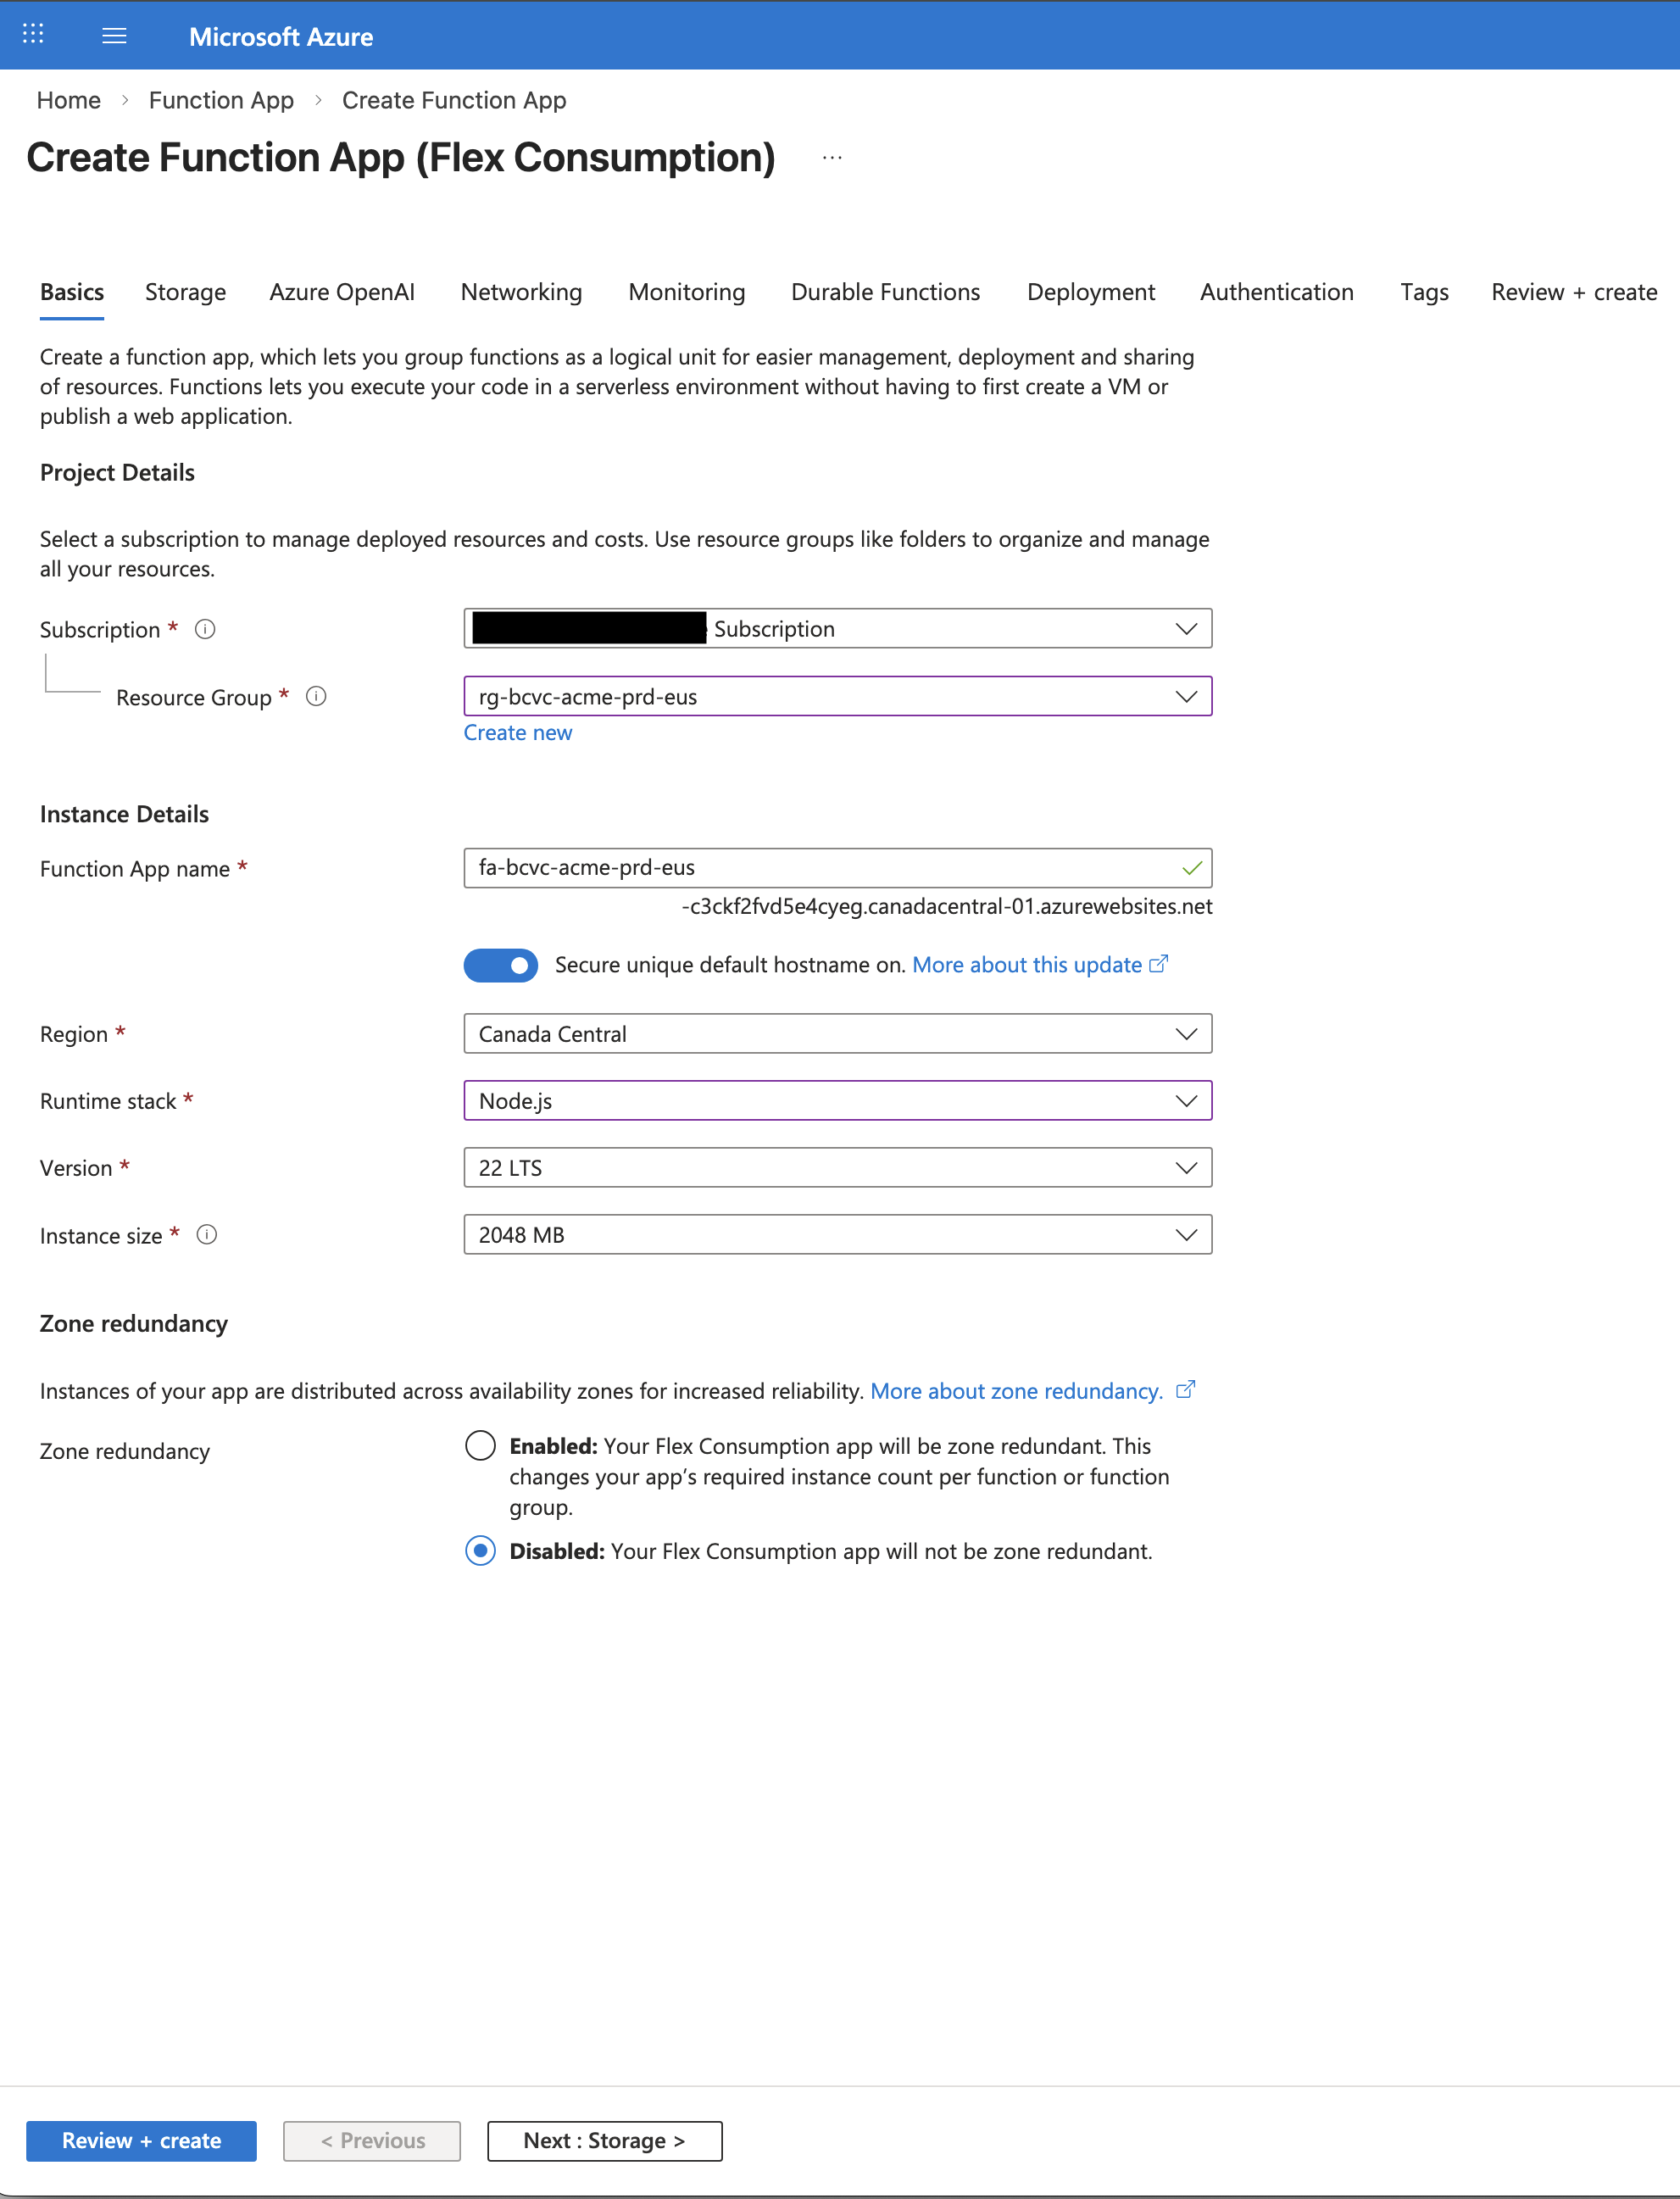
4.3 Provision a Function App
Where: Azure Portal → Function App → Create
Configuration:
- Hosting plan: Flex Consumption
- Resource group: Select the resource group created in 4.1.
- Function app name: Use your naming convention (e.g.,
fa-bcvc-acme-prd-eus). - Secure unique default hostname: On
- Region: Select the region closest to your users.
- Runtime stack: Node.js
- Version: 22 LTS
- Instance size: 2048 MB (recommended for production).
- Zone redundancy: Disabled
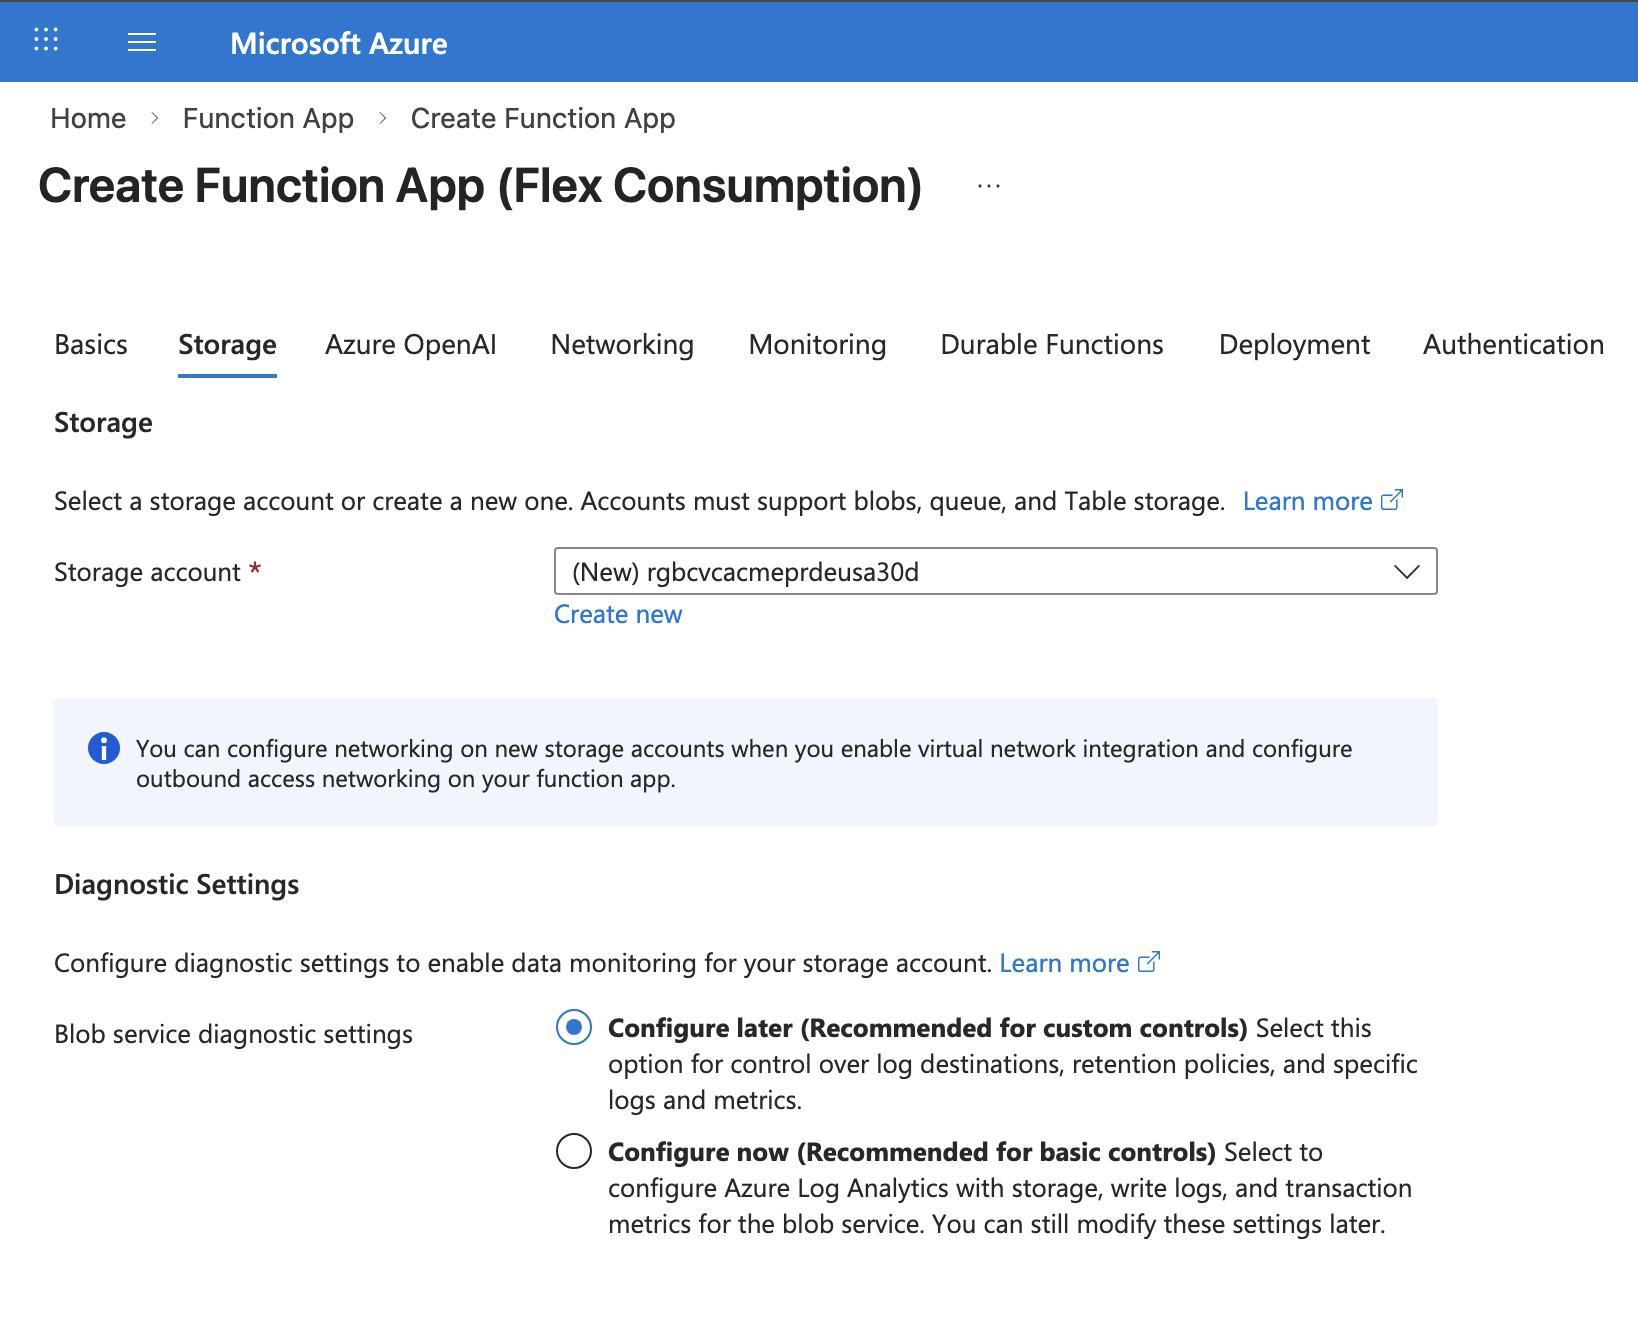
- Blob service diagnostic settings: Configure later
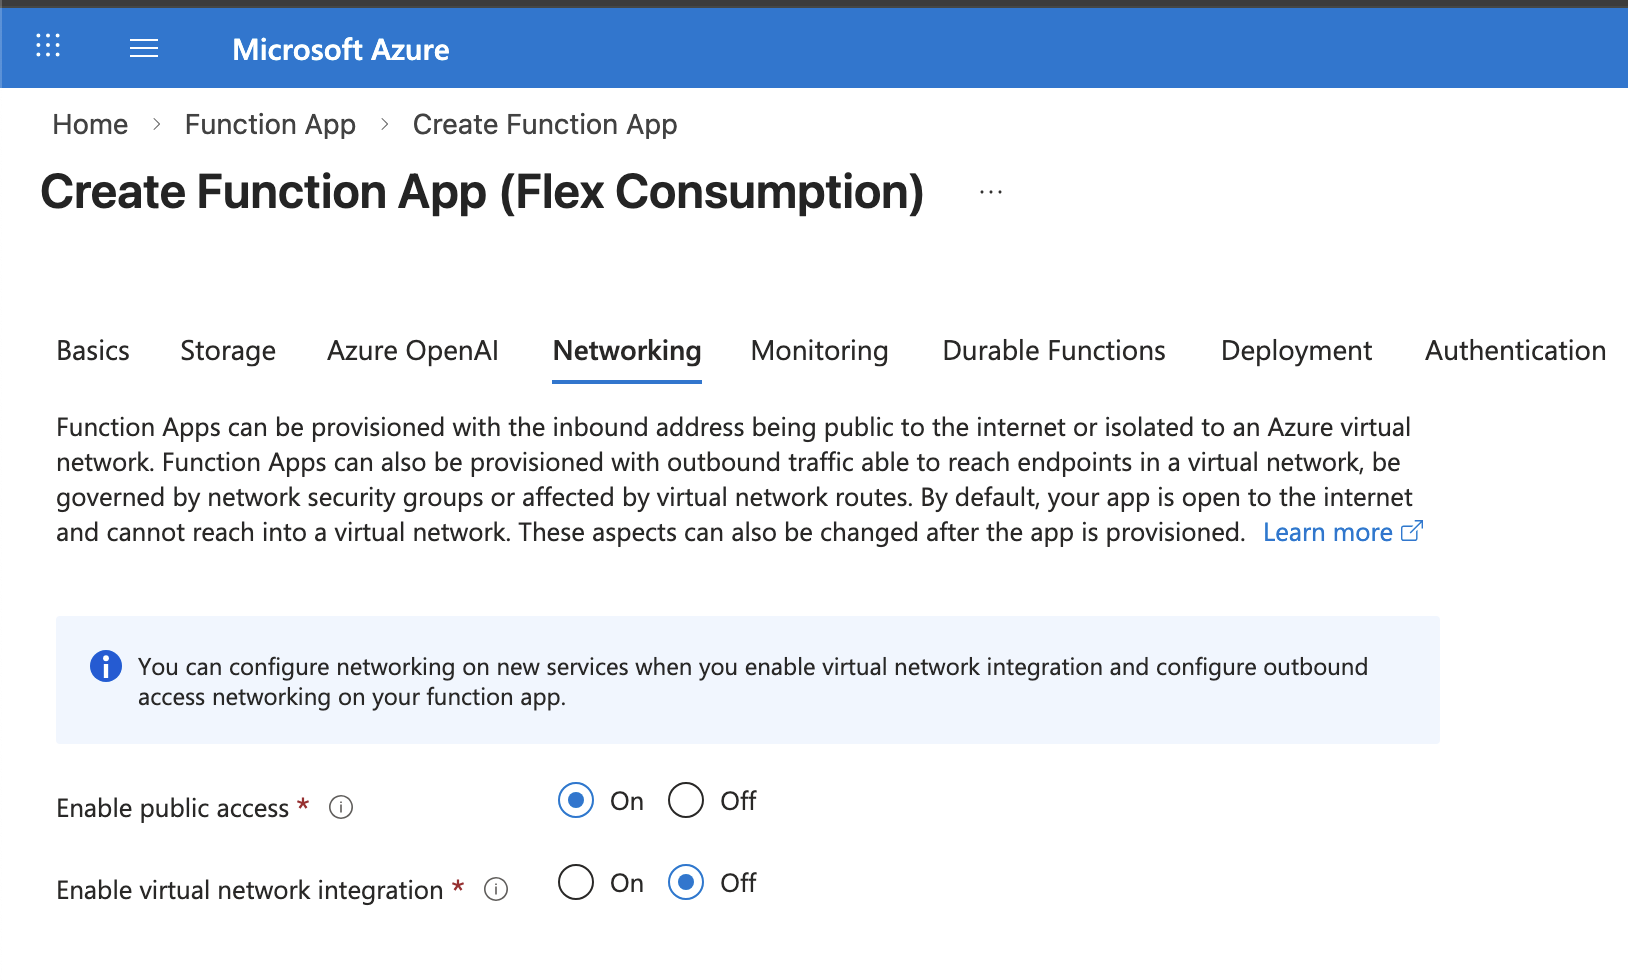
- Enable public access: On
- Enable virtual network integration: Off
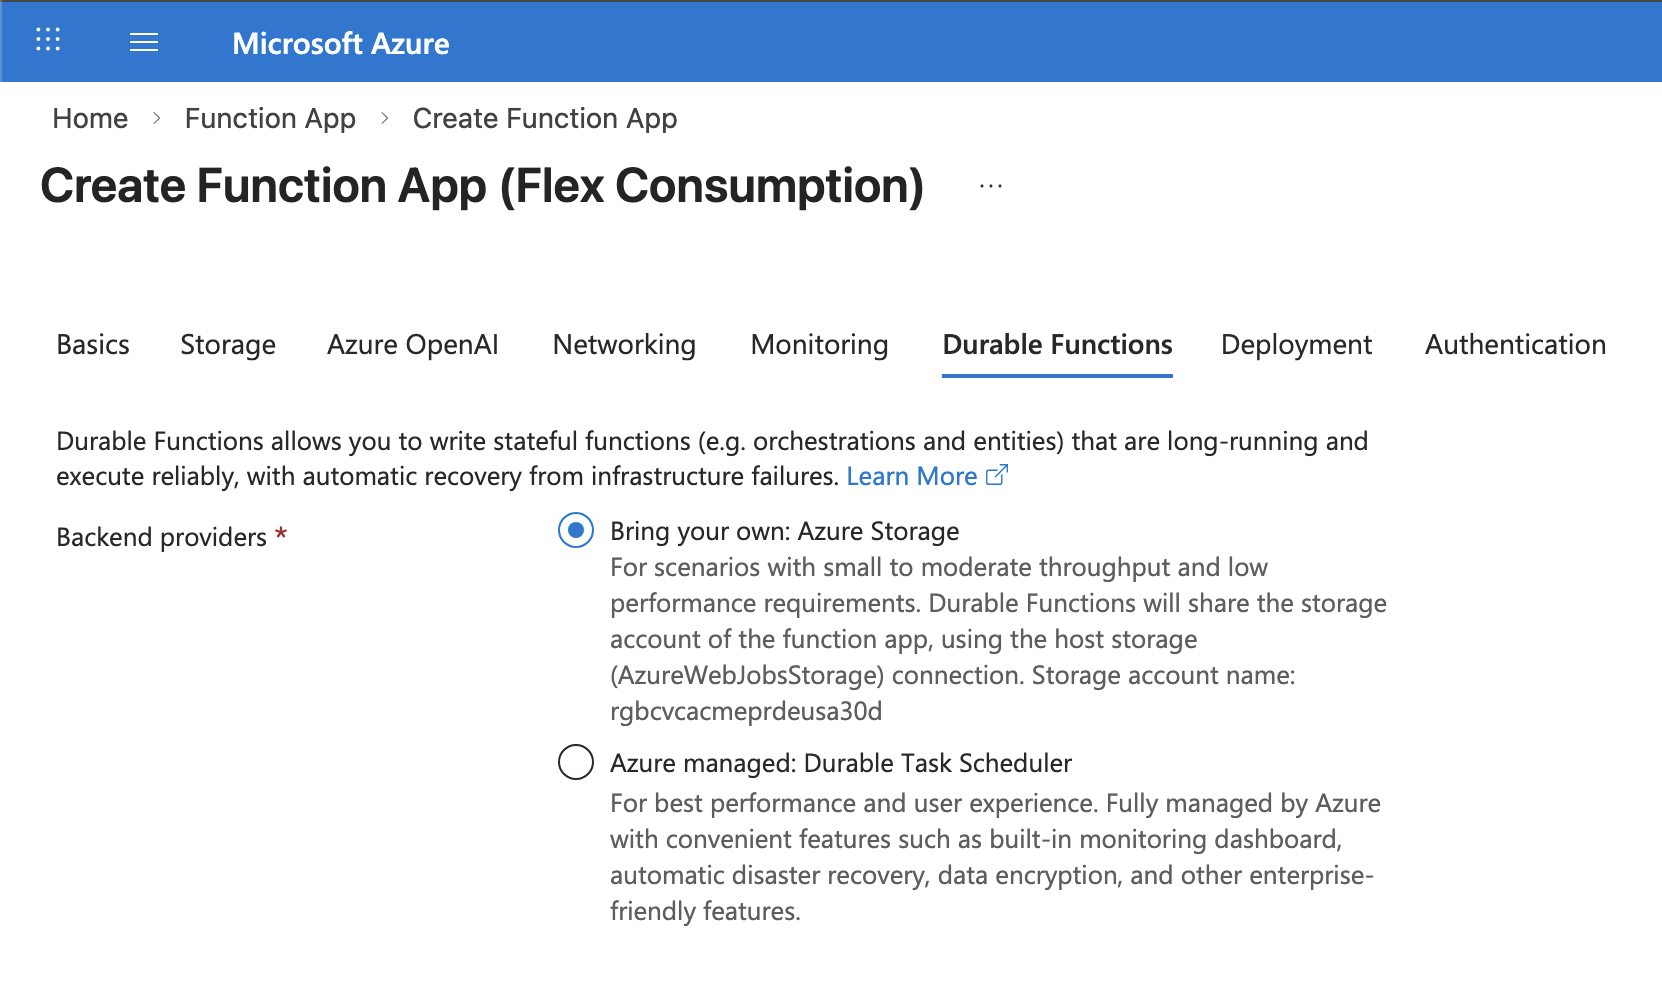
- Backend providers: Bring your own: Azure Storage
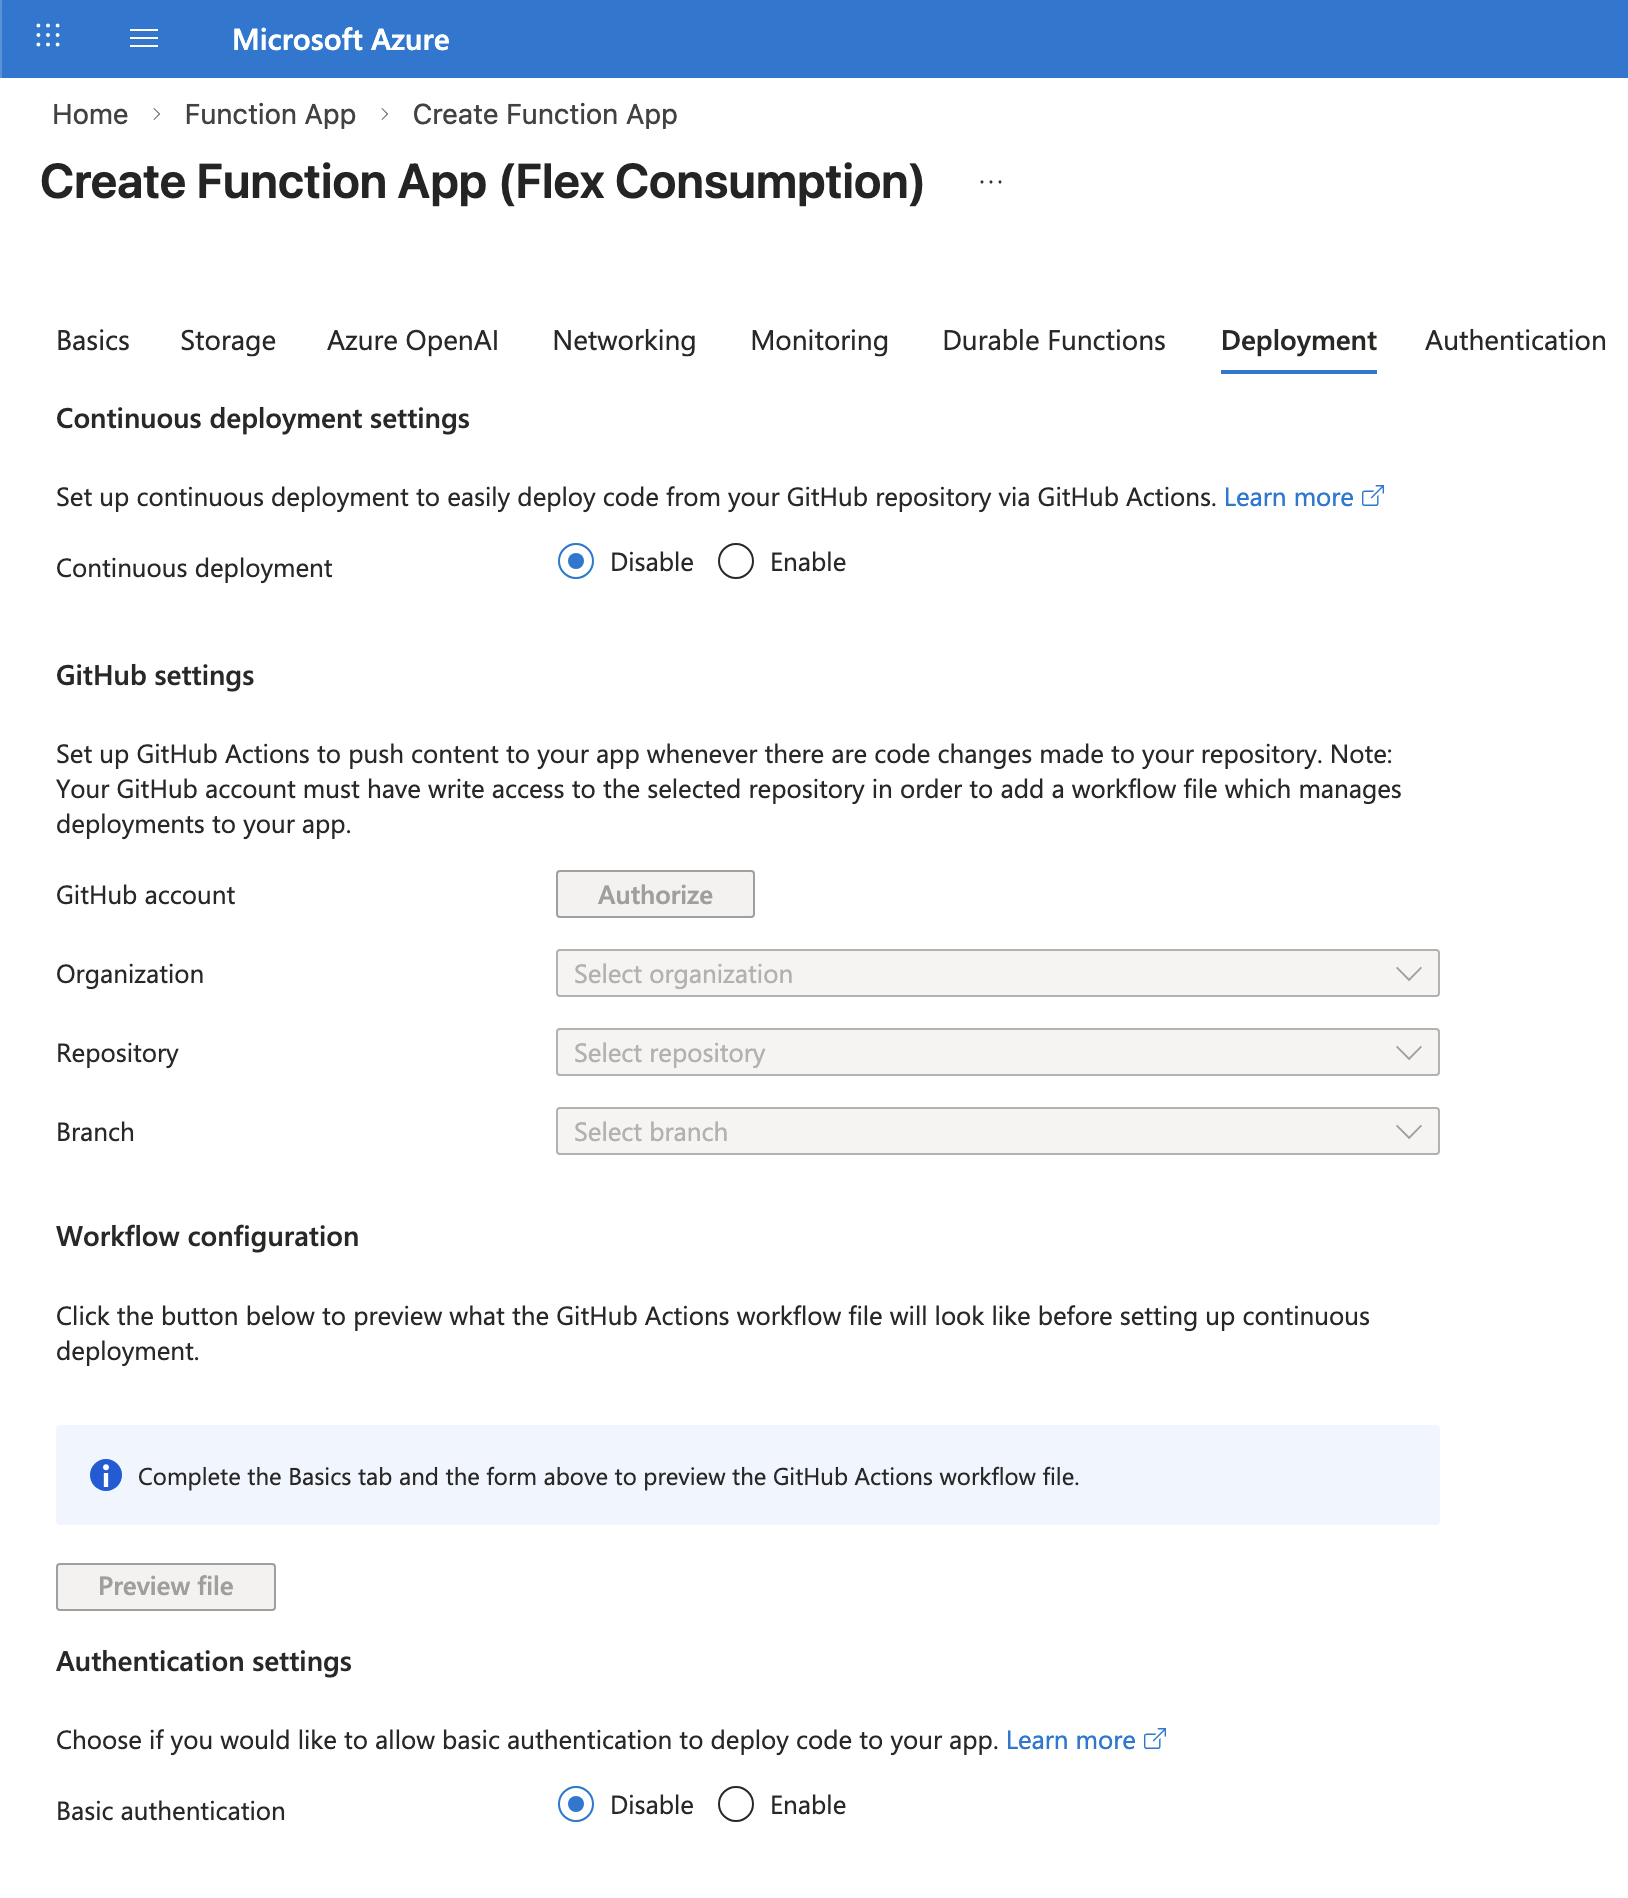
- Continuous deployment: Disable
- Basic authentication: Disable
Application Insights (optional)
Application Insights provides detailed logging, request tracing, and performance monitoring. However, it adds cost and complexity.
If you choose to enable Application Insights:
- You can enable it during Function App creation or add it later from Settings → Application Insights → Turn on Application Insights.
- A Log Analytics Workspace will be created automatically.
- Be aware this can generate ongoing costs depending on log volume.
If you do not enable Application Insights, you can still view real-time logs via:
- Function App → Monitoring → Log stream (live tail of console output)
- Function App → Functions → [function name] → Monitor (invocation history, requires Application Insights)
For production environments where the you needs detailed request-level tracing (e.g., diagnosing intermittent auth failures), Application Insights is recommended.
Diagnostic Settings (Alternative to Application Insights)
If you want to persist logs for long-term auditing or querying without using the full Application Insights suite, you can use Diagnostic Settings to send logs to a Log Analytics Workspace.
Why use Diagnostic Settings?
- Centralized Logging: Aggregate logs from multiple Function Apps into one workspace.
- KQL Querying: Use the Kusto Query Language (KQL) to filter, analyze, and create dashboards from your logs.
- Lower Overhead: Captures standard platform and application logs without the advanced instrumentation overhead of Application Insights.
To enable Diagnostic Settings:
- Navigate to your Function App → Monitoring → Diagnostic settings.
- Click + Add diagnostic setting.
- Logs: Check the box for Function Application Logs (this captures
console.logandcontext.logoutput). - Destination details: Check Send to Log Analytics workspace.
- Select your Subscription and an existing Log Analytics Workspace.
- Click Save.
Viewing the Logs:
- Once enabled, go to Function App → Monitoring → Logs.
- It may take 5–15 minutes for the first logs to appear after the setting is saved.
- Run a simple query like
FunctionAppLogs | order by TimeGenerated descto see your latest Node.js output.
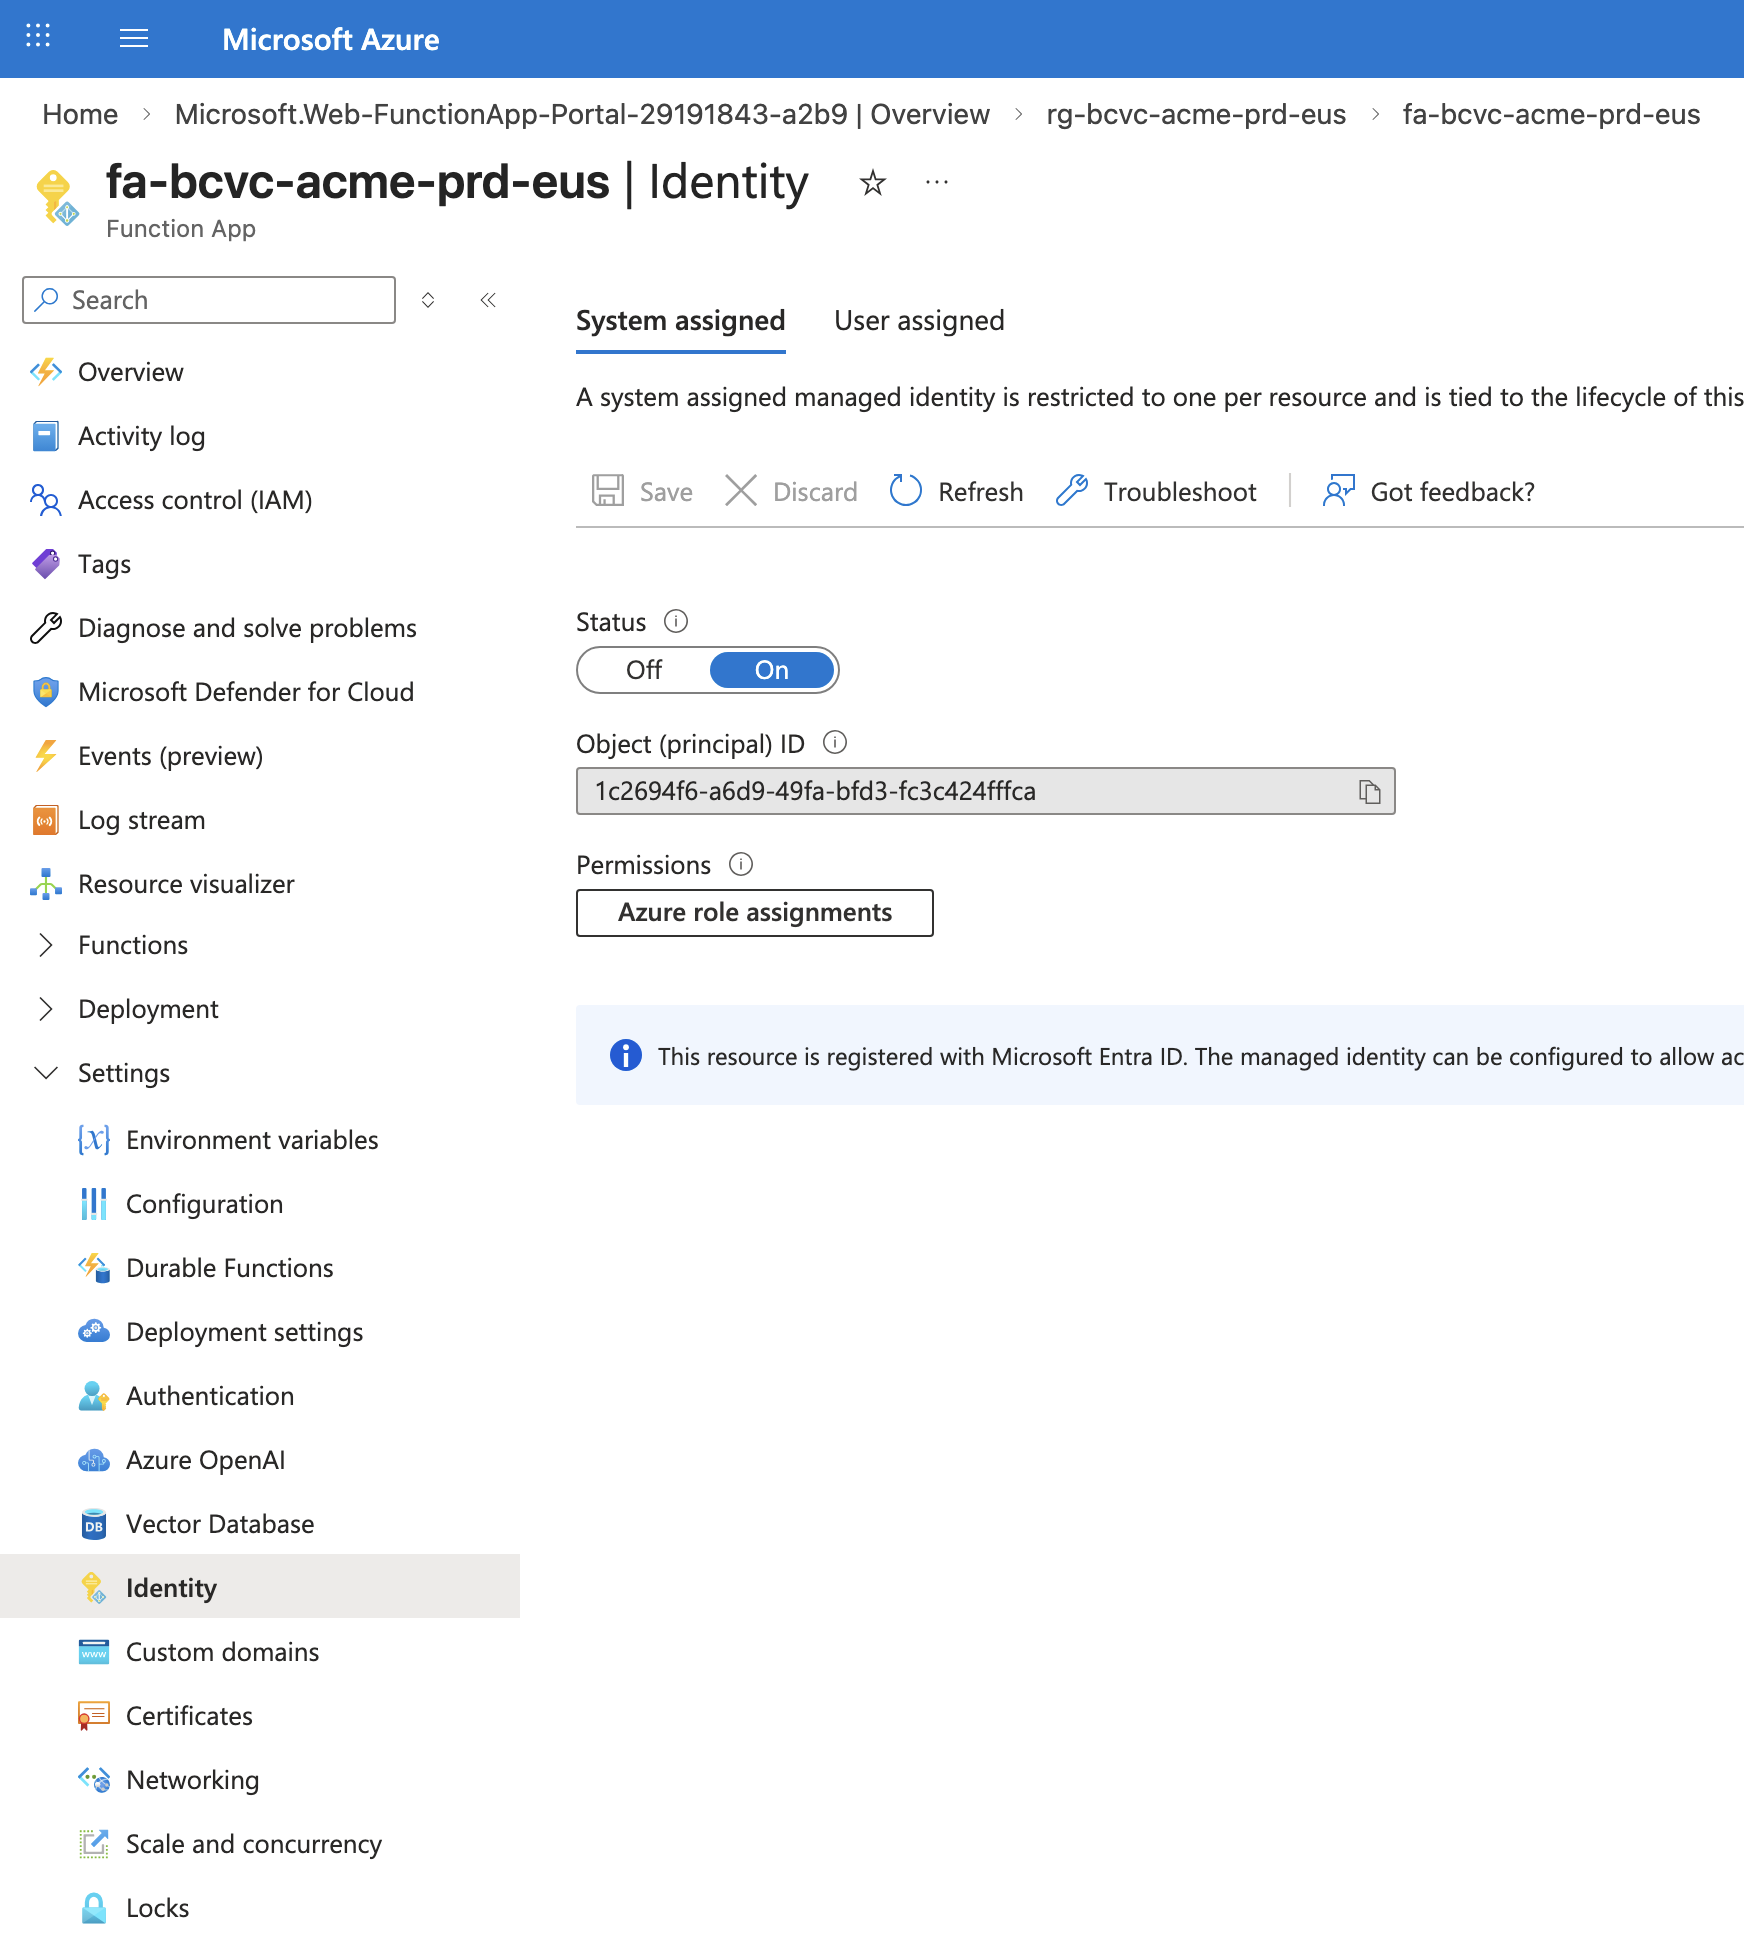
4.4 Create Function App managed identity and assign Key Vault role
The Function App needs a managed identity with permission to read and write secrets in the Key Vault.
Enable managed identity:
- Navigate to your Function App → Settings → Identity.
- On the System assigned tab, toggle Status to On.
- Click Save and then Yes to enable the system managed identity.
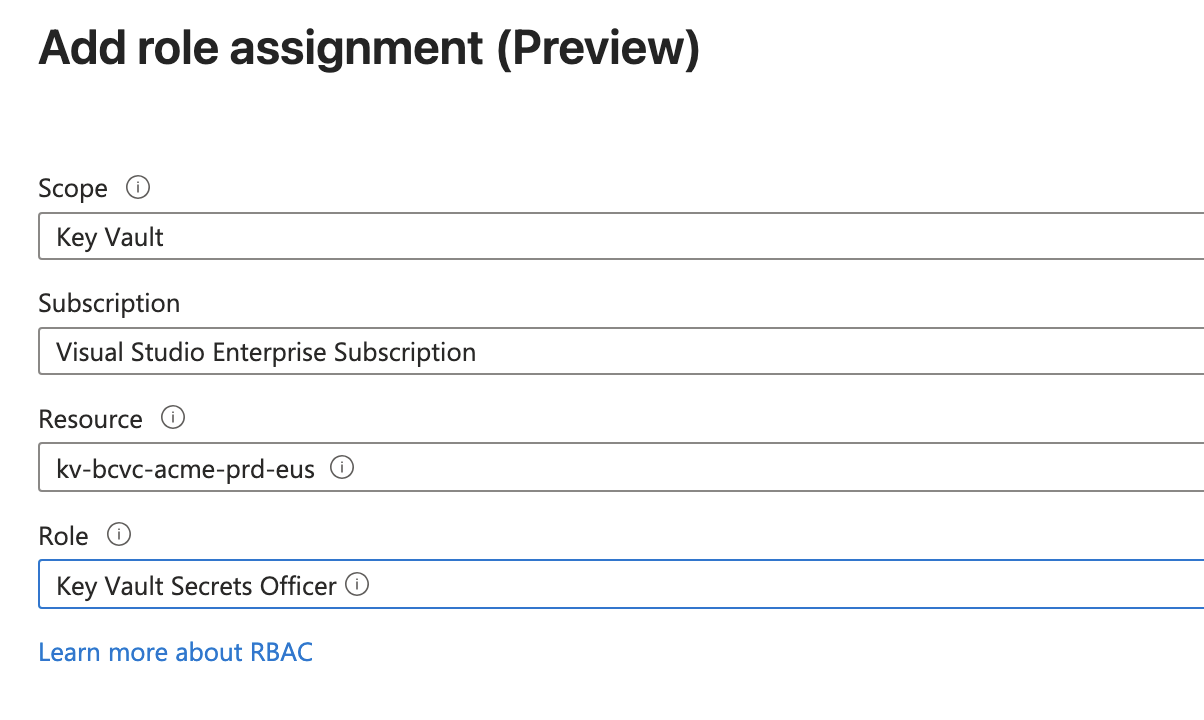
Assign Key Vault role:
- On the same Identity page, click Azure role assignments.
- Click Azure role assignments.
- Click Add role assignment (Preview)
- Configure:
- Scope: Key Vault
- Subscription: Your subscription
- Resource: The Key Vault created in 4.2
- Role: Key Vault Secrets Officer
- Click Save.
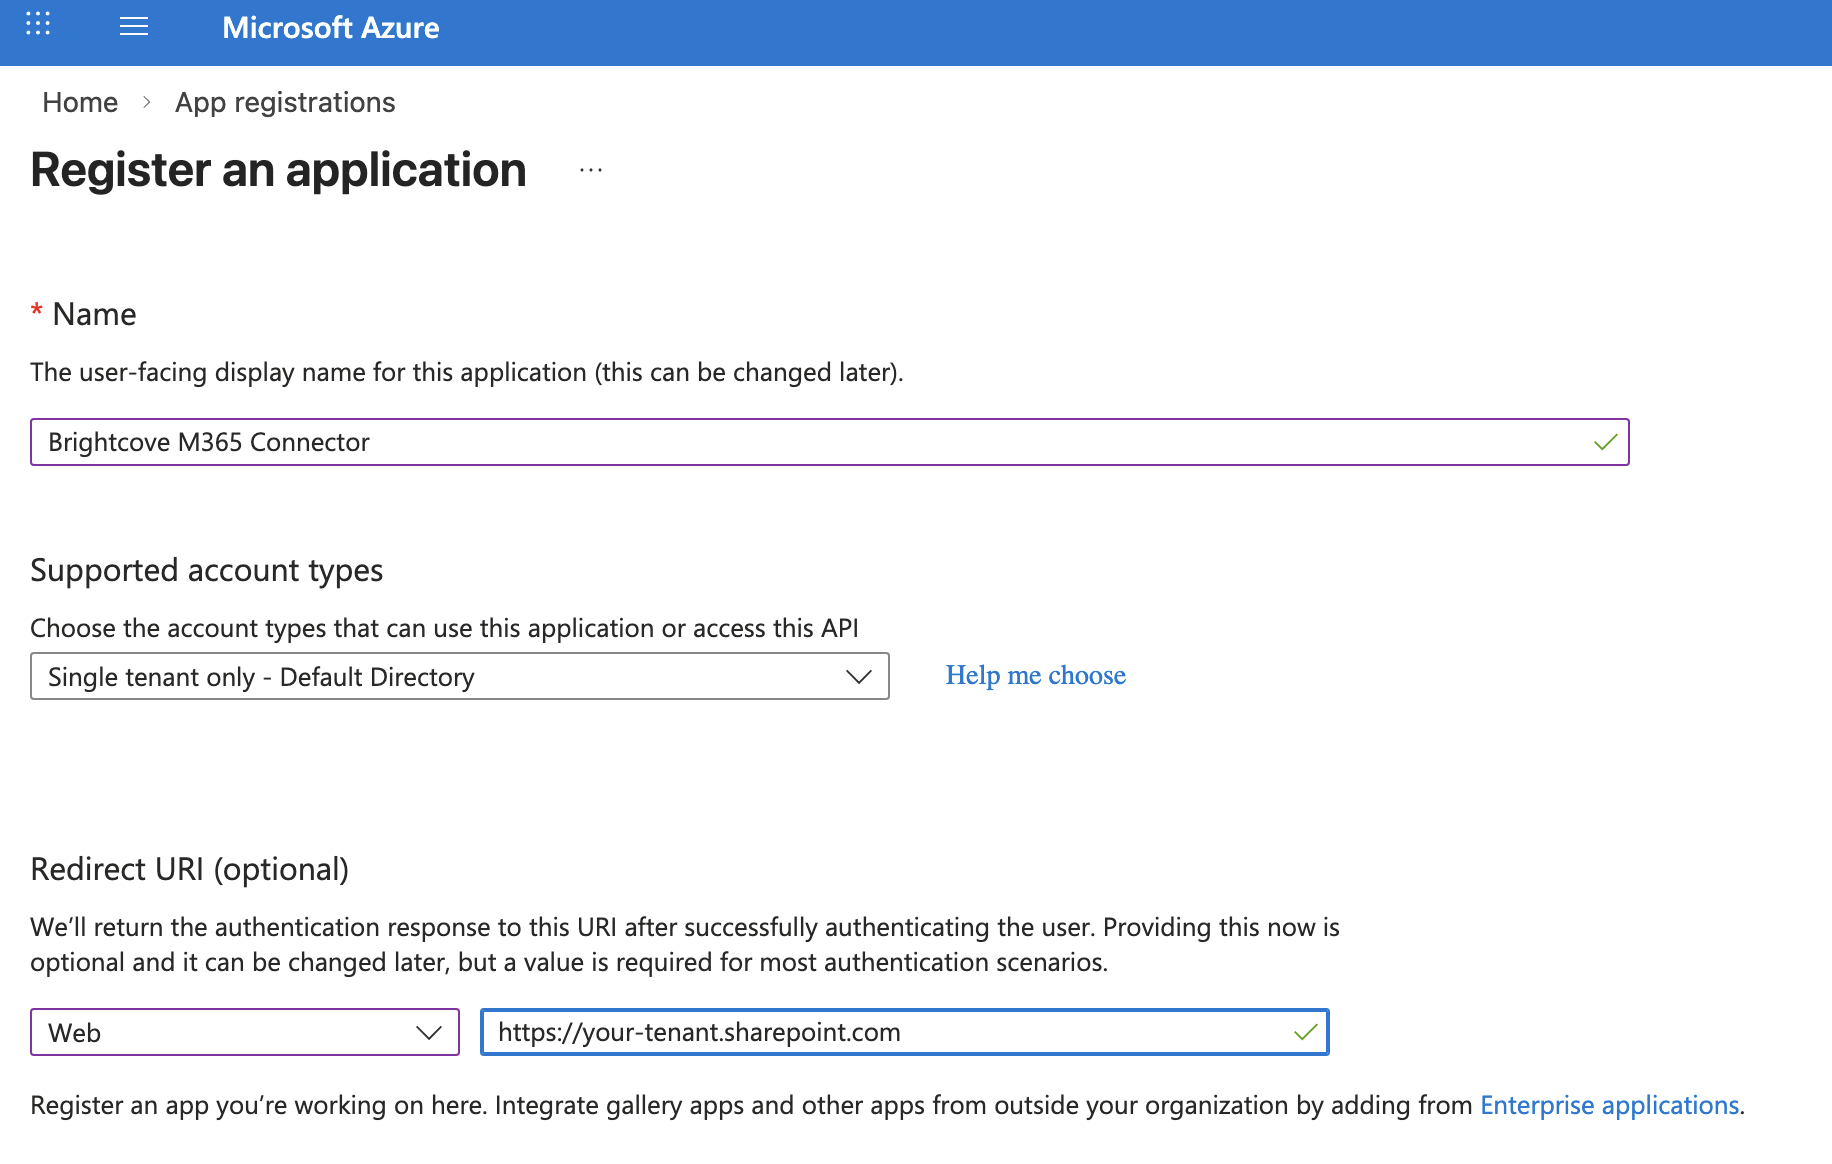
4.5 Create an App Registration
The Proxy API uses Microsoft Entra ID to authenticate requests from SharePoint. You need to create an App Registration that the SPFx app will use to acquire access tokens.
Where: Azure Portal → App registrations → New registration
Configuration:
- Name:
Brightcove M365 Connector
- Supported account types: Choose based on your tenant topology:
| Scenario | Setting |
|---|---|
| SharePoint and Azure are in the same Entra ID tenant | Single tenant only — Default Directory |
| SharePoint and Azure are in different Entra ID tenants | Multiple Entra ID tenants → then choose Allow all tenants or Allow only certain tenants |
- Redirect URI: Select Web as the platform and enter:
https://<your-tenant>.sharepoint.com/(include the trailing slash). This redirect URI is required for the SPFx delegated auth flow.
Click Register.
Record the Application (client) ID — you will need this in Sections 4.6, 4.8, 5, and 6.

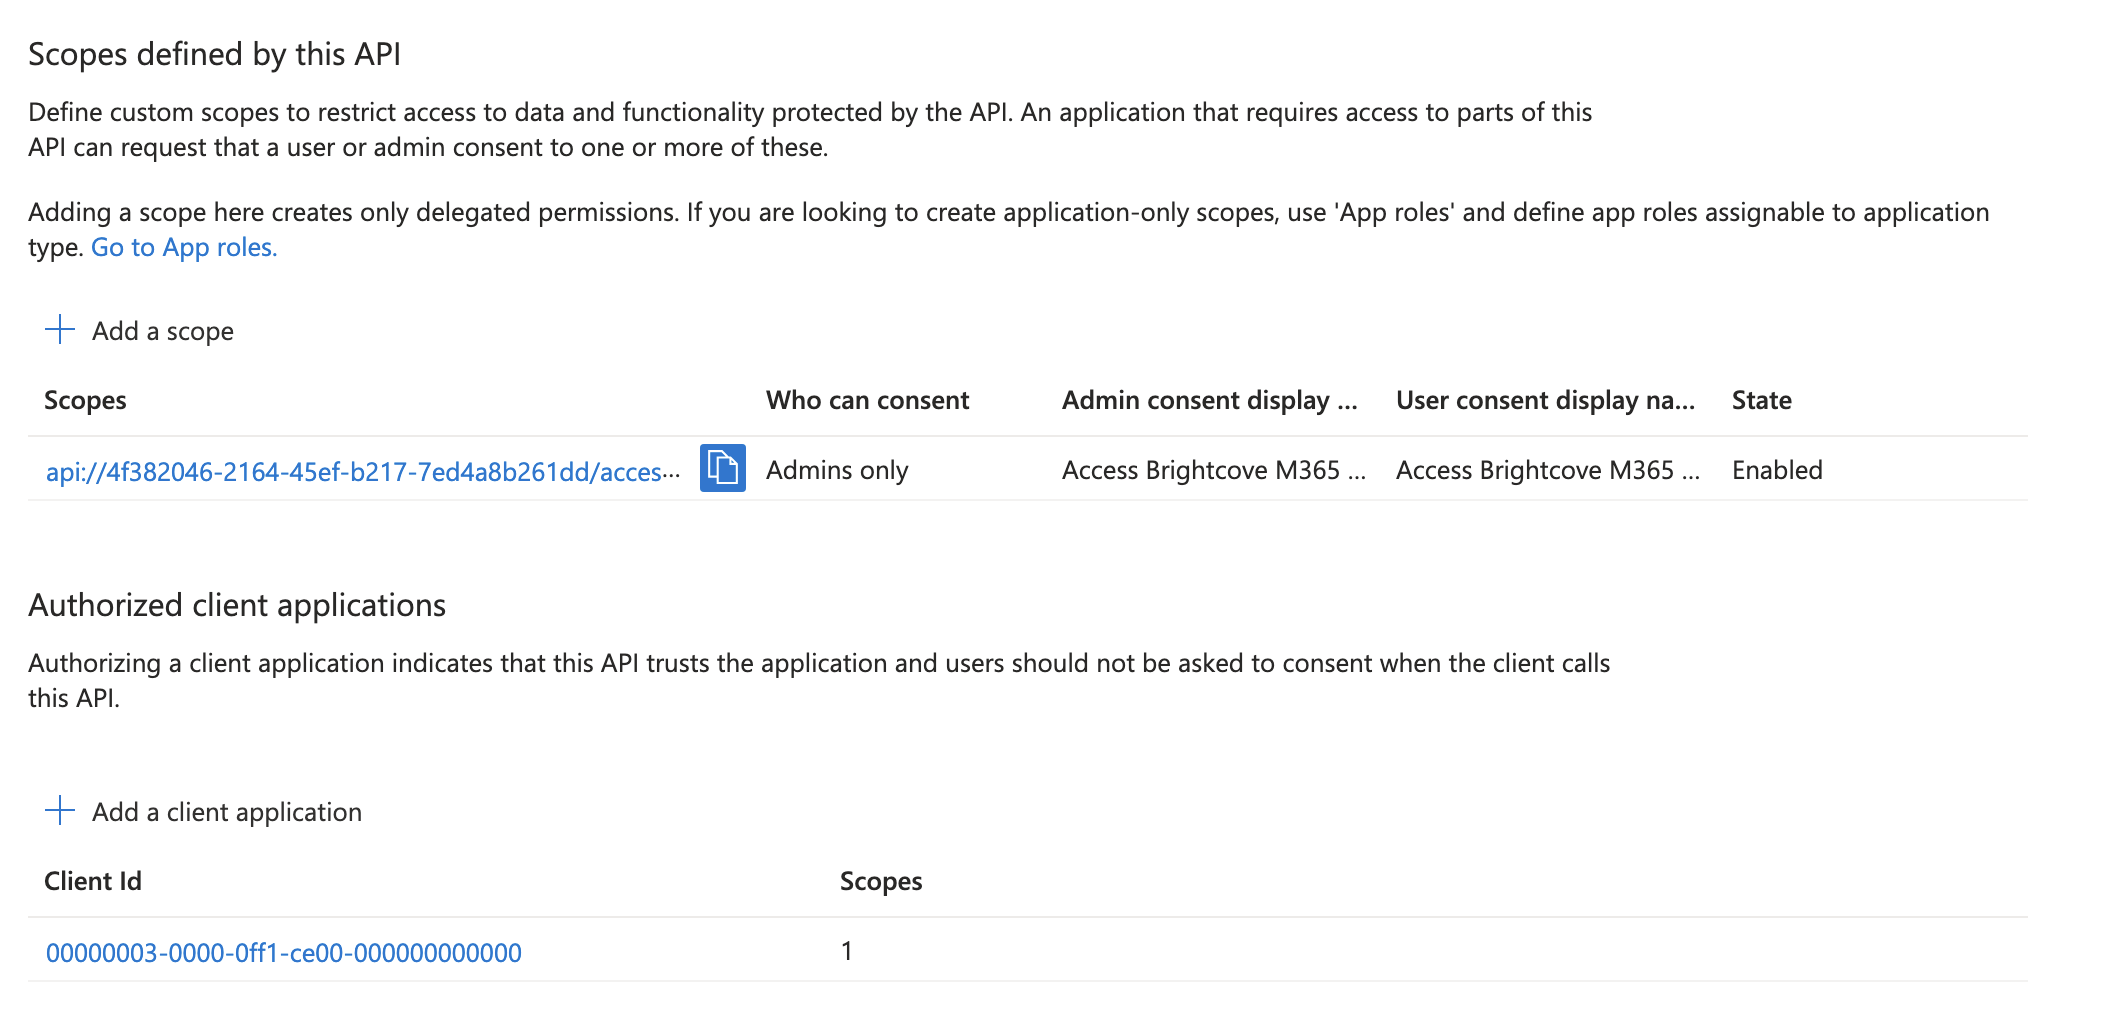
4.6 Expose an API scope
The SPFx app needs permission to call the Proxy API on behalf of the signed-in user. You must expose an API scope on the App Registration.
Where: App Registration → Expose an API
- Set the Application ID URI: Click Set next to "Application ID URI". Accept
the default (
api://<application-client-id>) or set a custom URI. Click Save. - Add a scope:
- Click Add a scope.
- Scope name:
access_as_user - Who can consent: Admins only
- Admin consent display name: Access Brightcove M365 Connector Proxy API
- Admin consent description: Allow the Brightcove M365 Connector (SharePoint/Teams) to call the Brightcove Proxy API on behalf of signed-in users.
- User consent display name: Access Brightcove M365 Connector Proxy API
- User consent description: Allow the Brightcove M365 Connector to call the Brightcove Proxy API on your behalf.
- State: Enabled
- Click Add scope.
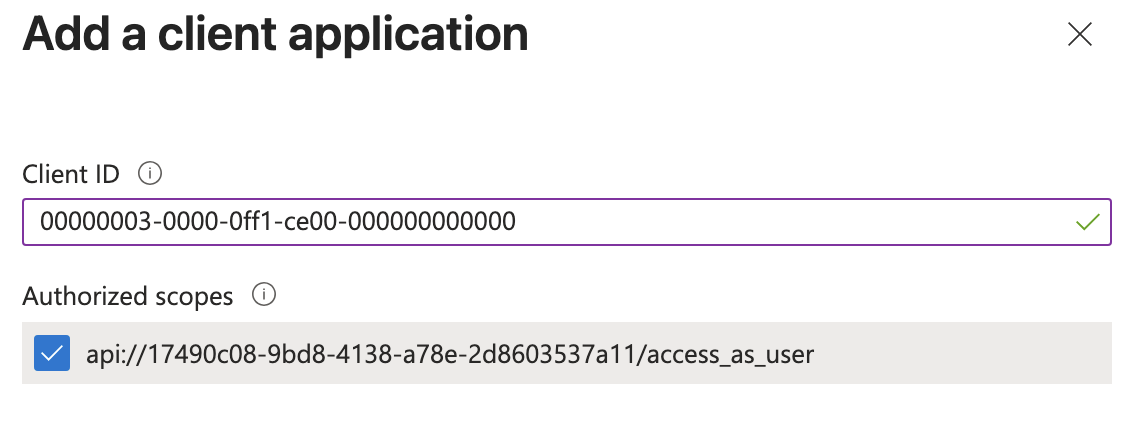
- Pre-authorize SharePoint Online: This step allows SharePoint to silently acquire tokens for
the Proxy API without requiring per-user consent popups.
- Under Authorized client applications, click Add a client application.
- Client ID:
00000003-0000-0ff1-ce00-000000000000(this is the well-known application ID for SharePoint Online / Office 365). - Check the
access_as_userscope. - Click Add application.

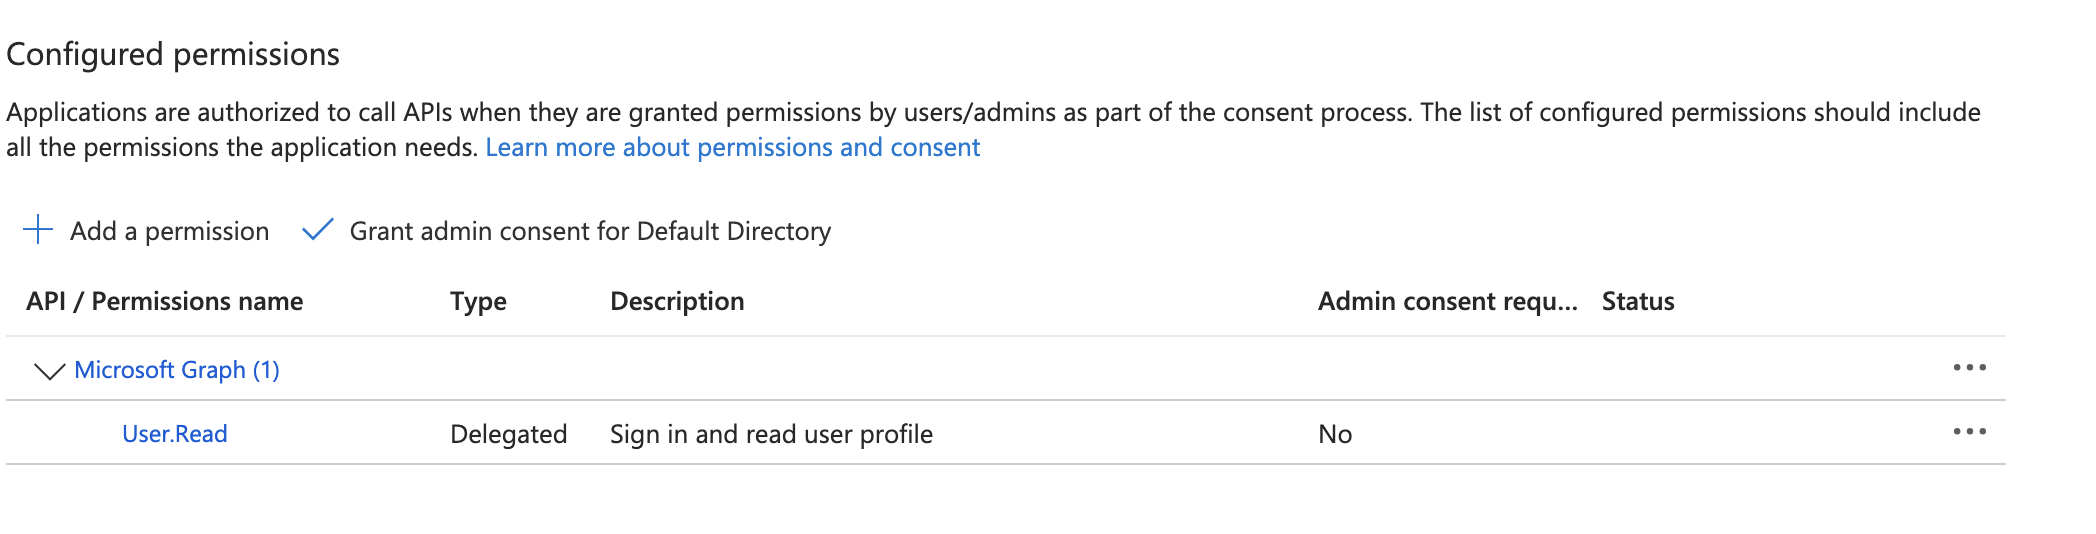
4.7 Configure API permissions
Where: App Registration → API permissions
The default registration includes Microsoft Graph → User.Read (Delegated). This is sufficient — no additional permissions are required.
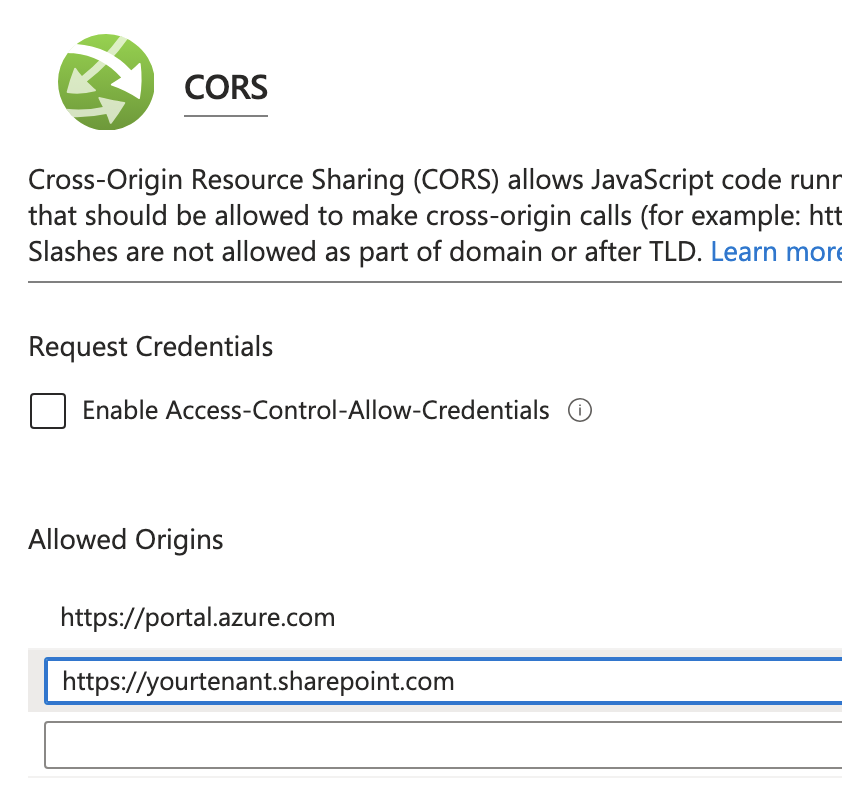
4.8 Configure CORS for the Function App
Where: Function App → API → CORS
Add your SharePoint Online origin(s) as allowed origins and click save:
https://<your-tenant>.sharepoint.com
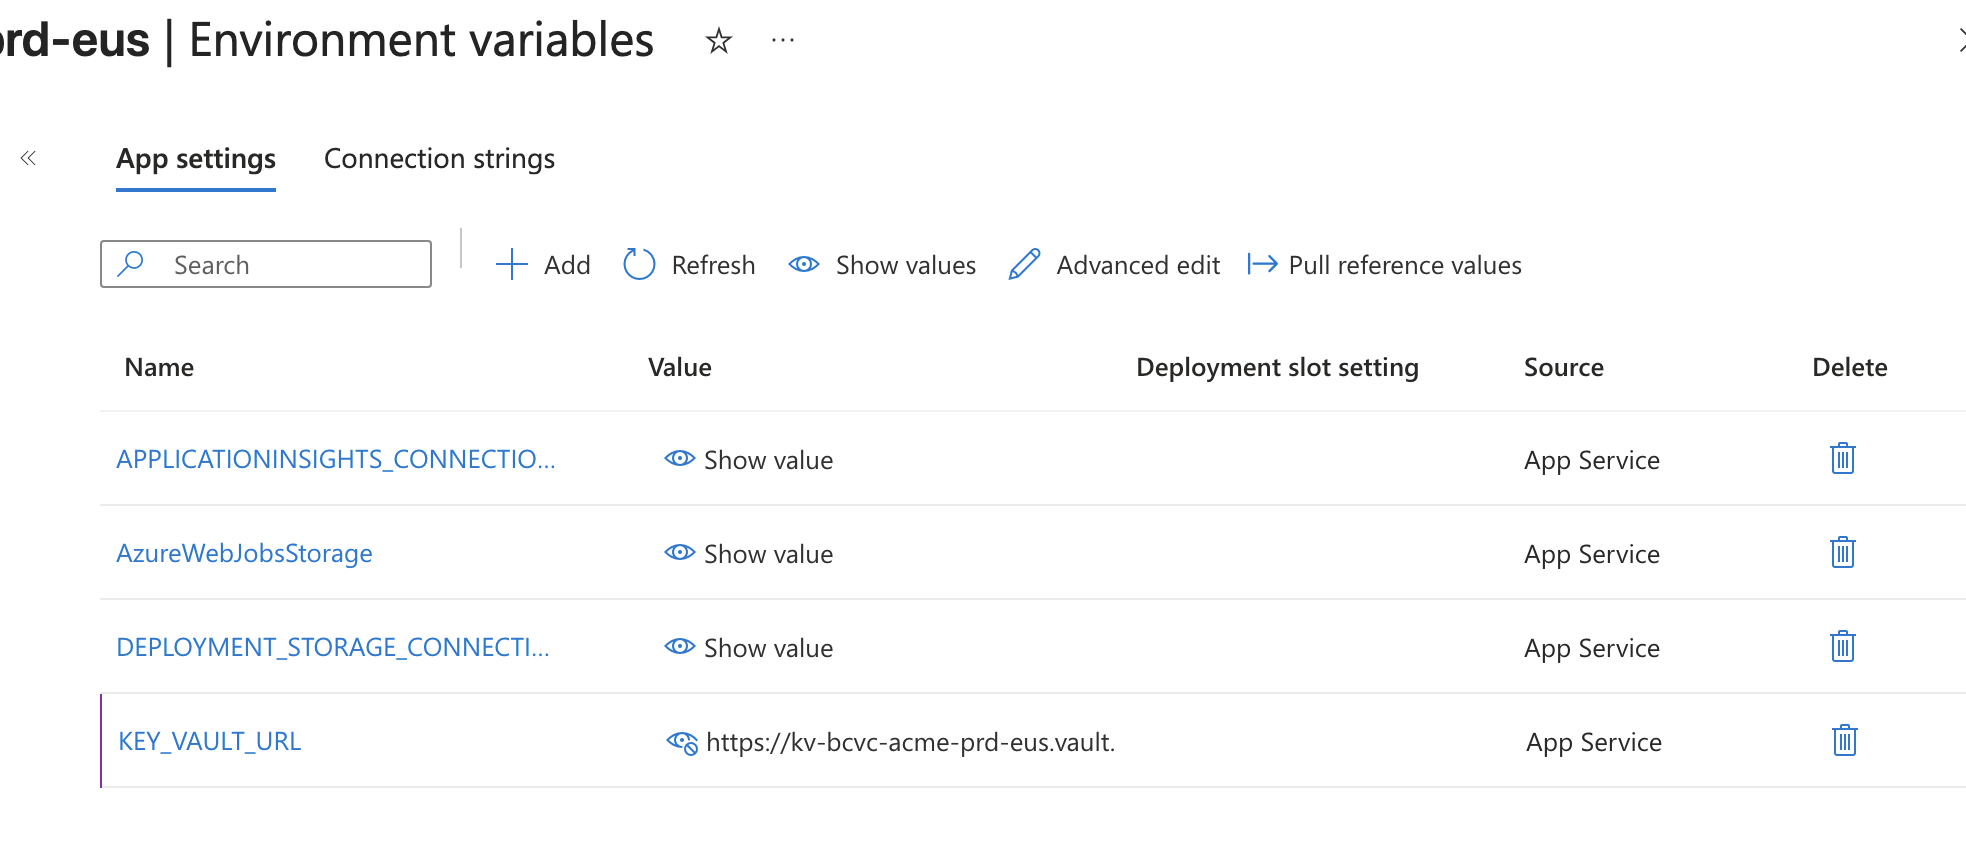
4.9 Configure Function App environment variables
Where: Function App → Settings → Environment Variables → App settings
Add the following environment variables:
| Name | Value | Description |
|---|---|---|
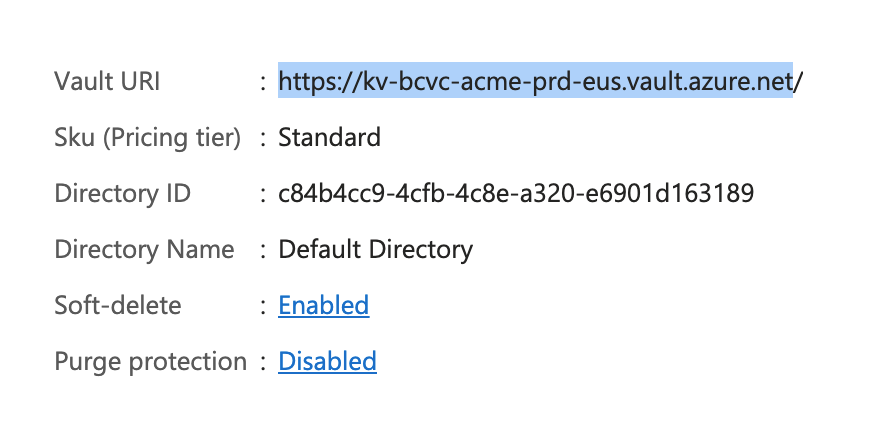
KEY_VAULT_URL |
https://<your-vault-name>.vault.azure.net/ |
Required. Full URL of the Key Vault created in 4.2. |
Click Apply and confirm to save.
4.10 Deploy the Proxy API to the Function App
Deploy the functionapp.zip file to your Function App using one of these methods:
Option A — Azure CLI:
az functionapp deployment source config-zip \
  -g <resource-group-name> \
  -n <function-app-name> \
  --src functionapp.zip
Option B — Azure Portal:
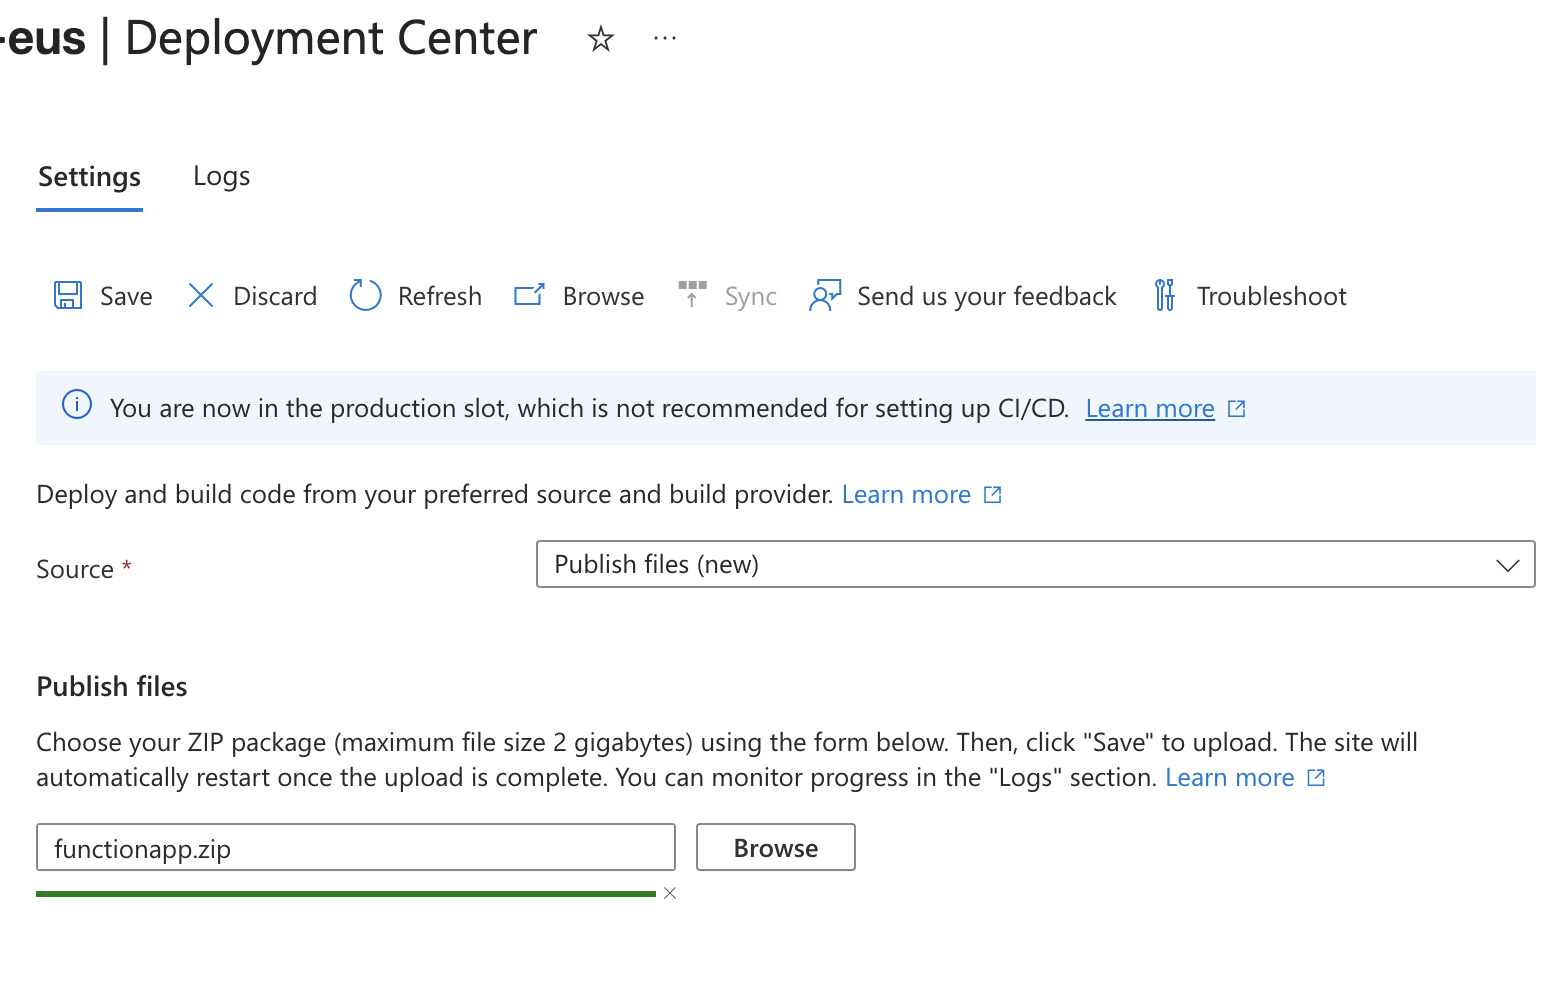
Navigate to Function App → Deployment → Deployment Center and use Source: Publish files (new) to
upload functionapp.zip and click save.
You can monitor the deployment and its status from the Logs tab.
Verify the deployment:
On the Overview blade verify you see bcProxy and health listed under the Functions tab and the status for each is enabled.
Then open a browser and navigate to:
https://<your-function-app-name>.azurewebsites.net/api/healthYou should see a JSON response:
{
  "ok": true,
  "name": "brightcove-proxy-api",
  "version": "1.0.0",
  "time": "2026-03-24T..."
}

5. SharePoint deployment
This section installs the SPFx package in your tenant and approves the API permission the package requests.
5.1 Ensure you have a Tenant App Catalog and add trusted script source
Where: SharePoint Admin Center → More features → Apps → Open → App Catalog
If your tenant does not have an App Catalog, create one (this is a one-time setup). See Microsoft's documentation on managing the App Catalog.
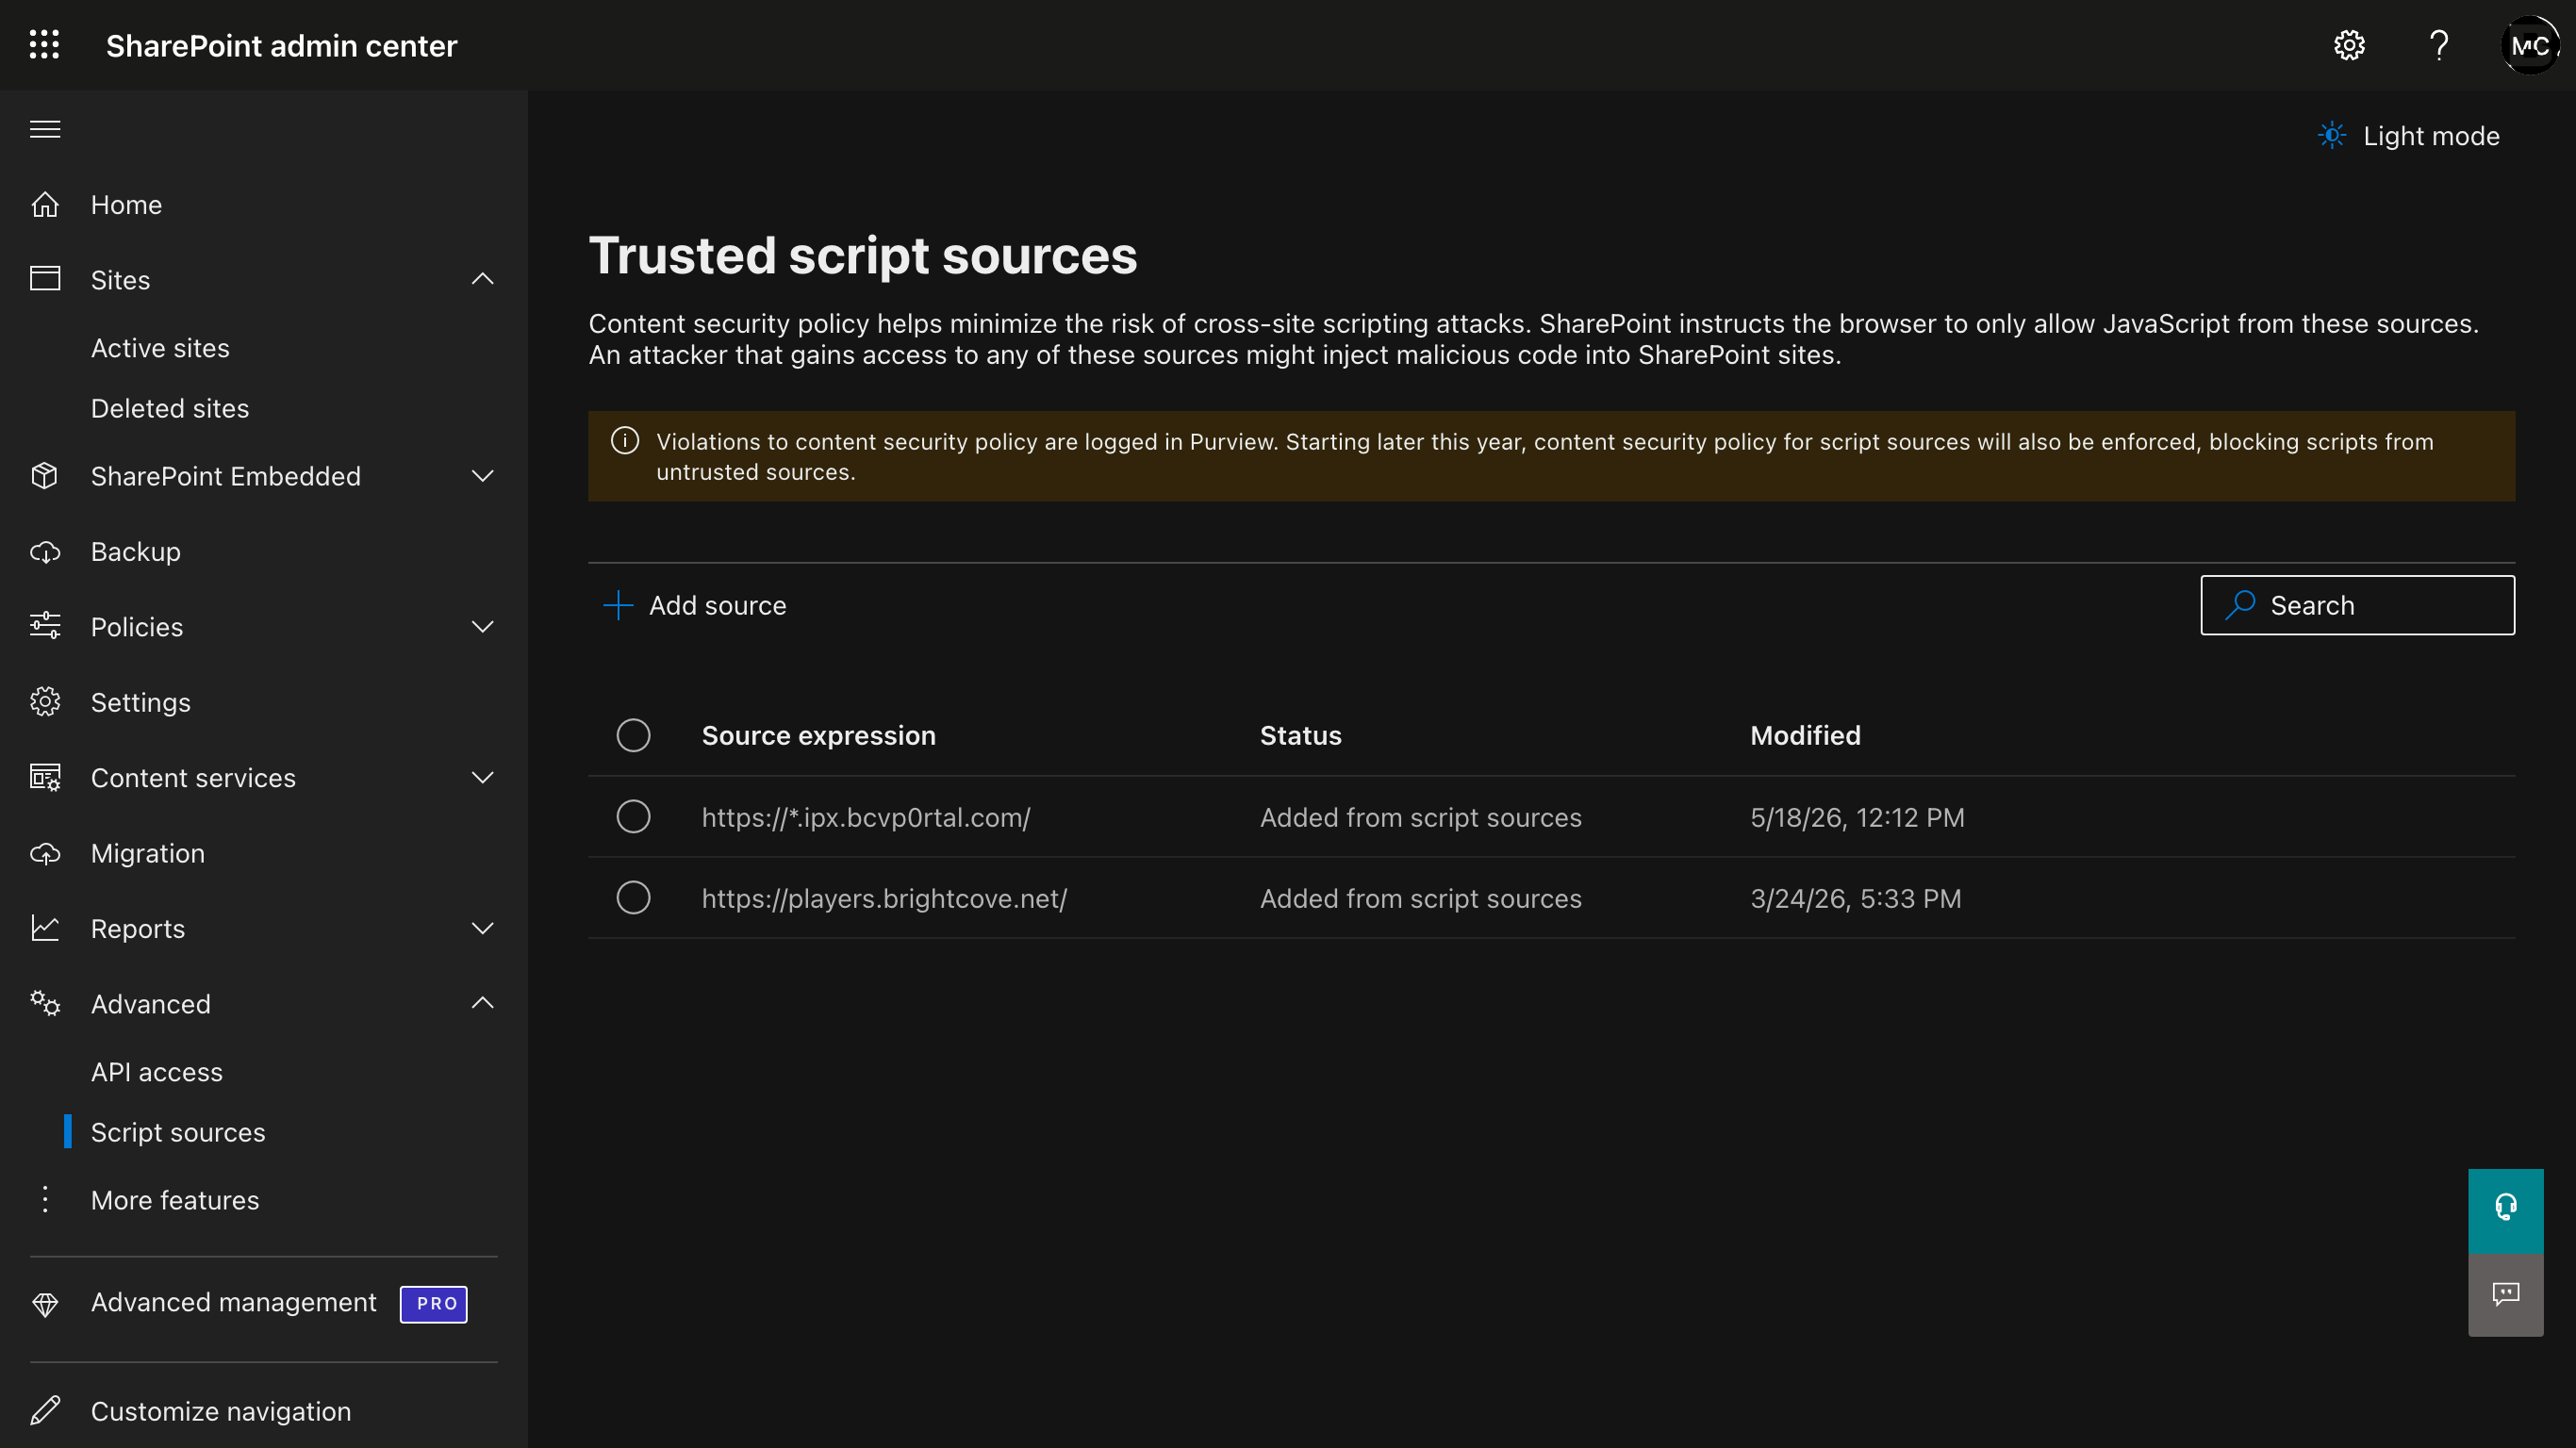
Where: SharePoint Admin Center → Advanced → Script Sources
If your tenant has Content Security Policy (CSP) enforcement enabled, add the following trusted script sources. Click Add source and enter each Source expression in turn:
https://players.brightcove.net/— Required for the Experience web part's JavaScript embed type, and for Embed Builder experiences (the helper scriptin-page-manager.min.jsis loaded from this origin).https://*.ipx.bcvp0rtal.com/— Required for Embed Builder experiences (the experience iframe is hosted on this origin).
Both entries are required if you intend to use Embed Builder experiences from the Experience web part's Embed Experiences tab. The players.brightcove.net entry alone is sufficient if you only use legacy IPX experiences with the JavaScript embed type.
5.2 Upload and deploy the SPFx package
Where: App Catalog → Apps for SharePoint → Upload
- Upload the file
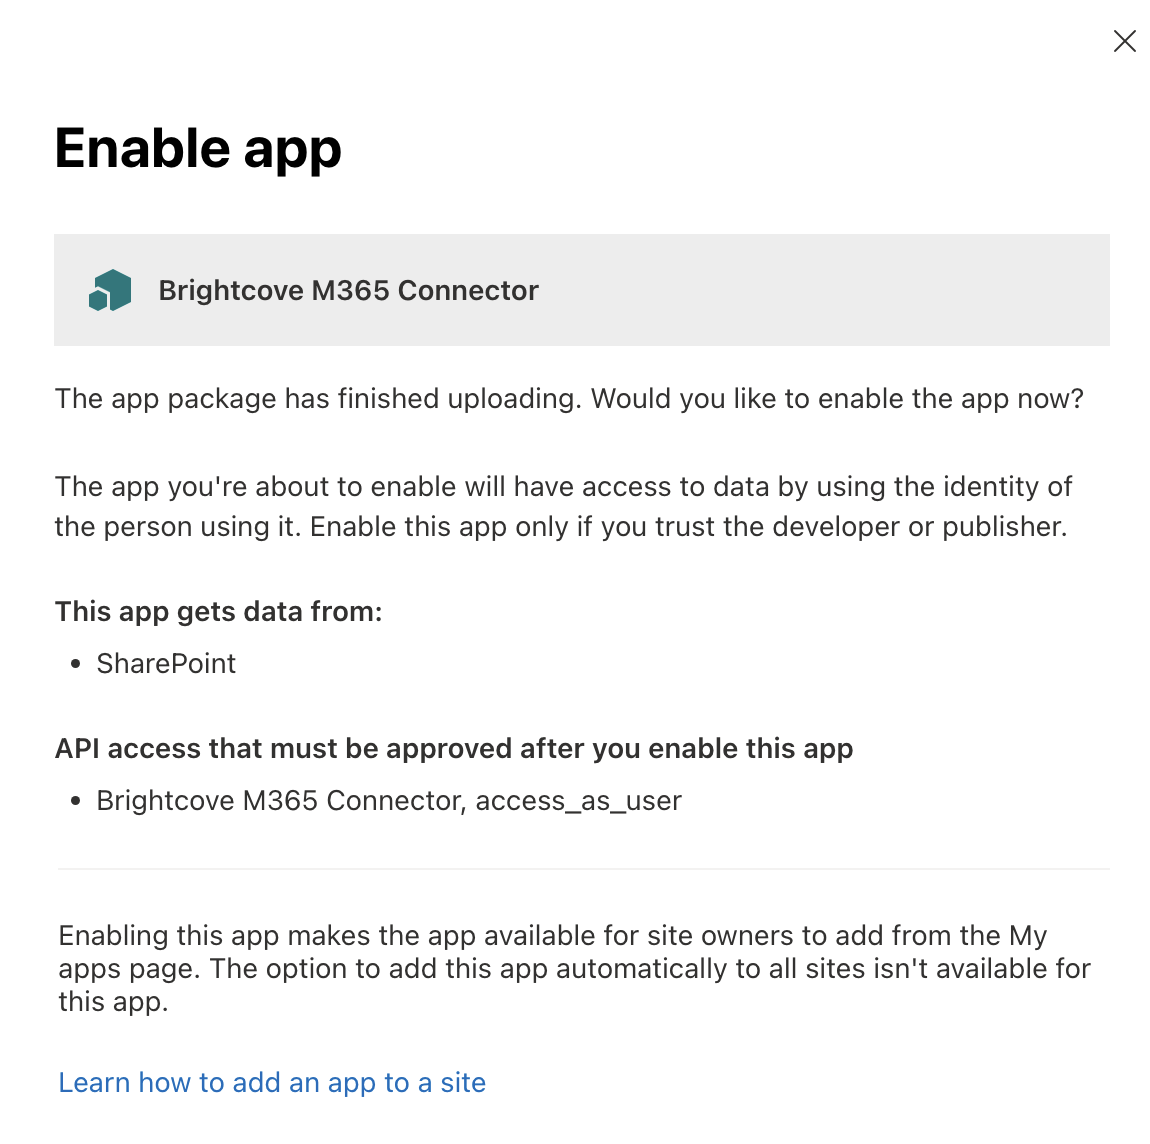
brightcove-video-connector.sppkg. - In the deploy dialog:
- Click Enable this app.
- Click Go to API access page to approve the pending request.
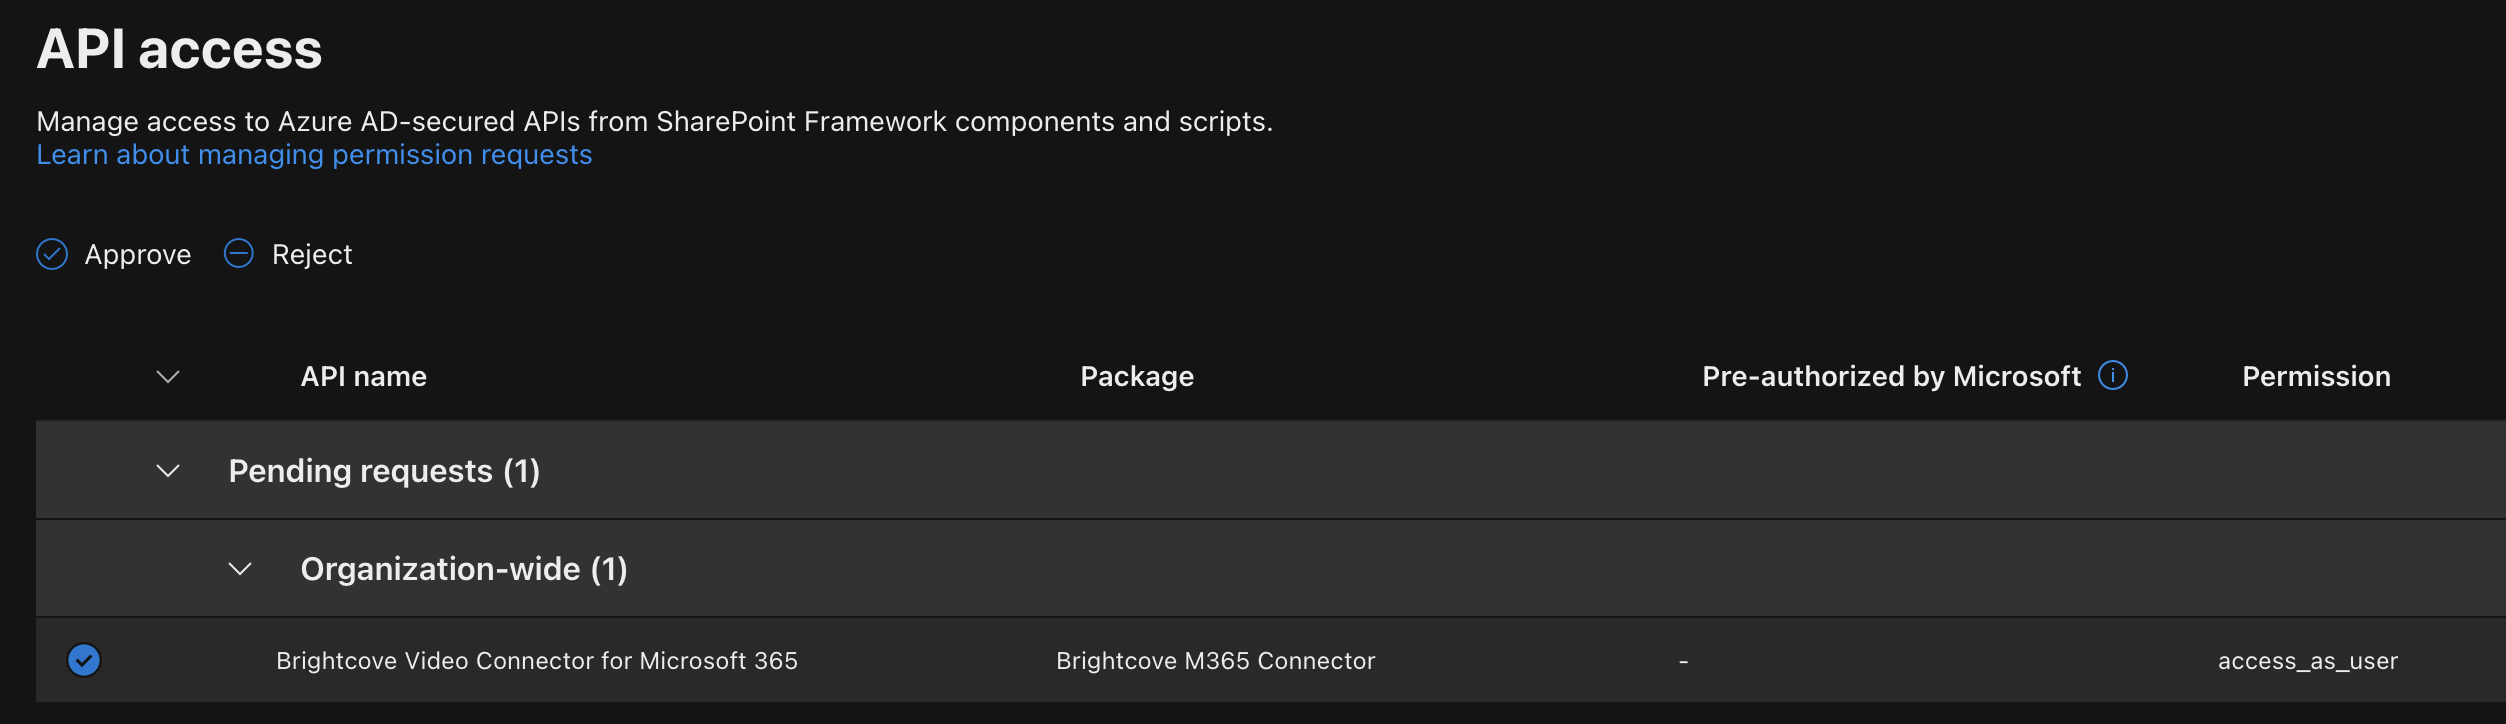
5.3 Approve the API permission (one-time)
The SPFx package requests delegated permission to call your Proxy API using the access_as_user
scope.
Where: SharePoint Admin Center → Advanced → API access
- You'll see a pending request for the Brightcove Proxy API (the name will match your App Registration name from Section 4.5).
- Select the pending request.
- Click Approve.
- An admin consent popup will appear — complete the consent flow.
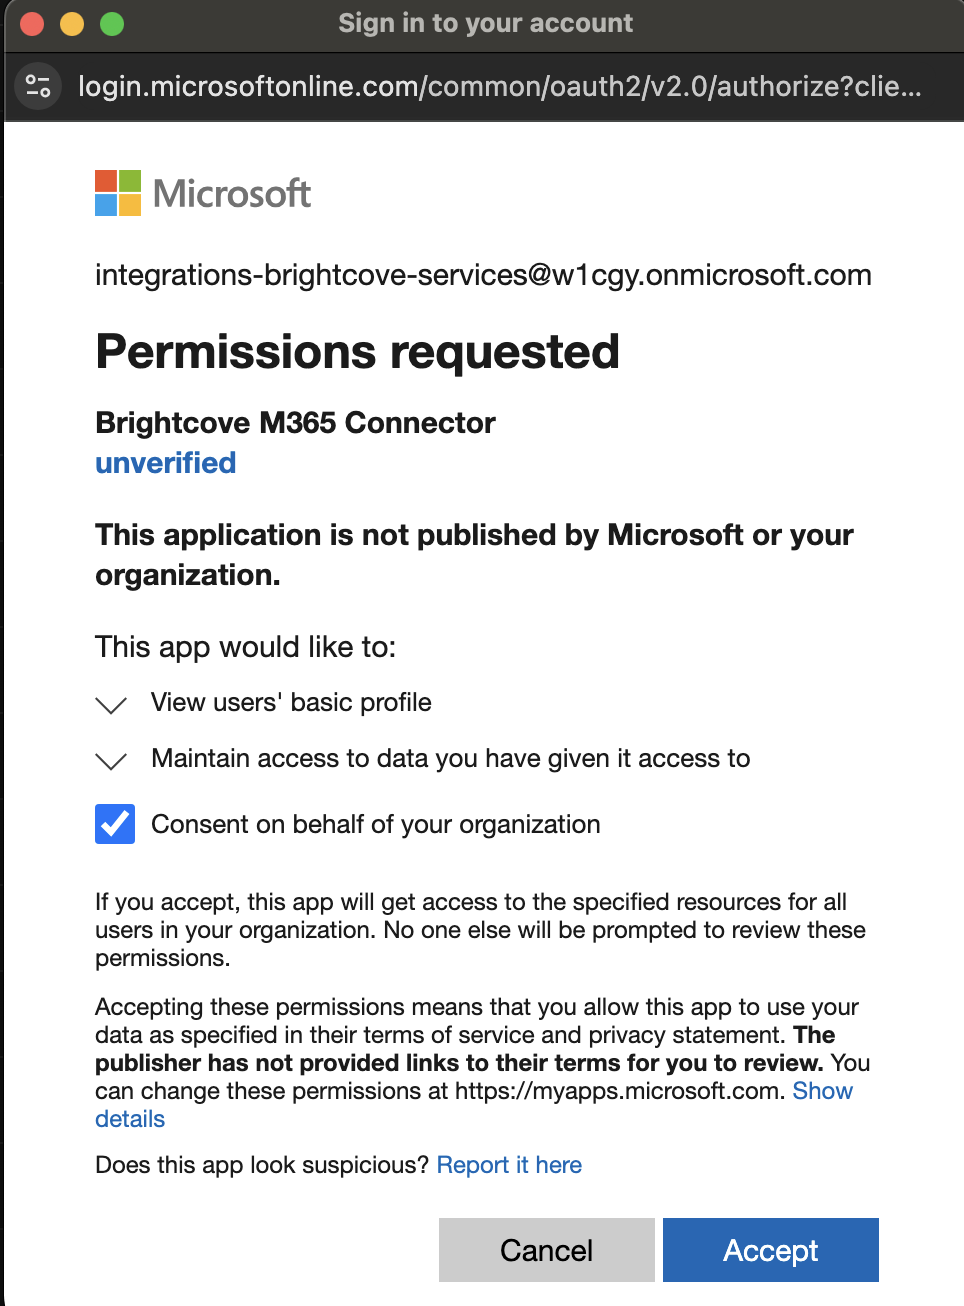
What happens behind the scenes: When you approve the API permission, SharePoint creates an Enterprise Application (service principal) in the SharePoint tenant's Entra ID directory. This enterprise app represents the Proxy API's App Registration in the SP tenant and is required for the delegated token flow to work.
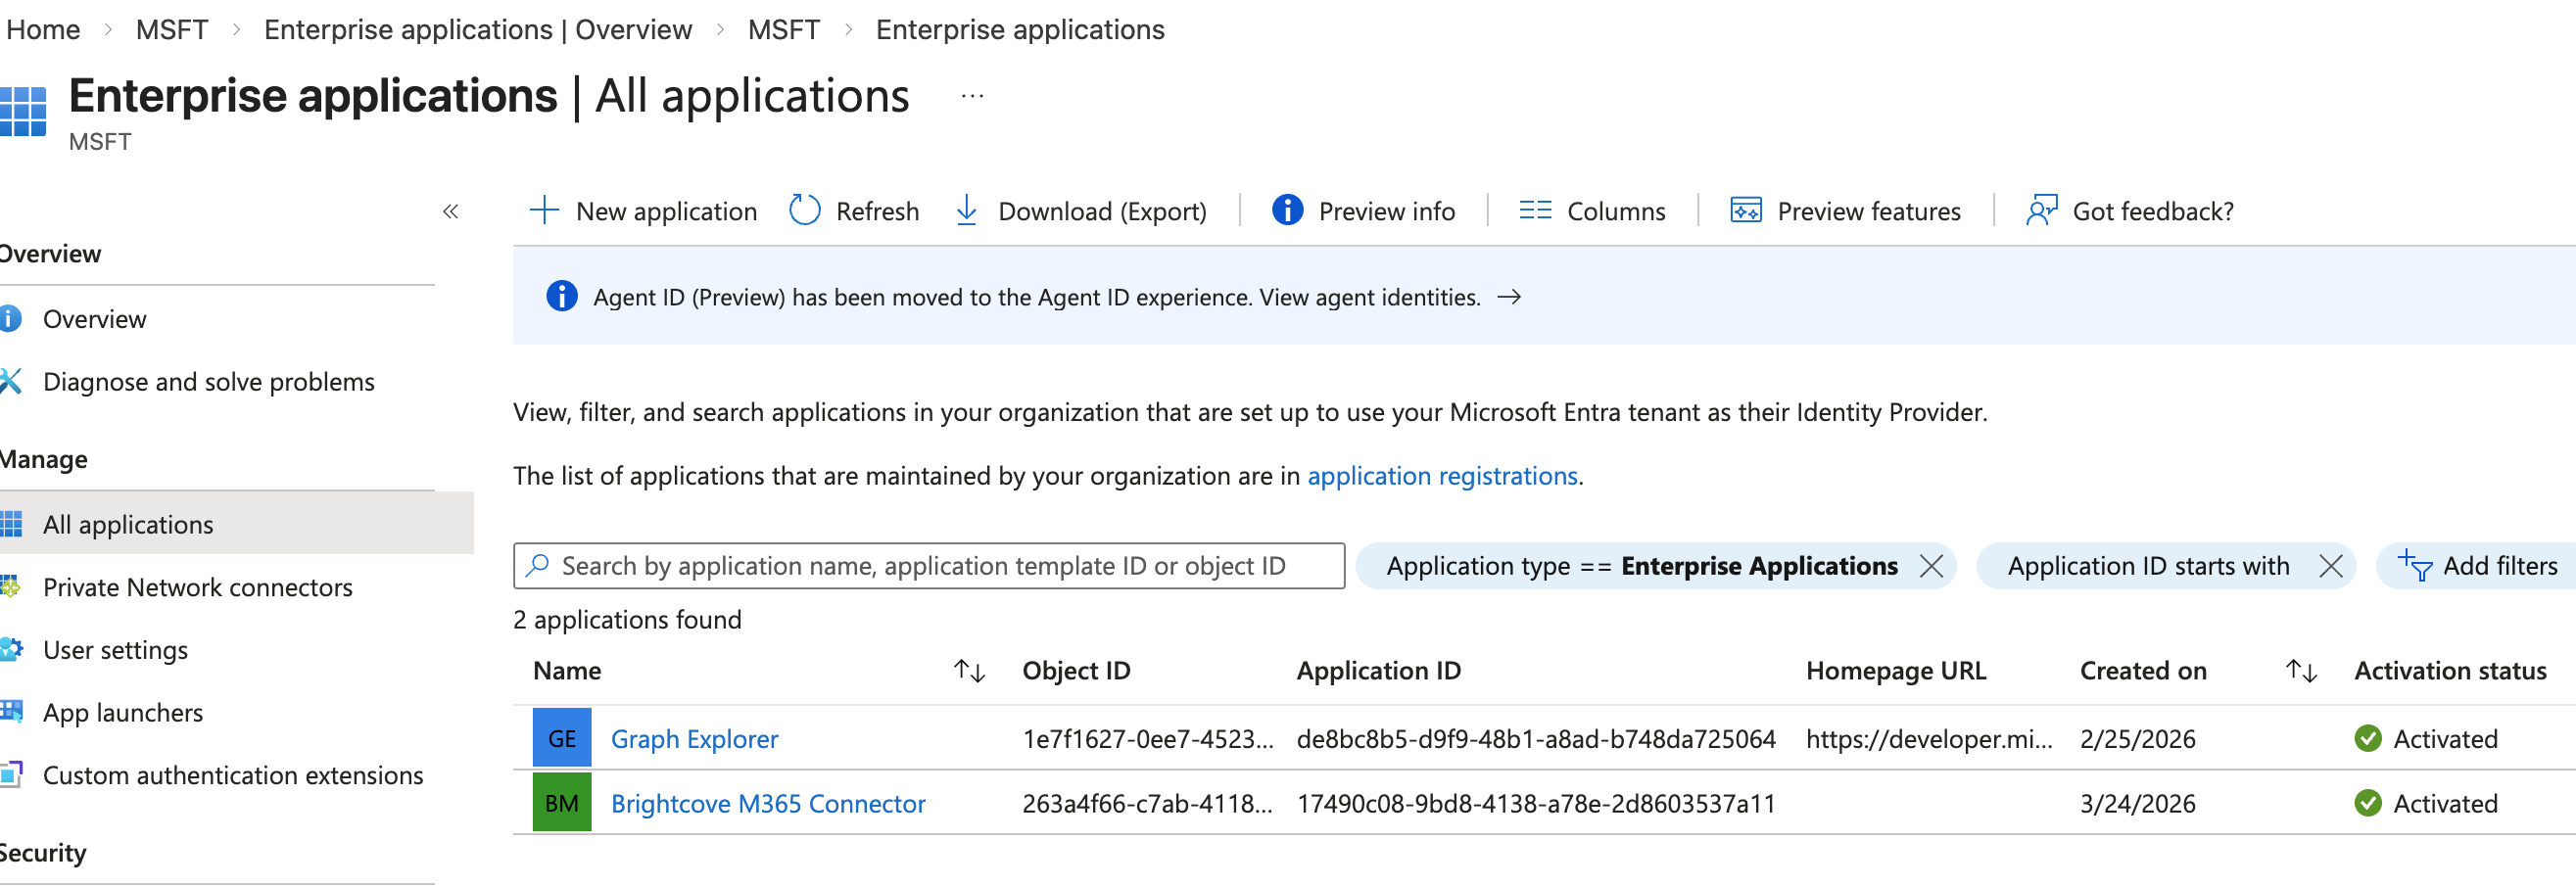
5.3.1 Verify the Enterprise Application was created
After approval, confirm the Enterprise Application exists:
- Go to Microsoft Entra ID (in the SharePoint tenant, if different from the Azure tenant) → Enterprise applications.
- Search for the App Registration name (e.g.,
Brightcove M365 Connector). - You should see the enterprise app listed with the same Application ID as your App Registration.
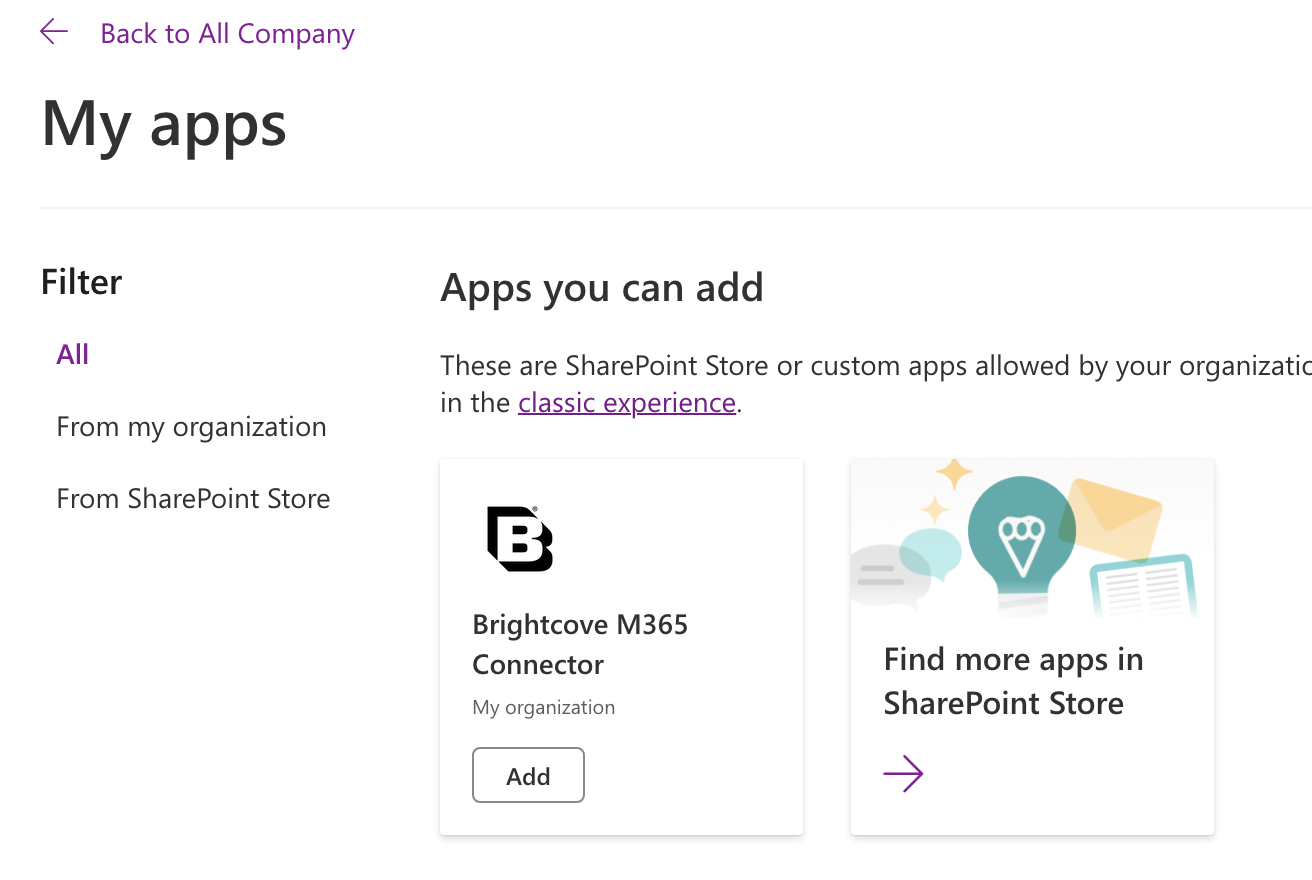
5.4 Add the app to a site
On the SharePoint site where you want to use the connector:
- Go to Settings → Add an app.
- Find and select the Brightcove M365 Connector app
- Click Add.
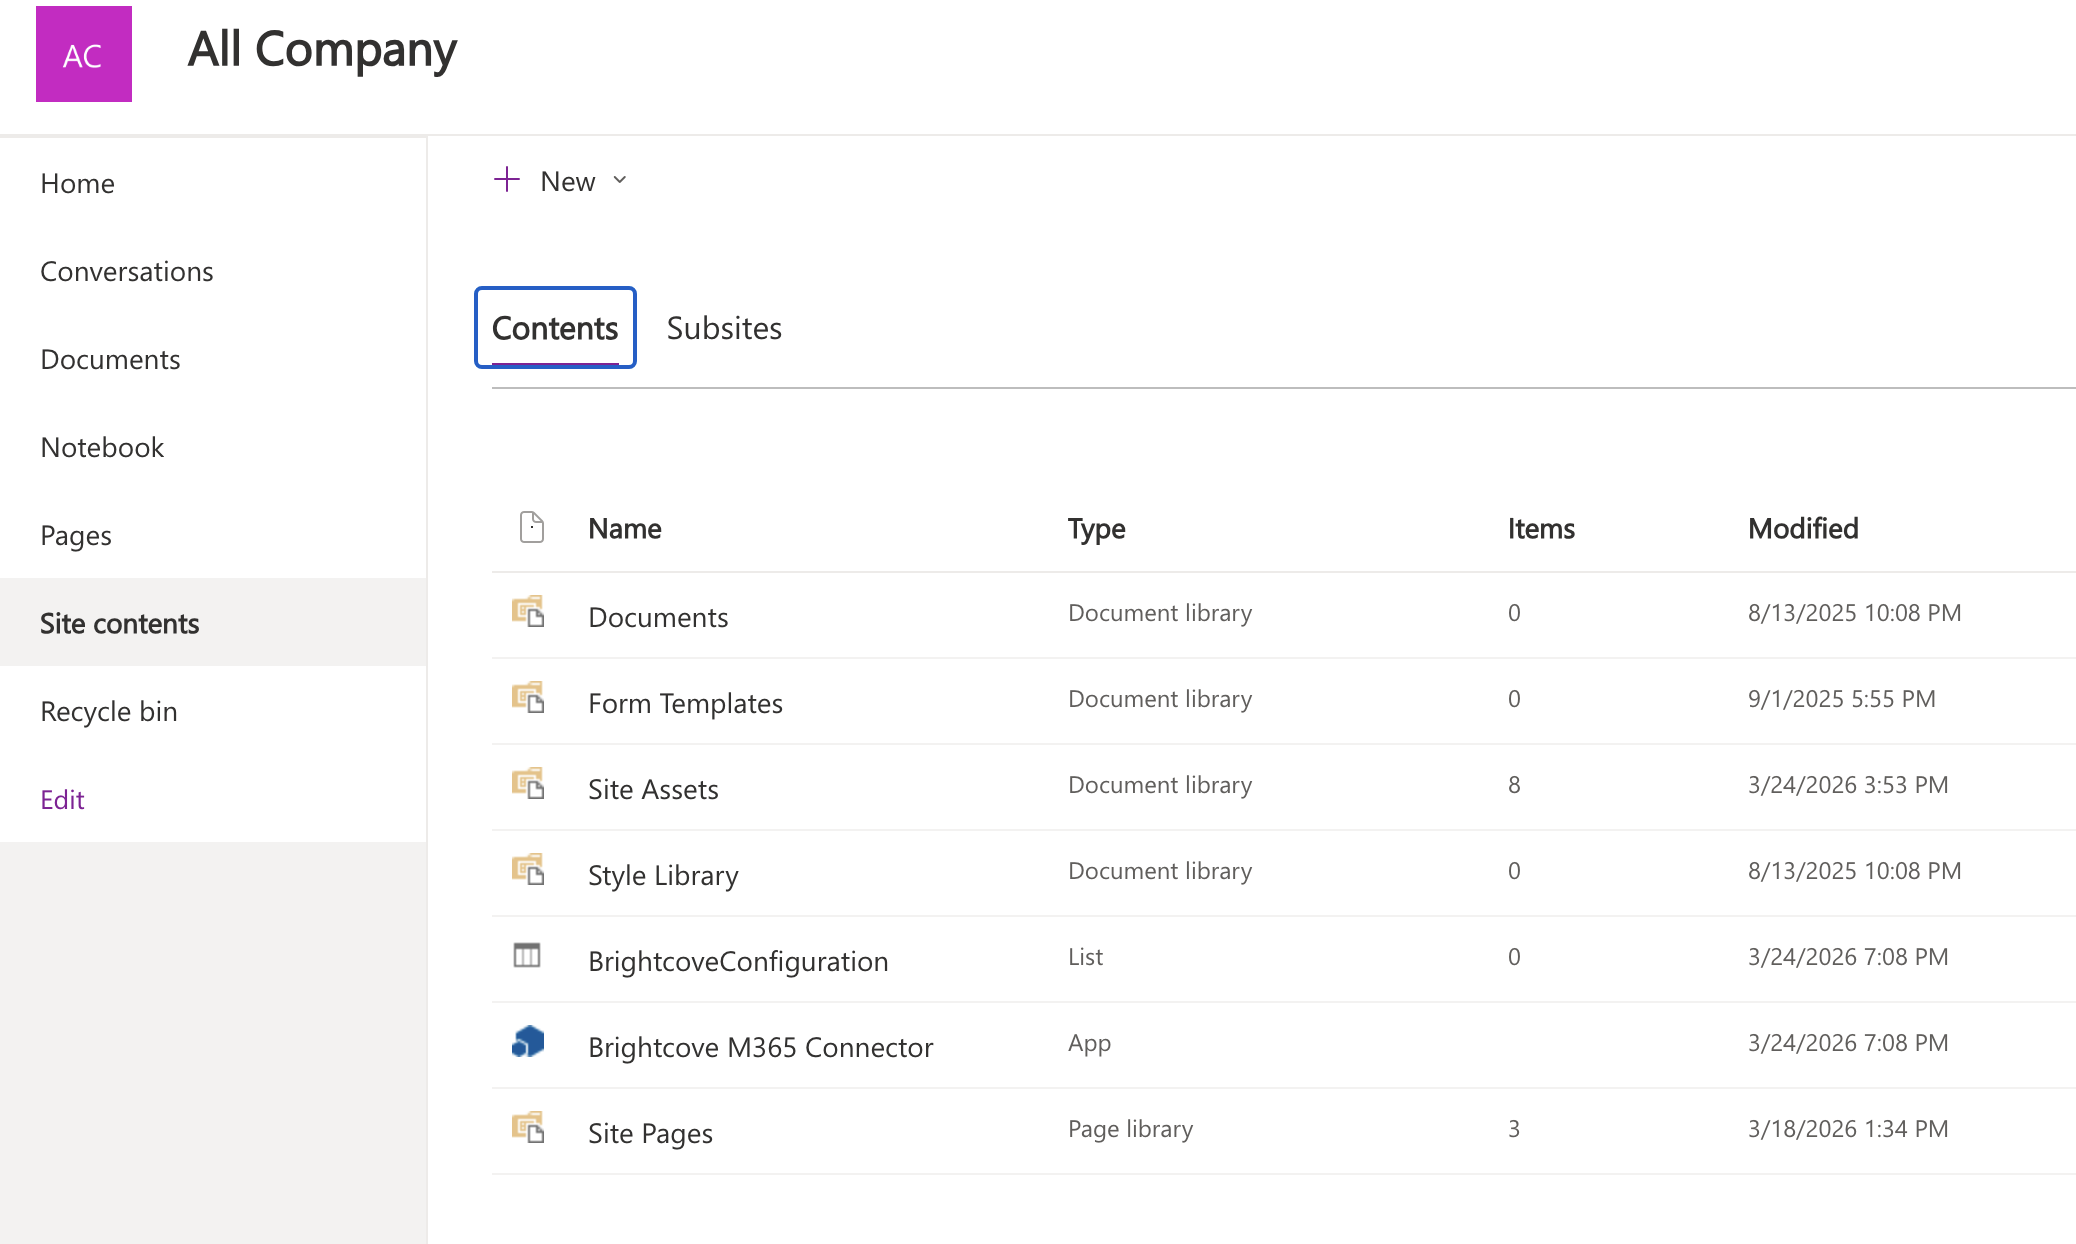
When the app is added to a site, the following are automatically provisioned:
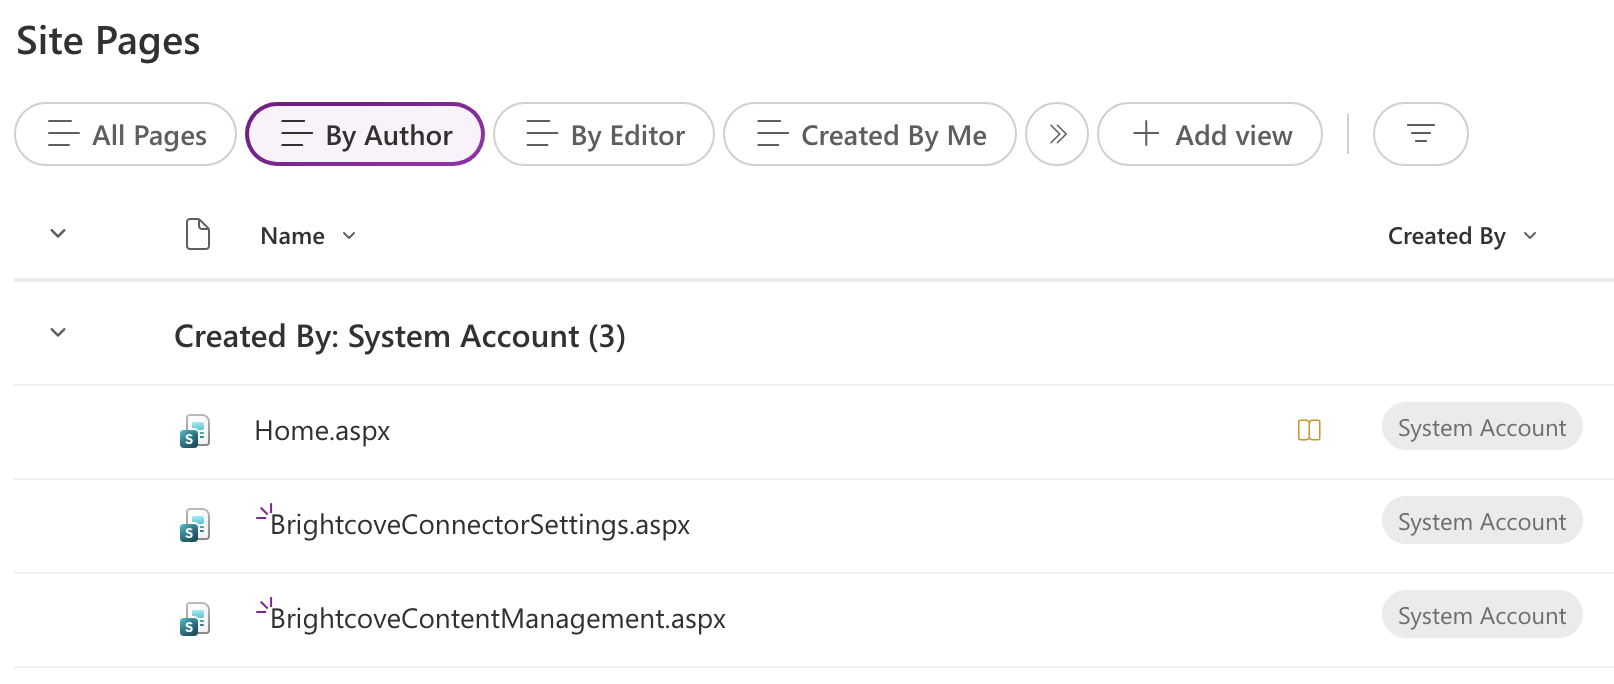
- Site pages:
- BrightcoveConnectorSettings.aspx — The connector settings admin page.
- BrightcoveContentManagement.aspx — The content management page for uploading and editing videos.
- Site contents:
- BrightcoveConfiguration list — A hidden SharePoint list that stores proxy connection settings.
6. Initial configuration in SharePoint
Use the Brightcove Connector Settings page to connect SharePoint to your Proxy API and register your Brightcove account credentials.
6.1 Navigate to Connector Settings
Where: Site → Site Pages → BrightcoveConnectorSettings.aspx
You can find this page in the site's Pages library. It was automatically created when you added the app to the site in Section 5.4.
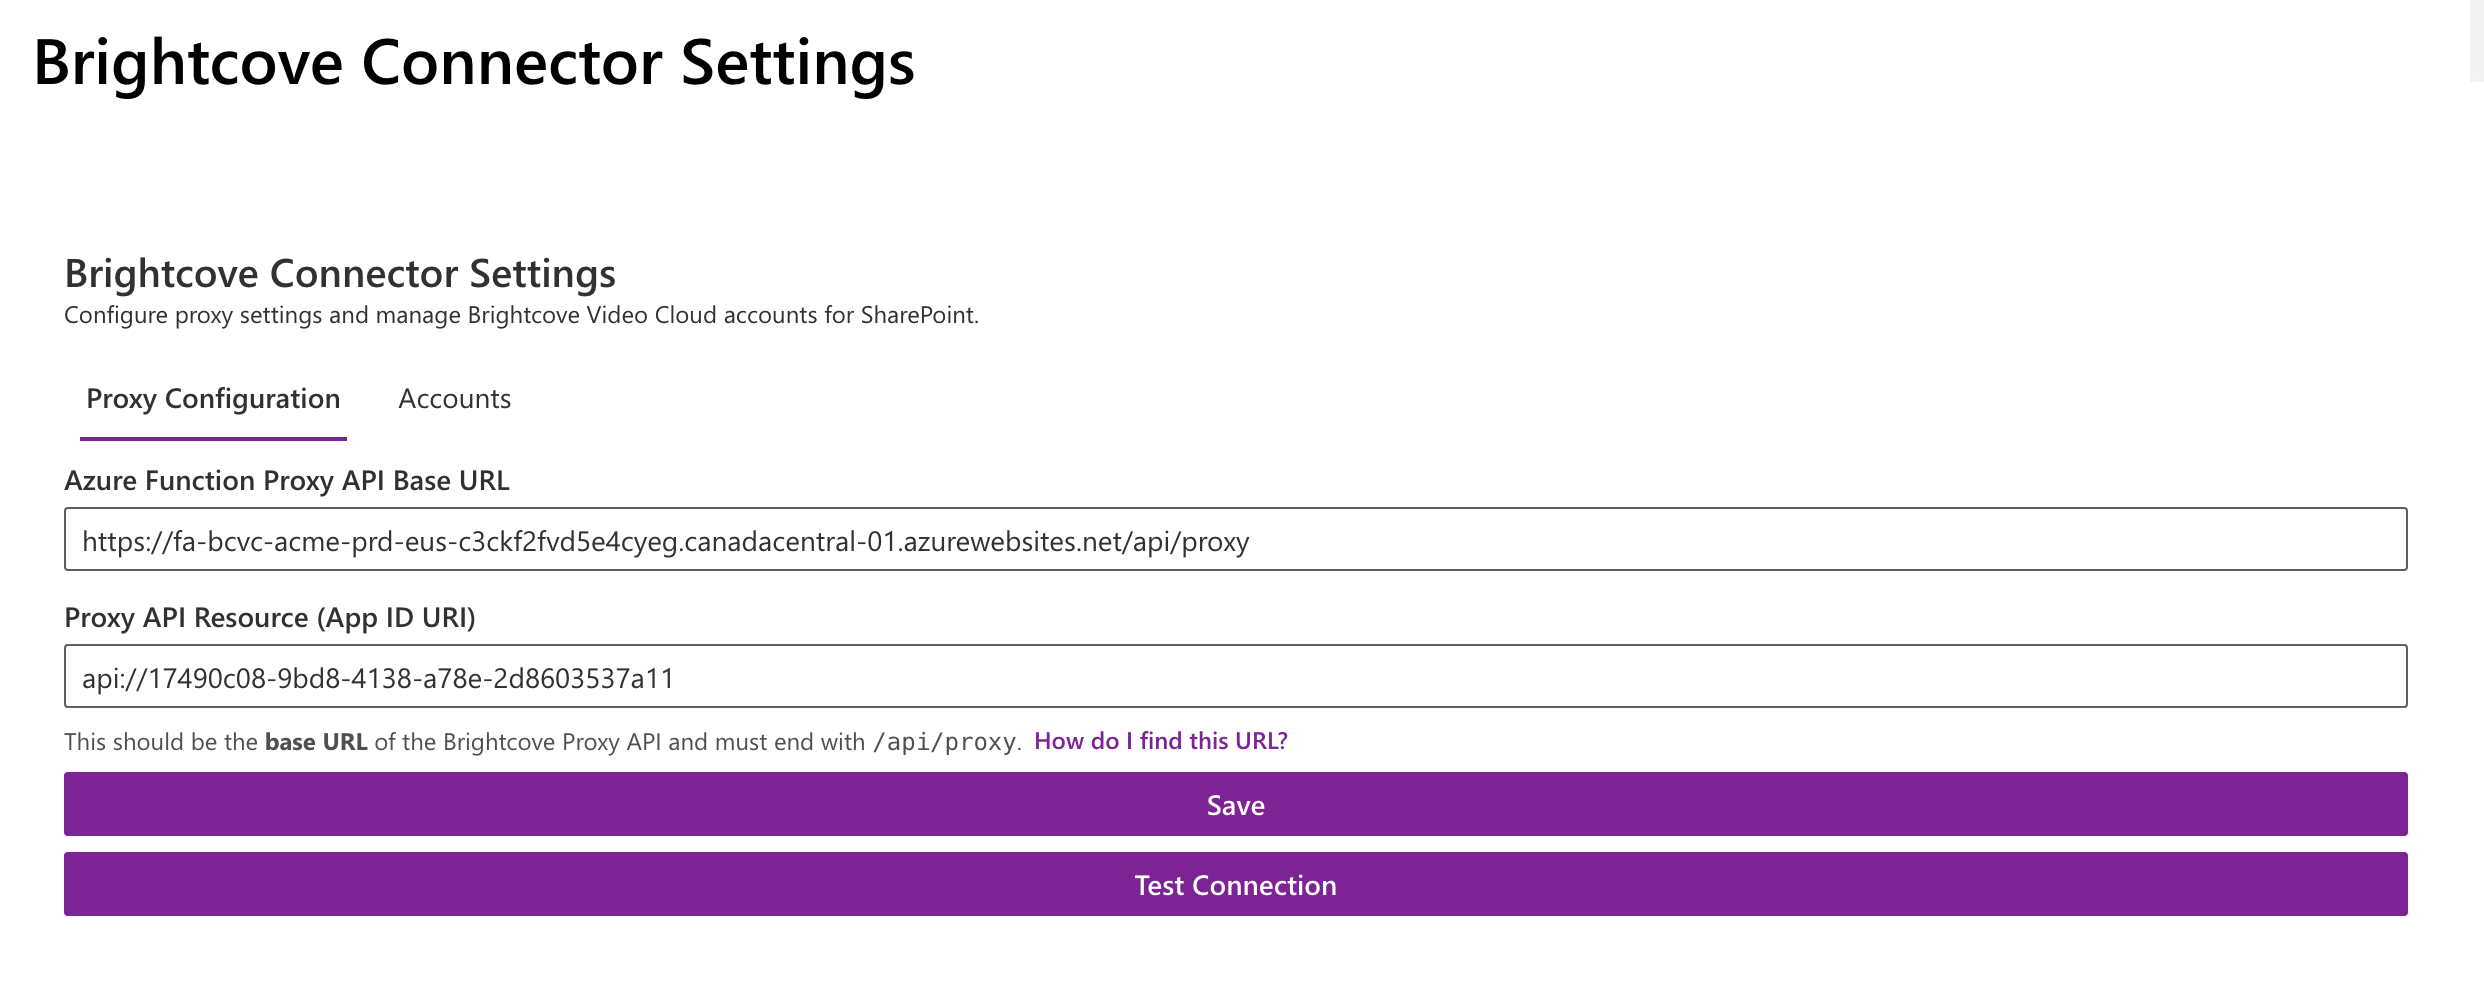
6.2 Configure proxy connection
On the Proxy Configuration tab, enter the following:
| Field | Value |
|---|---|
| Proxy API Base URL | https://<your-function-app-name>.azurewebsites.net/api/proxy (the default domain from
Section 4.5) |
| Proxy API Resource | api://<application-client-id> (the Application ID URI from Section 4.6) |
Click Save, then click Test Connection to verify connectivity.
The test performs two checks:
- Health check — Calls
GET /api/health(public endpoint) to verify the Function App is reachable. - Authenticated ping — Calls
GET /api/proxy/ping(protected endpoint) to verify that token acquisition and JWT validation are working end-to-end.
If both checks pass, the proxy connection is configured correctly.

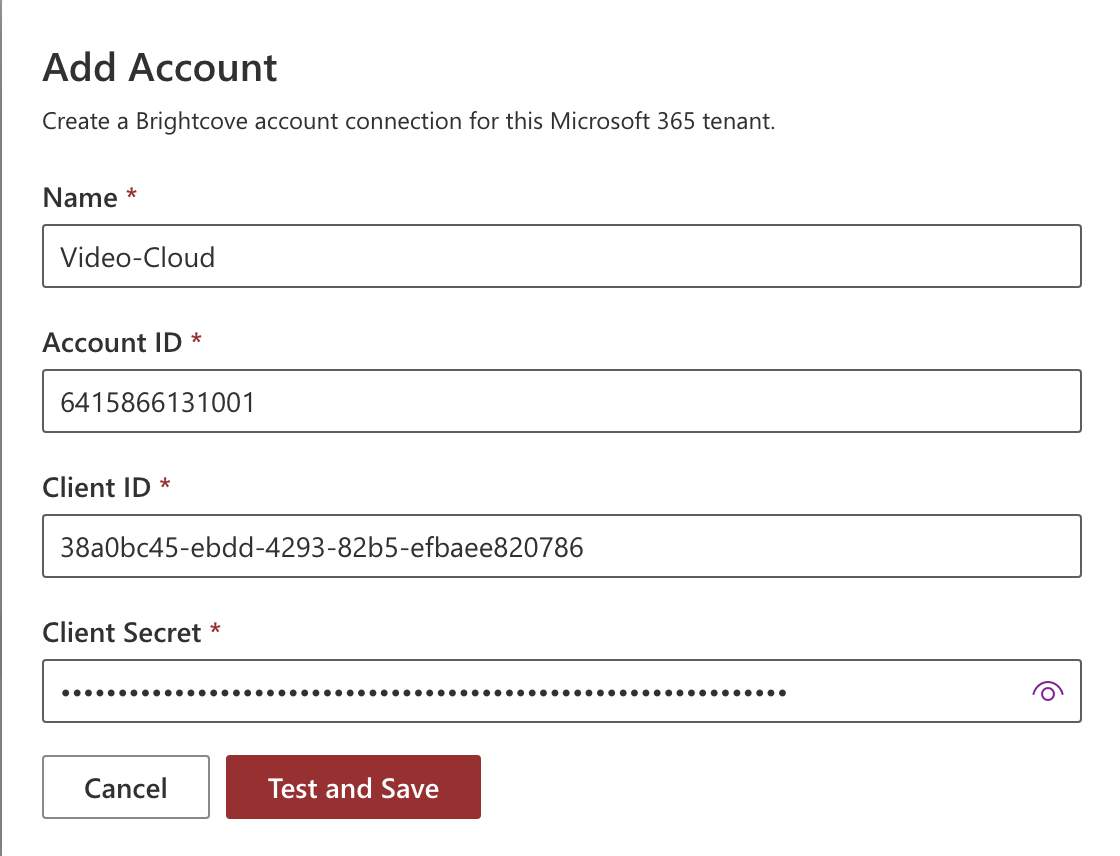
6.3 Add Brightcove accounts
Switch to the Accounts tab.
- Click Add.
- Enter the credentials you recorded in Section 3:
- Name: A friendly label for this account (alphanumeric and hyphens only; 4–64 characters; must start and end with a letter or number).
- Account ID: Your Brightcove numeric Account ID.
- Client ID: The Brightcove API Client ID.
- Client Secret: The Brightcove API Client Secret.
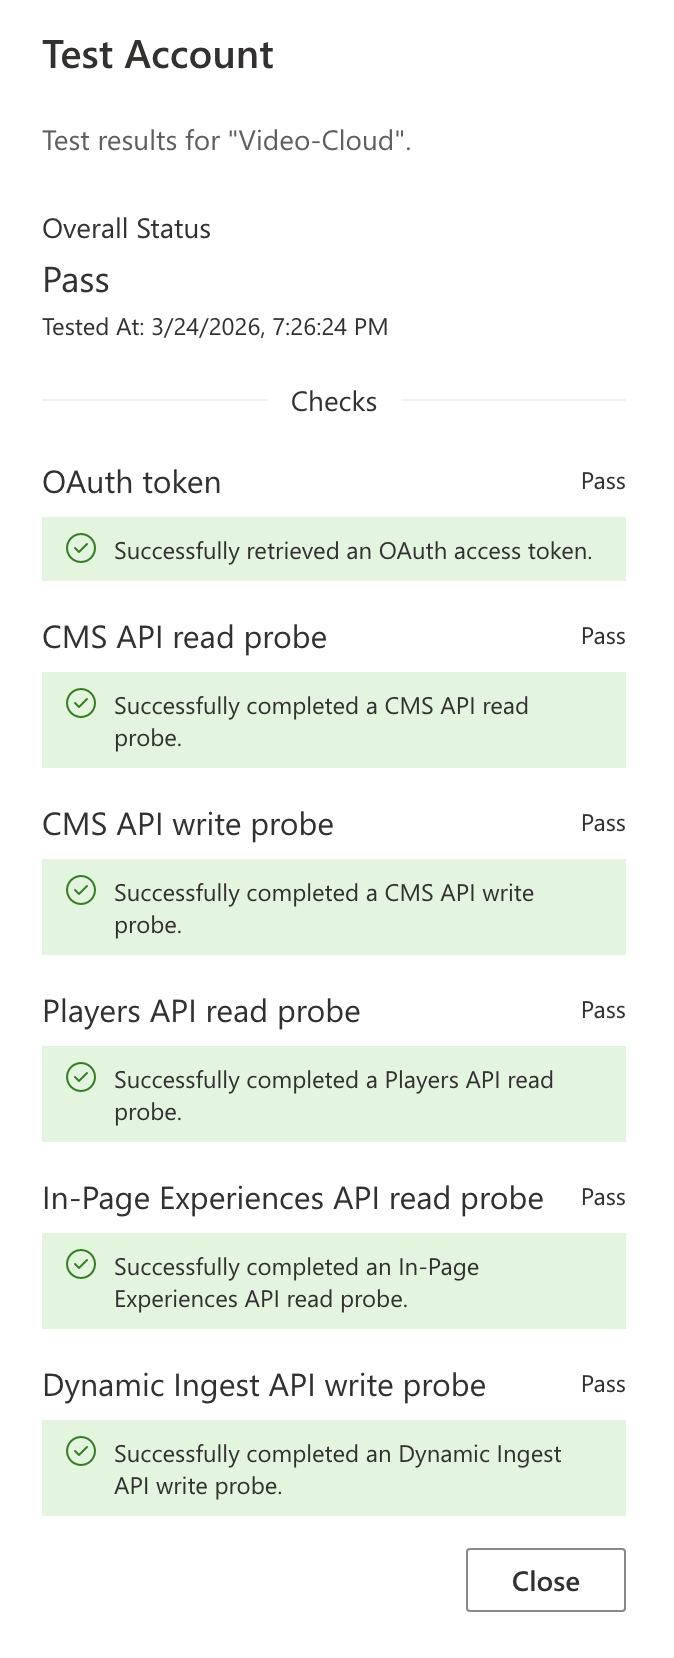
- Click Test and Save.
Repeat for each Brightcove account you want to make available on this site.
6.4 Validate
After saving your proxy settings and adding at least one Brightcove account:
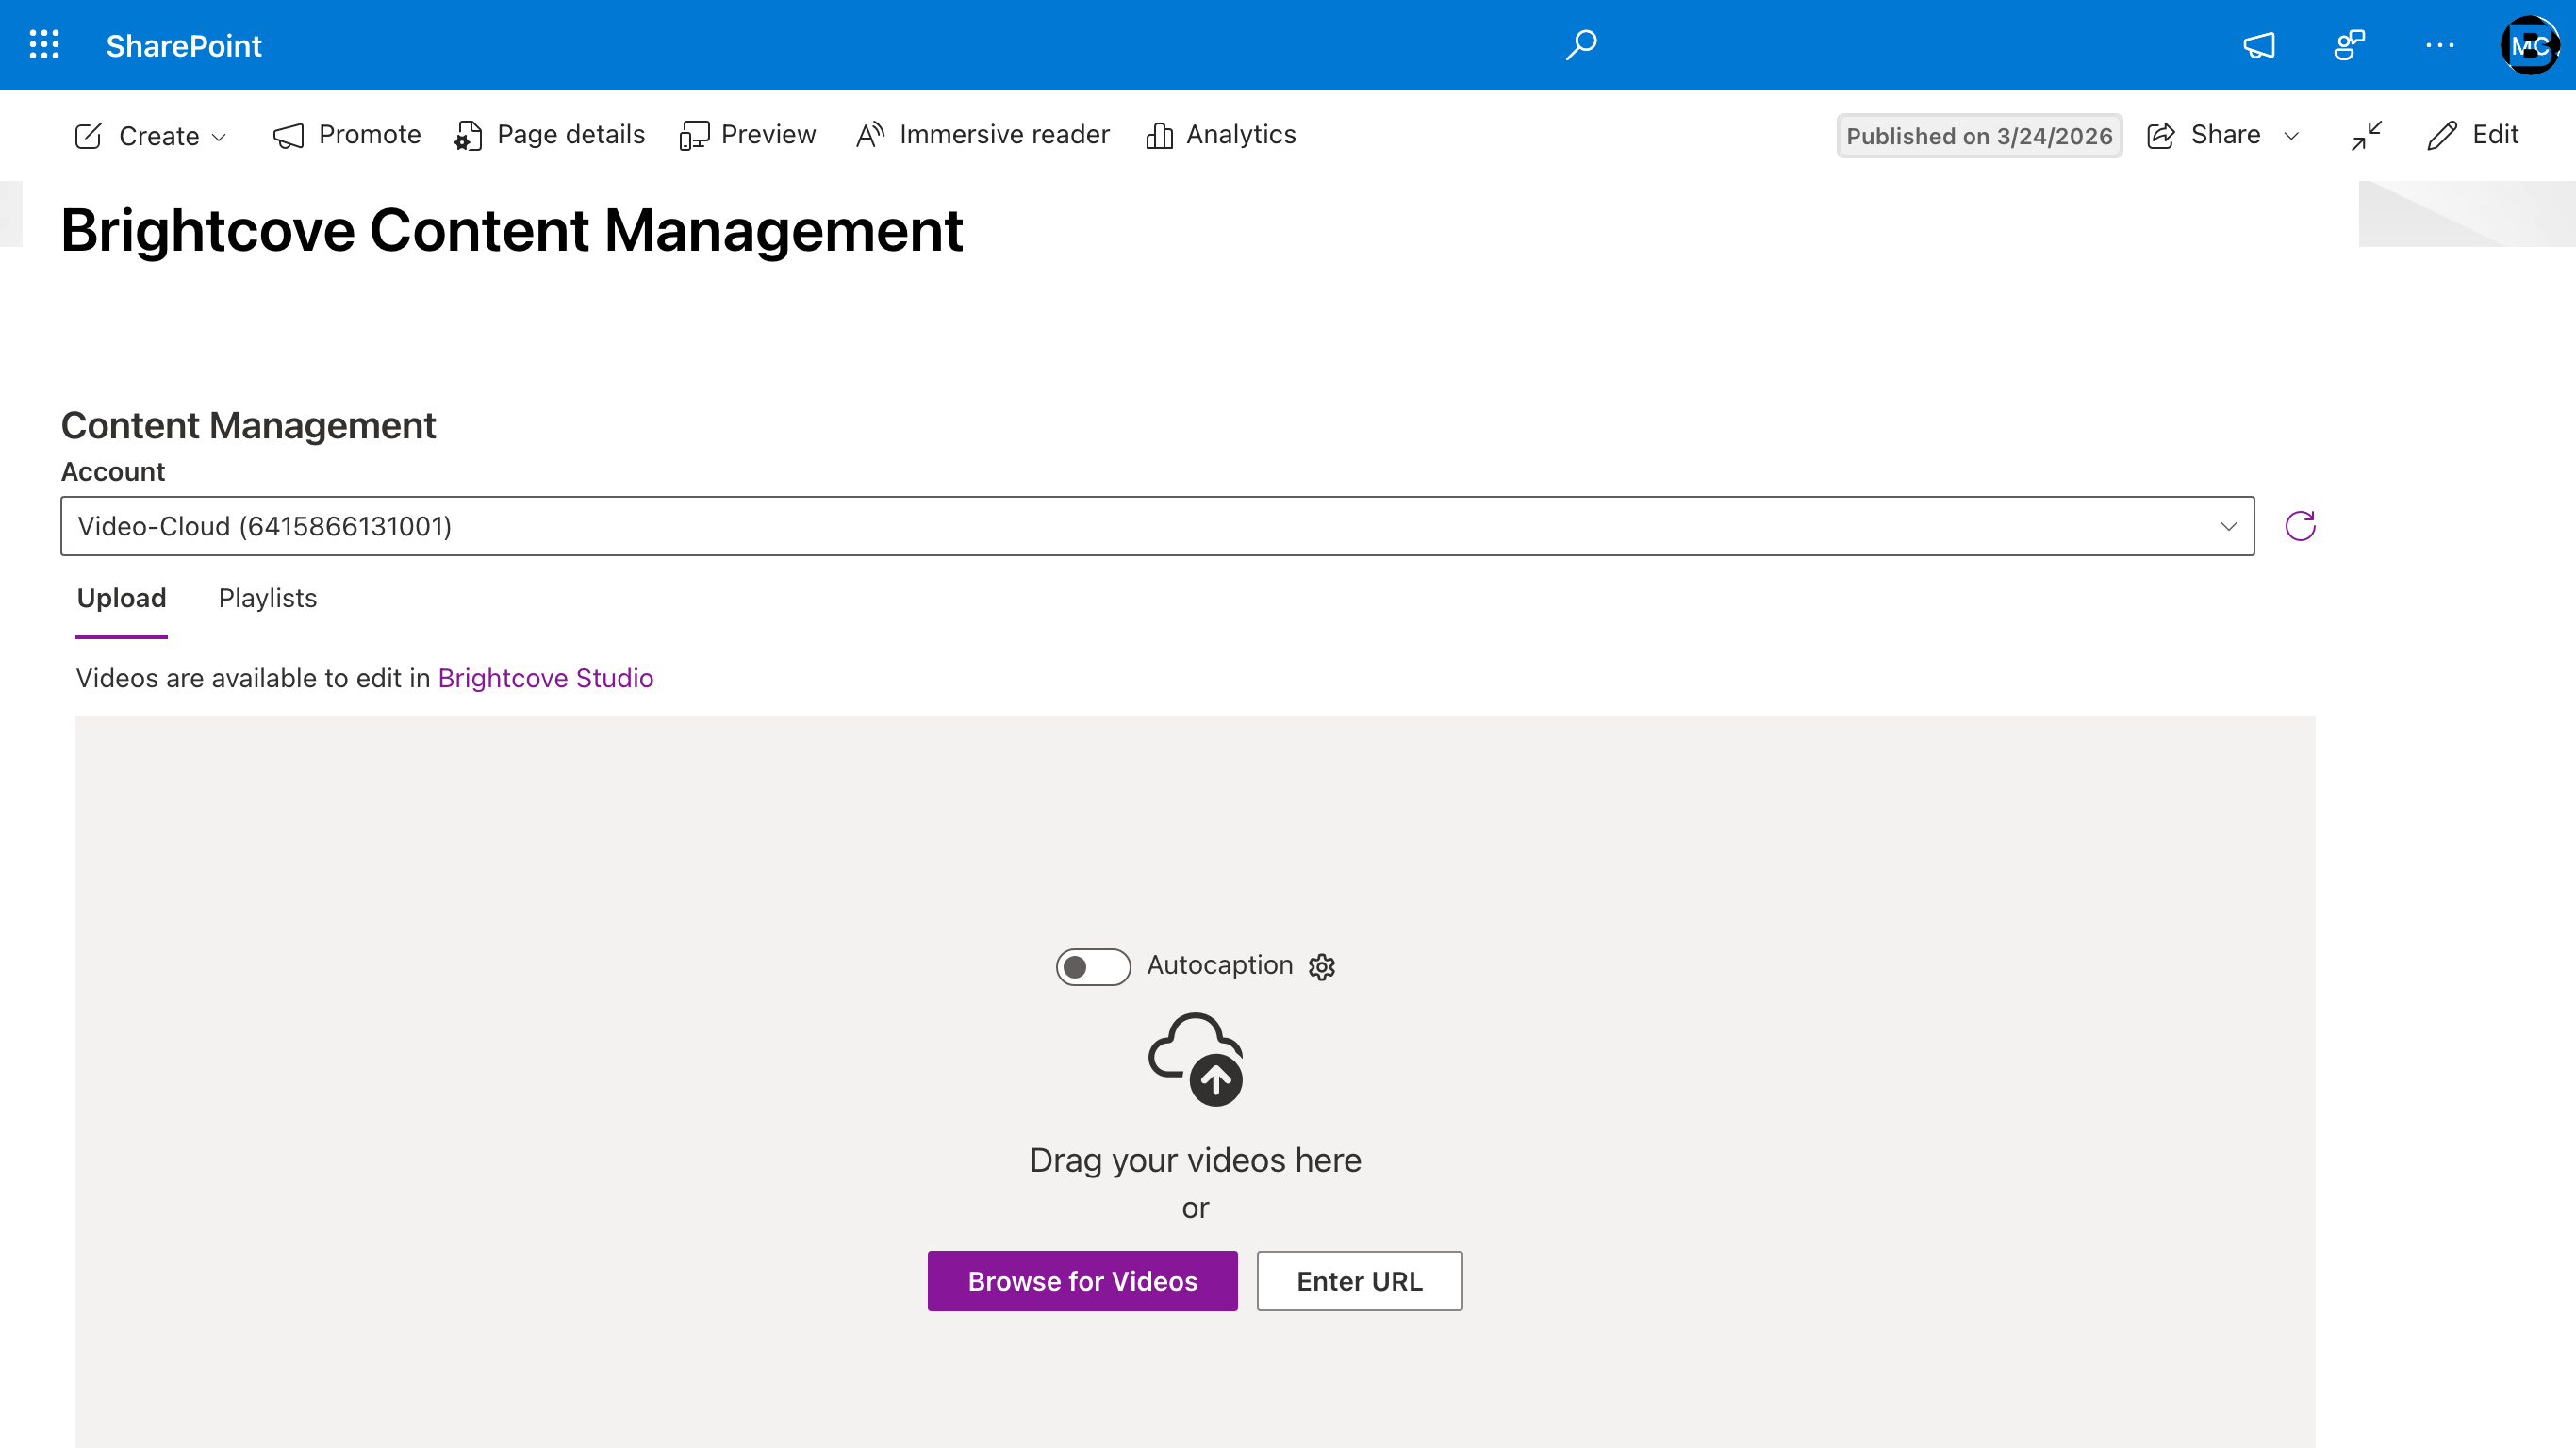
- Navigate to Site Pages → BrightcoveContentManagement.aspx.
- Verify that the Brightcove account dropdown displays the account(s) you just configured.
- If the account appears and the page loads without errors, the installation is complete.
7. Verify web parts
The connector includes three authoring web parts that appear in the SharePoint web part toolbox when editing a page.
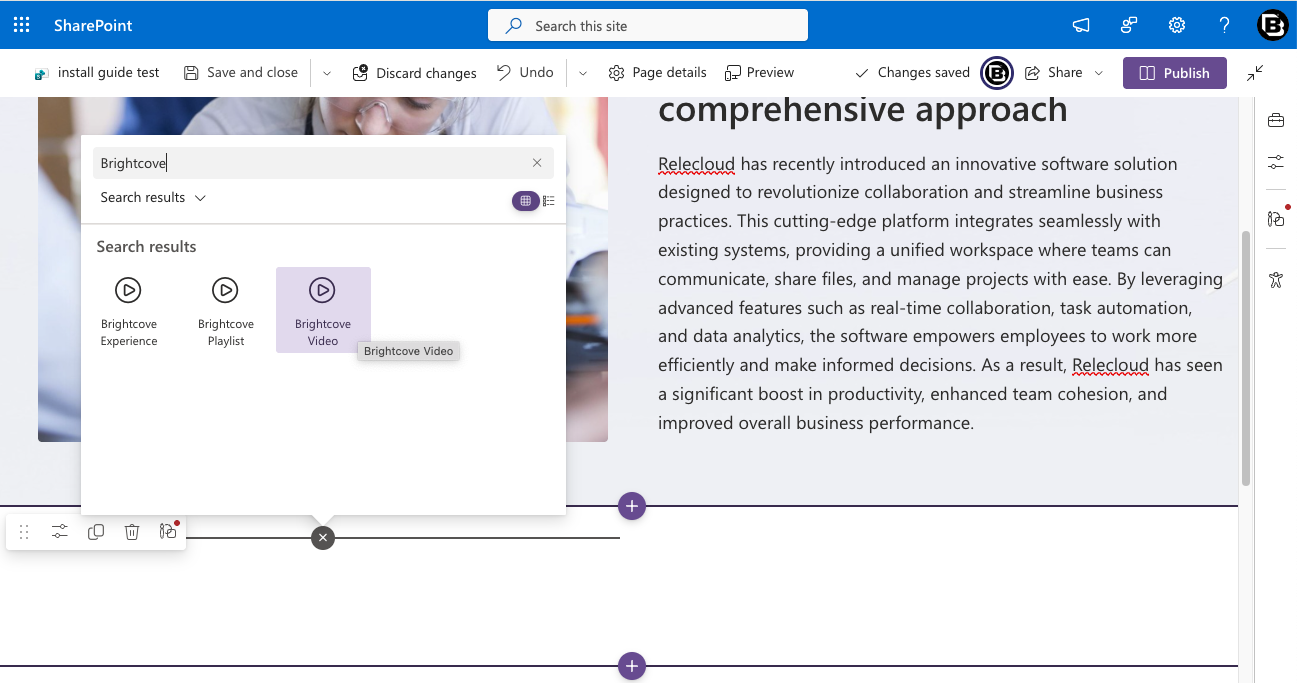
7.1 Add a Brightcove web part to a test page
- Navigate to a SharePoint page and click Edit.
- Click the + button to add a web part.
- Search for Brightcove in the toolbox.
- You should see three web parts:
- Brightcove Video — Embed a single video.
- Brightcove Playlist — Embed a playlist.
- Brightcove Experience — Embed an In-Page Experience (IPX).
- Add one of the web parts to the page.
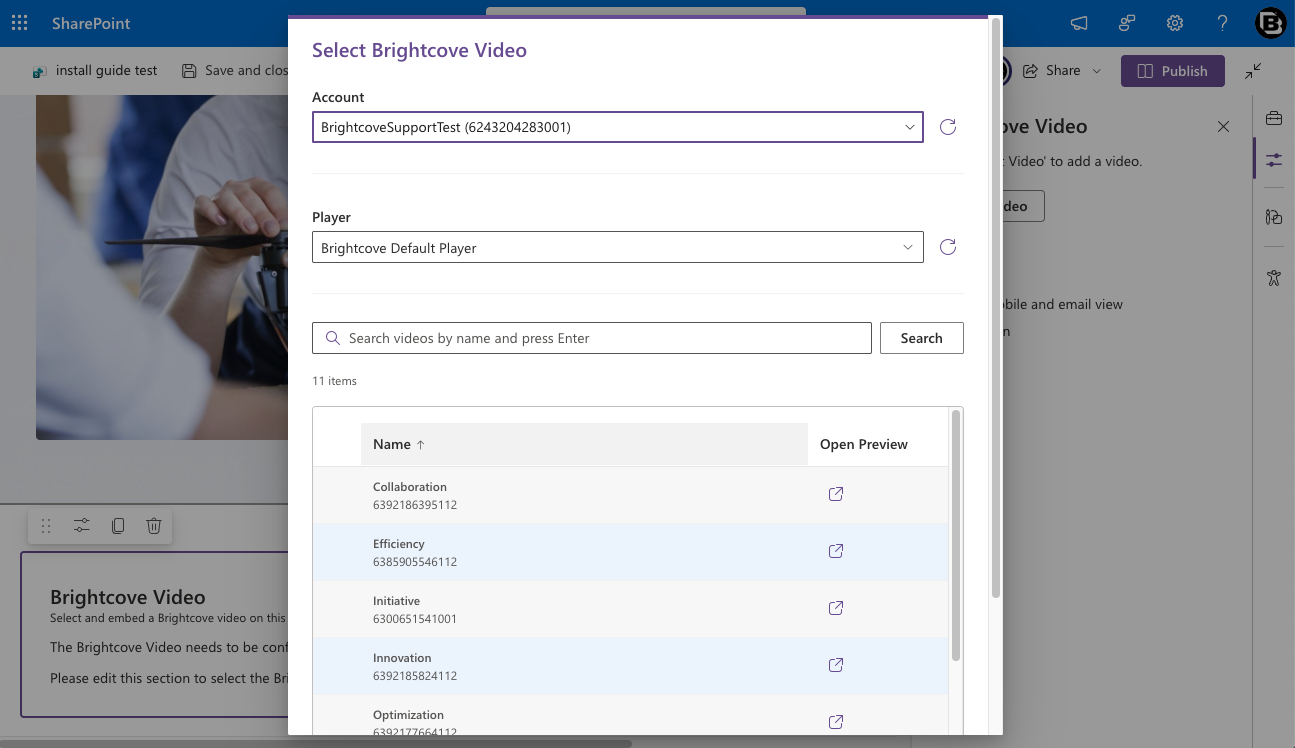
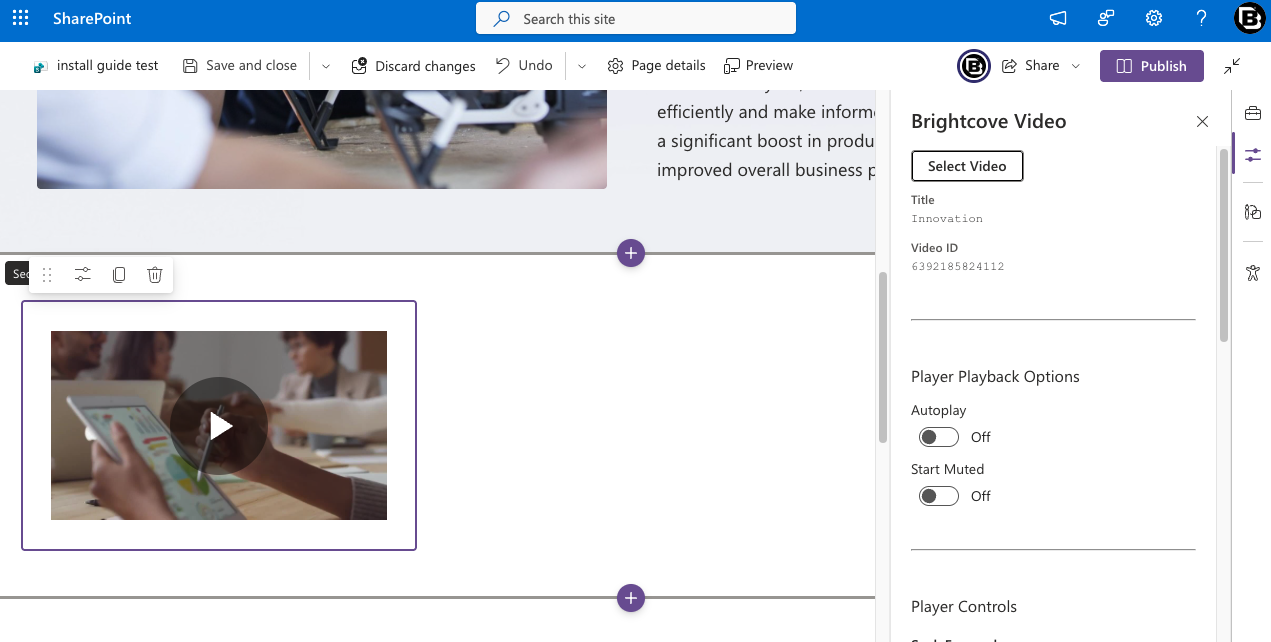
- Open the web part's property pane and select your Brightcove account from the dropdown.
- Browse and select content from your Brightcove library.
- Click Publish (or Republish) to save the page.
If the web parts appear in the toolbox, content loads from your Brightcove account, and the embedded player renders on the published page, the installation is fully verified.
8. Tenant topology reference
This section provides additional detail on same-tenant versus cross-tenant configurations.
8.1 Same tenant (most common)
In this scenario, both the Azure subscription (hosting the Function App and Key Vault) and SharePoint Online belong to the same Microsoft Entra ID directory.
- App Registration: Single tenant only — Default Directory
- Token issuer: Tokens from SharePoint users will have an
issclaim matching the same tenant ID as the App Registration. - This is the simplest configuration and requires no additional tenant allowlisting.
8.2 Cross-tenant
In this scenario, the Azure subscription belongs to a different Entra ID directory than the SharePoint Online tenant. This can occur when:
- A customer's Azure infrastructure is managed by a different team or subsidiary with its own directory.
- A Brightcove partner hosts the Proxy API on behalf of multiple customers.
Configuration differences:
- App Registration: Multiple Entra ID tenants → Allow all tenants (or Allow only certain tenants for tighter control).
- The Proxy API validates tokens using the Microsoft common JWKS endpoint, which accepts tokens issued by any
Entra tenant. Tenant scoping is enforced at the application level — the proxy extracts the
tidclaim from the JWT and uses it to scope Brightcove credential lookups in Key Vault. - The SharePoint admin must still approve the API permission in their tenant's SharePoint Admin Center (Section 5.3). This consent flow works across tenants as long as the App Registration allows multi-tenant access.
9. Troubleshooting
Proxy health check fails
- Confirm the Function App is running in the Azure Portal (check the Overview page for status).
- Verify the URL is correct:
https://<function-app-name>.azurewebsites.net/api/health. - Open the health URL directly in a browser to check for DNS or TLS issues.
Authenticated ping fails (401 or 403)
- 401 Unauthorized: The token was not accepted. Check:
JWT_AUDIENCEin the Function App environment variables matches the Application ID URI on the App Registration.- The API permission was approved in SharePoint Admin Center (Section 5.3).
- CORS is configured with the correct SharePoint origin URL.
- The redirect URI
https://<tenant>.sharepoint.com/is configured on the App Registration (Section 4.5). - The Enterprise Application exists in the SharePoint tenant's Entra ID (Section 5.3.1).
- 403 Forbidden: The token was valid but missing required scopes. Check:
- The
access_as_userscope is defined under Expose an API in the App Registration. - SharePoint Online (
00000003-0000-0ff1-ce00-000000000000) is listed as a pre-authorized application for theaccess_as_userscope (Section 4.6). - The SPFx package's permission request was approved.
- The
consent_missing or resource_mismatch errors in the browser
These errors appear in the SPFx Connector Settings "Test Connection" results when the token acquisition fails before any request reaches the Proxy API.
- consent_missing: The Enterprise Application was not created in the SharePoint tenant. Re-approve the API permission in SharePoint Admin Center, or have a Global Admin grant consent manually via Entra ID → Enterprise Applications.
- resource_mismatch: The resource identifier in the SPFx package does not match the App
Registration. Ensure the App Registration name matches the
resourcevalue inwebApiPermissionRequestsin the SPFx package. If using a custom-named App Registration, the SPFx package may need to be rebuilt with the matching resource name.
Viewing Function App logs without Application Insights
If Application Insights is not enabled, you can still access basic logs:
- Live log stream: Function App → Monitoring → Log stream. Shows real-time
console output from the running function (including
console.log,console.error, and uncaught exceptions). - Filesystem logs: Enable diagnostic logs under Function App → Monitoring → Diagnostic settings and route to a Storage Account if persistent logging is needed.
- Kudu console: Navigate to
https://<function-app-name>.scm.azurewebsites.net→ Log Files to browse filesystem logs directly.
For production environments, Application Insights is recommended as it provides structured request tracing, dependency tracking, and failure analysis that filesystem logs cannot match.
Web parts don't appear in the toolbox
- Confirm the SPFx package was deployed with Enable this app checked.
- Confirm the app was added to the specific site (Section 5.4).
- Try refreshing the page or clearing the browser cache.
Brightcove accounts don't appear in the dropdown
- Verify that at least one account was added and saved in Connector Settings (Section 6.3).
- Check that the proxy connection test passes.
- If using a cross-tenant setup, ensure the App Registration supports multi-tenant access and the
tidclaim in the token matches the tenant used when the accounts were added.
Key Vault access errors
- Confirm the Function App's managed identity is enabled (Section 4.4).
- Verify the Key Vault Secrets Officer role is assigned to the managed identity on the Key Vault.
- Check that
KEY_VAULT_URLin the Function App environment variables points to the correct Key Vault.
10. Summary of provisioned resources
After completing this guide, you will have the following resources:
Azure
- Resource Group
- Key Vault (stores Brightcove API credentials as encrypted secrets)
- Function App (runs the Proxy API — Node.js 22, Linux, Flex Consumption plan)
- Storage Account (auto-provisioned for Function App deployment packages)
- Enterprise Application / Service Principal (created in the SharePoint tenant's Entra ID when API permission is approved)
- App Registration (enables Entra ID authentication between SharePoint and the Proxy API)
SharePoint
- SPFx package deployed to Tenant App Catalog
- API permission approved for the Proxy API
- Per-site: Brightcove Connector Settings page (
BrightcoveConnectorSettings.aspx) - Per-site: Brightcove Content Management page (
BrightcoveContentManagement.aspx) - Per-site: BrightcoveConfiguration list (stores proxy URL and API resource)
- Three authoring web parts available in the toolbox (Video, Playlist, Experience)