Brightcove Global Services | Last updated: March 2026 | Version 1.0.0.0
1. Introduction
This guide explains how to use the Brightcove M365 Connector for SharePoint after it has been installed and configured by your administrator. If the connector is not yet installed, refer to the companion Installation Guide first.
1.1 What is the Brightcove M365 Connector?
The Brightcove M365 Connector allows SharePoint Online users to embed and manage Brightcove Video Cloud content directly within modern SharePoint pages. It consists of:
- Three authoring web parts (available in the SharePoint toolbox when editing a page): Brightcove Video, Brightcove Playlist, and Brightcove Experience (In-Page Experience / IPX).
- Connector Settings page — An admin page for configuring the proxy connection and managing Brightcove account credentials.
- Content Management page — A page for uploading new videos and editing video details without leaving SharePoint.
1.2 Who is this guide for?
- Site Owners and Editors who want to embed Brightcove content on SharePoint pages.
- Site Admins who manage Brightcove account credentials and connector settings for their site.
- Content Managers who upload and edit videos from within SharePoint.
1.3 Prerequisites
Before using the connector, ensure:
- The connector has been installed and configured by your SharePoint and Azure admins (see the Installation Guide).
- At least one Brightcove account has been added in the Connector Settings page.
- You have Edit permissions on the SharePoint site where the connector is installed.
2. What's changed: Legacy connector vs. modern connector
Microsoft is retiring the SharePoint Add-In framework used by the legacy Brightcove SharePoint Connector (version 4.1.2.0). The legacy connector will stop working in SharePoint Online (M365) on April 2, 2026. No workaround will be available after this date.
The new Brightcove M365 Connector (v1.0.0.0) is built on the SharePoint Framework (SPFx), which is the Microsoft-recommended replacement for SharePoint Add-Ins. This section helps customers migrating from the legacy connector understand the differences.
2.1 Architecture changes
| Aspect | Legacy Connector (4.1.2.0) | Modern Connector (1.0.0.0) |
|---|---|---|
| Framework | SharePoint Add-In model | SharePoint Framework (SPFx) |
| SharePoint Online support | Stops working April 2, 2026 | Fully supported |
| SharePoint On-premises | Supported (2013, 2016, 2019) | Not supported in this release |
| Credential security | API credentials stored client-side in SharePoint | Credentials stored server-side in Azure Key Vault |
| Azure dependency | None | Requires Azure account |
| Distribution | Open-source on GitHub | Distributed directly by Brightcove as compiled packages |
| Source code | Available (Apache 2.0 license) | Not distributed |
2.2 Feature comparison
| Feature | Legacy | Modern (v1.1.0.0) |
|---|---|---|
| Embedding | ||
| Embed single video | ✅ | ✅ |
| Embed playlist | ✅ | ✅ |
| Embed In-Page Experience (IPX) | ✅ | ✅ |
| Player playback options (autoplay, mute) | ❌ | ✅ |
| Player controls (seek, fullscreen, PiP, control bar size) | ❌ | ✅ |
| Player sizing (responsive/fixed, aspect ratio) | ❌ | ✅ |
| Classic SharePoint UI support | ✅ | ❌ Modern pages only |
| Video Management | ||
| Upload videos | ✅ | ✅ |
| Upload via URL | ❌ | ✅ |
| Auto-generate captions (Autocaption) | ❌ | ✅ |
| Edit video details (name, description, tags, folder, status) | ✅ | ✅ |
| Edit video custom fields | ✅ | 🔜 Planned for future release |
| Edit video poster and thumbnail images | ✅ | 🔜 Planned for future release |
| Add/manage text tracks (captions, subtitles) | ✅ | ⚠️ Replaced by Autocaption |
| Delete videos from SharePoint | ❌ | ❌ (use Video Cloud Studio) |
| Playlist & Experience Management | ||
| Create and manage playlists (manual and smart) | ✅ | ✅ |
| Manage experiences from SharePoint | ✅ (view only) | 🔜 Planned for future release |
| Administration | ||
| Multiple Brightcove accounts | ✅ | ✅ |
| SharePoint group-based access control (Authors/Viewers) | ✅ | ❌ (uses SharePoint site permissions) |
| Cross-tenant support (Azure ≠ SP tenant) | N/A | ✅ |
| Connection test and diagnostics | ❌ | ✅ |
| M365 App Support | ||
| Teams | ✅ | 🔜 Planned for future release |
| Viva | ❌ | 🔜 Planned for future release |
2.3 What SharePoint Online customers need to do
- Migrate to the new SPFx-based connector before April 2, 2026.
- Contact your Brightcove Account Manager to receive the new version.
- Follow the Installation Guide to deploy the connector.
- Add the new Brightcove web parts to your pages and configure them with your content. While existing Brightcove content that was previously embedded via the legacy Add-In may continue to render on pages independently of the Add-In framework, Microsoft has not provided clear guidance on whether all previously placed content will remain unaffected after the retirement date. Customers should consult with their Microsoft representative or review Microsoft's SharePoint Add-In retirement documentation to understand the full impact on their environment. Brightcove cannot guarantee the continued rendering of content placed by the legacy connector after April 2, 2026.
2.4 SharePoint On-premises customers
Customers running SharePoint Server (on-premises or self-hosted) are not immediately impacted by the Add-In retirement. Existing legacy connector versions may continue to function on on-premises environments. However, Brightcove recommends planning for migration as support for the legacy connector will eventually end.
3. Connector Settings (Admin)
The Connector Settings page is where site admins configure the connection to the Proxy API and manage Brightcove account credentials. This page is provisioned automatically when the app is added to a site and is located at Site Pages → BrightcoveConnectorSettings.aspx.
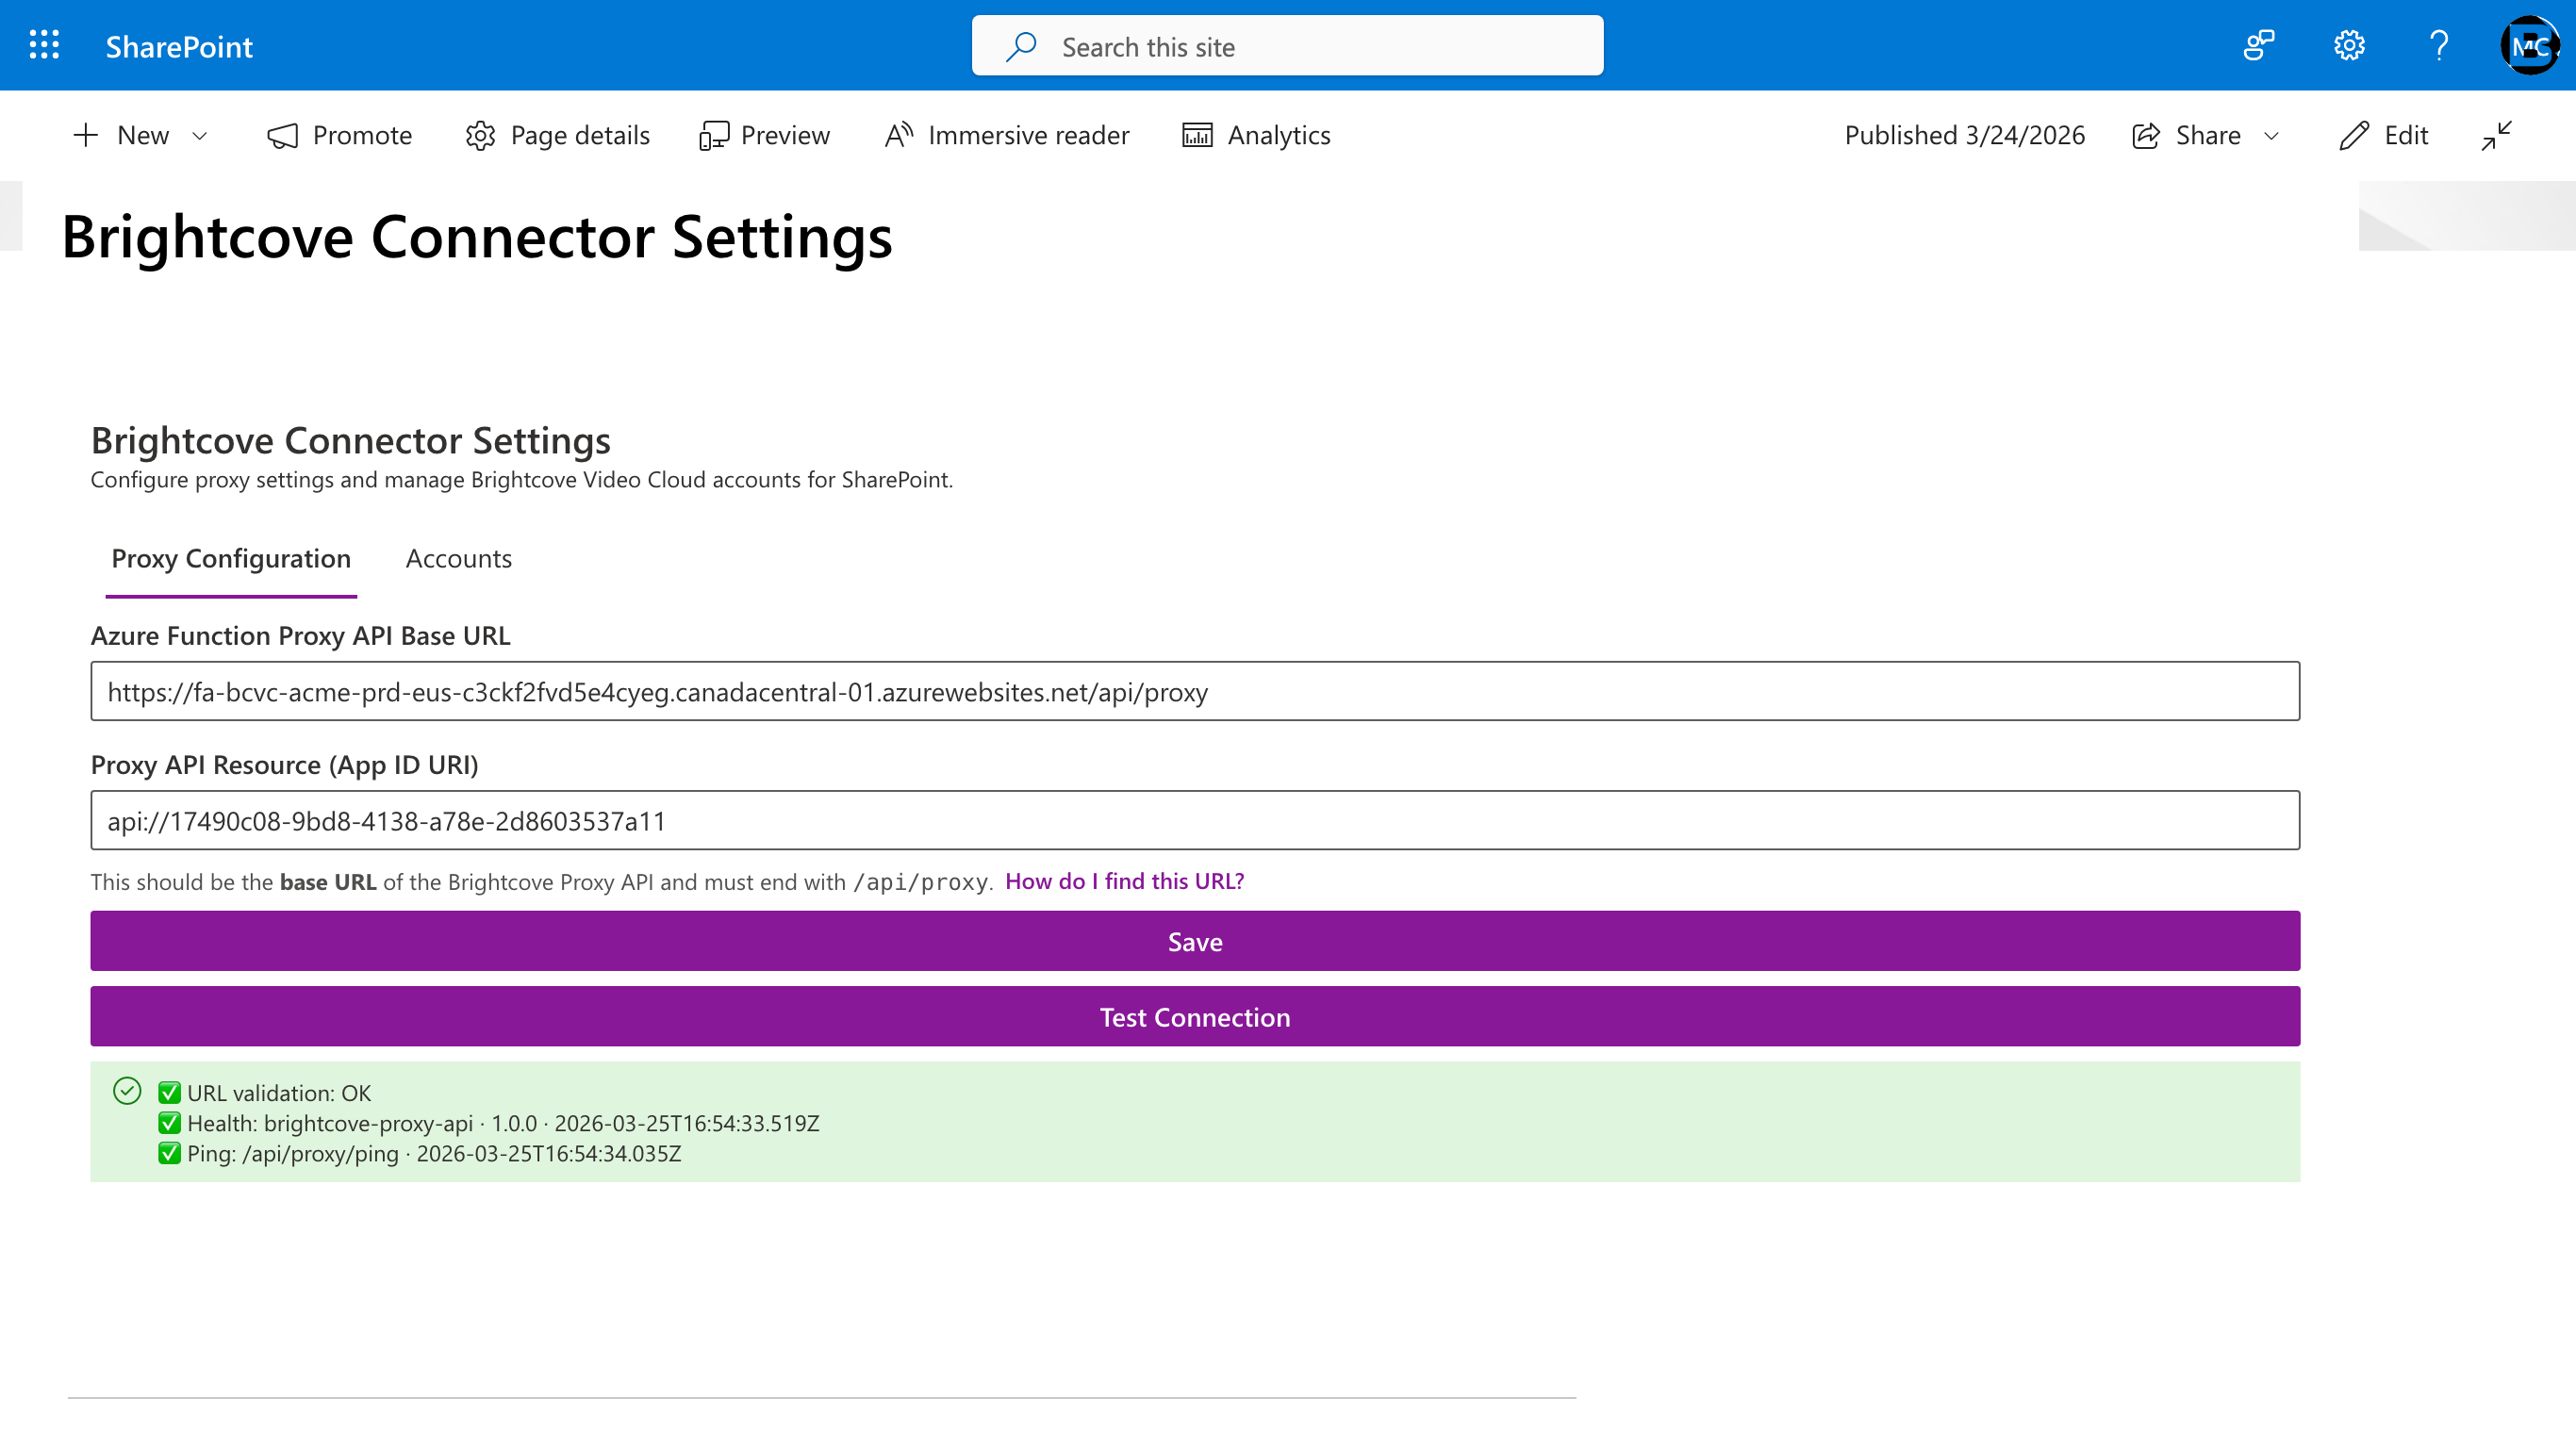
3.1 Proxy Configuration tab
This tab configures the connection between SharePoint and the Azure-hosted Proxy API.
Fields:
| Field | Description | Example |
|---|---|---|
| Proxy API Base URL | The full URL to the proxy endpoint on your Azure Function App. | https://fa-bcvc-acme-prd-eus.azurewebsites.net/api/proxy |
| Proxy API Resource | The Application ID URI from the Azure App Registration's "Expose an API" setting. | api://4f382046-2164-45ef-b217-7ed4a8b261dd |
After entering values, click Save and then Test Connection to verify.
Test Connection performs two checks:
- Health check — Confirms the Function App is reachable by calling the public
/api/healthendpoint. - Authenticated ping — Acquires an OAuth token from Microsoft Entra ID and calls the protected
/api/proxy/pingendpoint to verify end-to-end authentication.
If both checks pass, you'll see a success status with the proxy version and timestamp.
If either check fails, use the Copy Support Bundle button to capture diagnostic details (proxy URL, HTTP status codes, error messages, browser user-agent) for sharing with your Azure admin or Brightcove support.
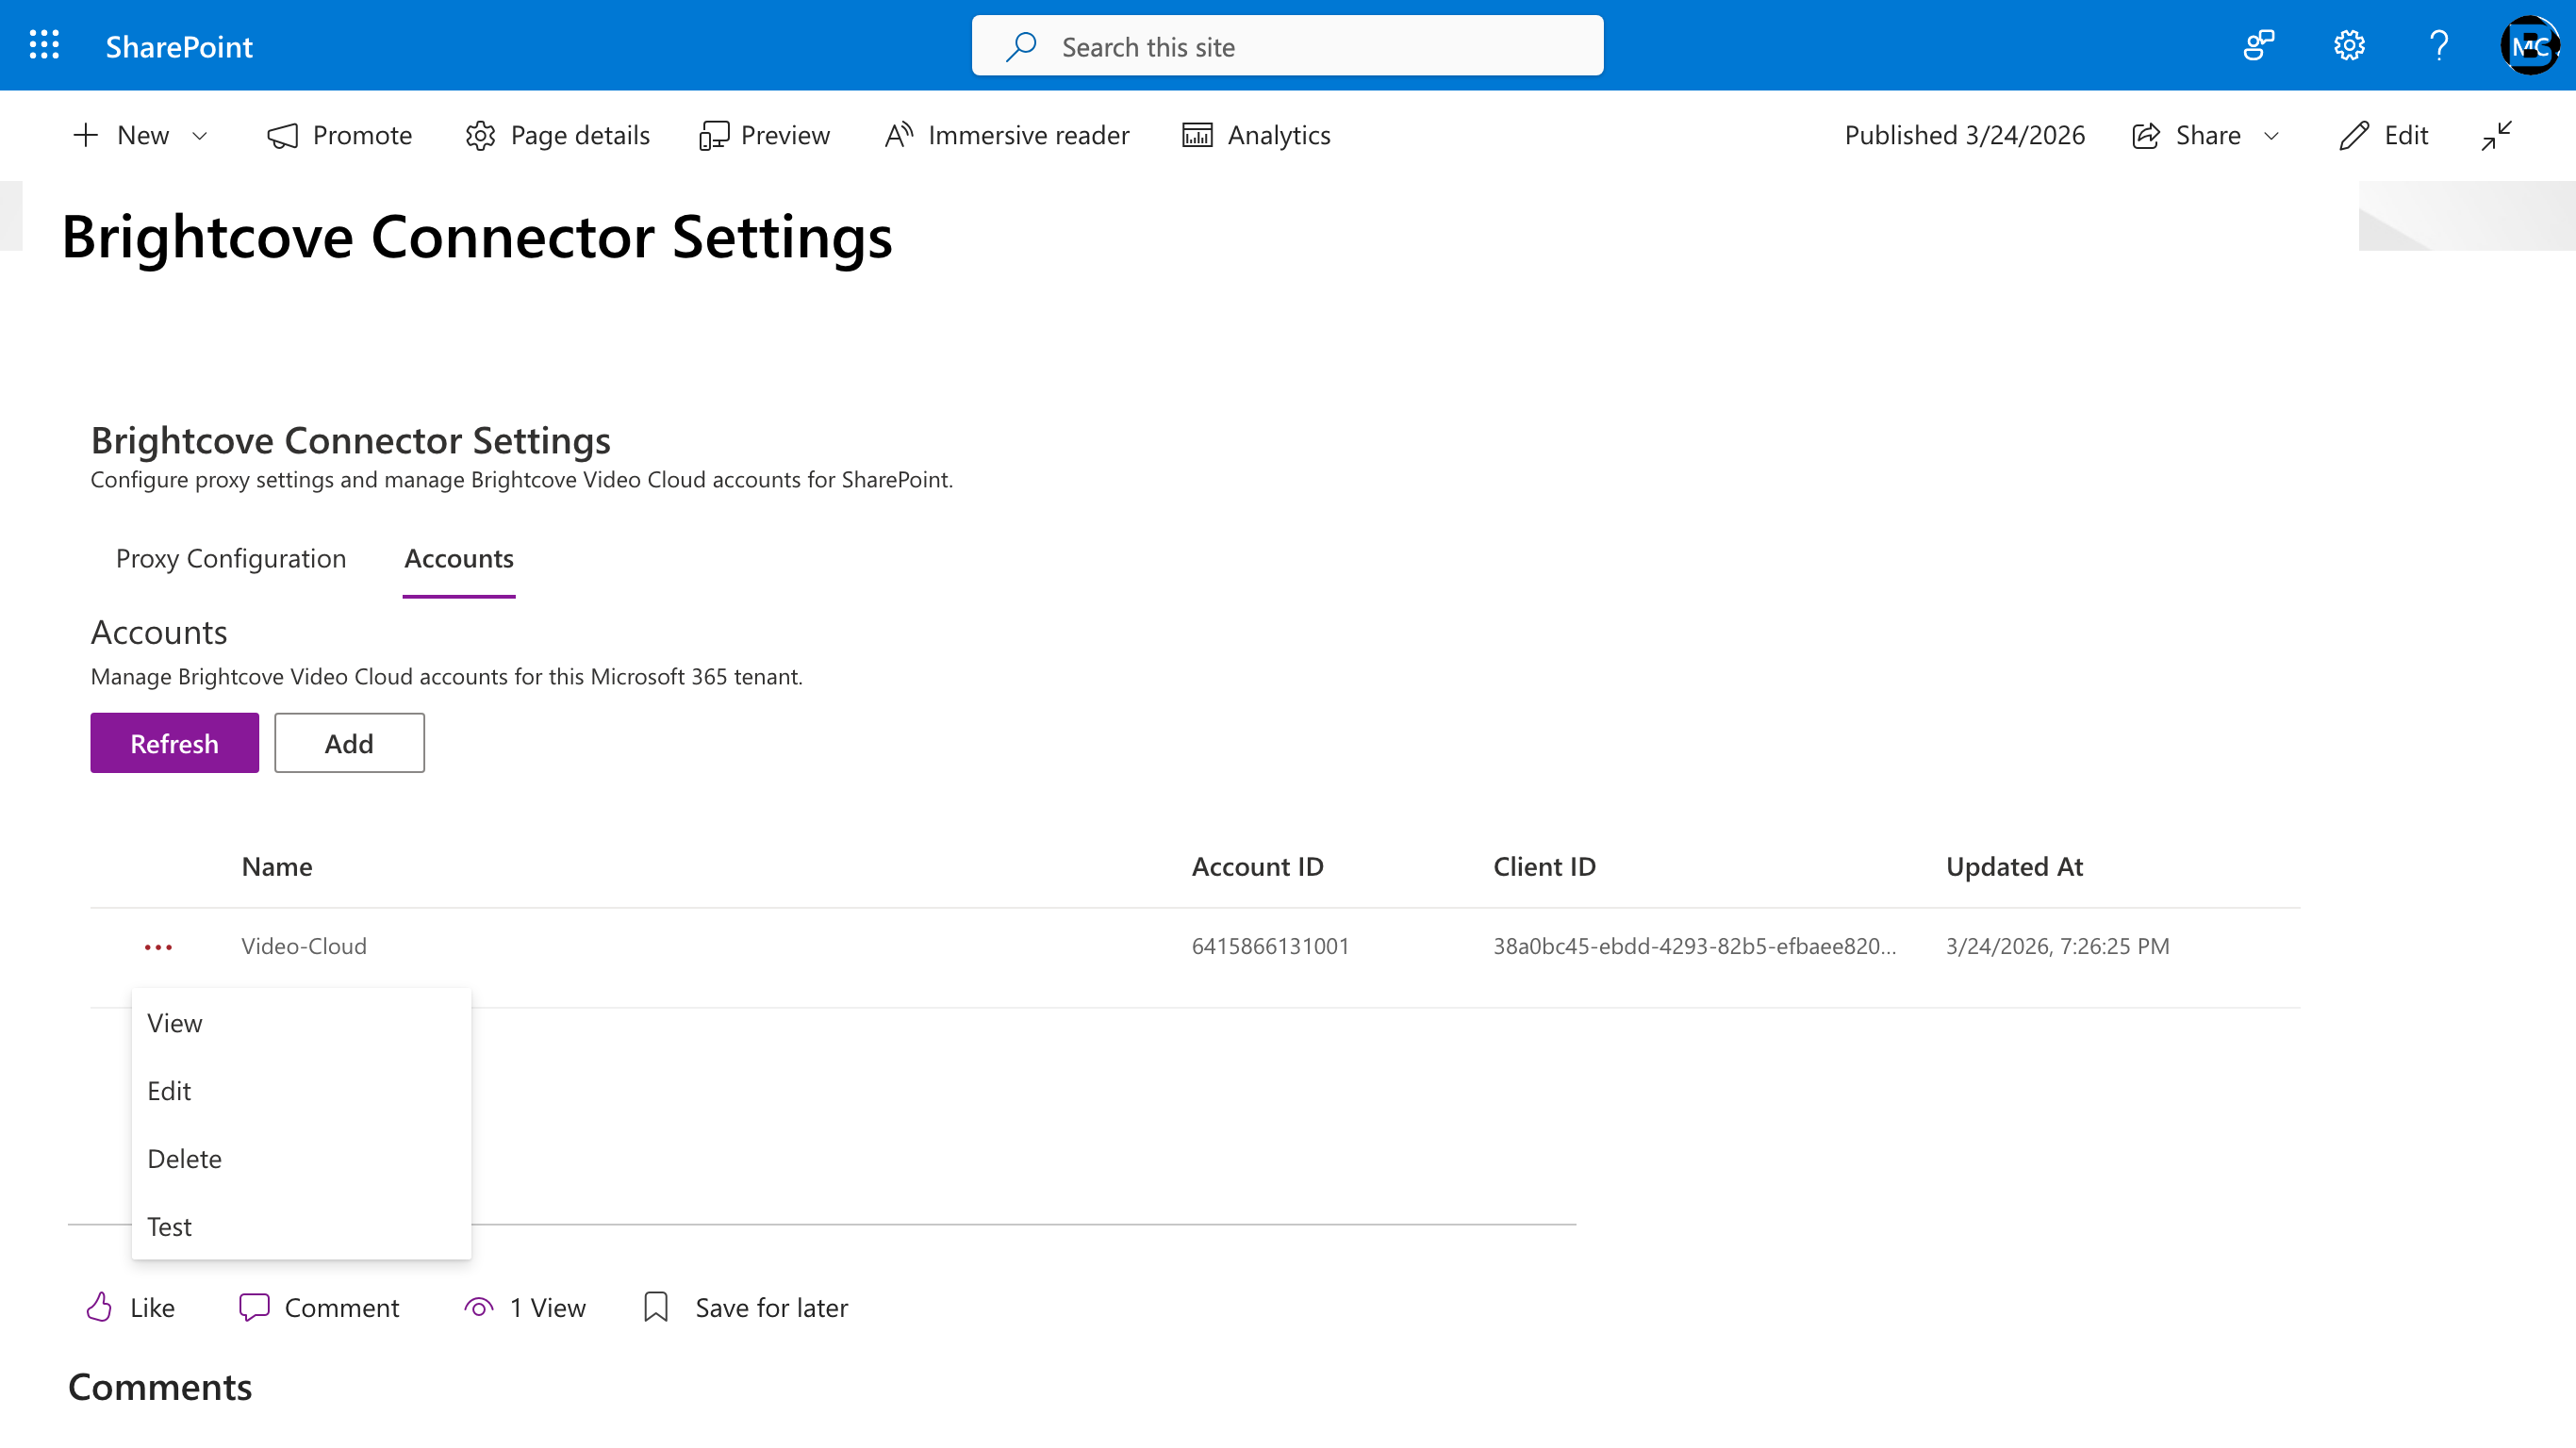
3.2 Accounts tab
This tab manages the Brightcove Video Cloud accounts that are available to authors on this site.
Adding an account:
- Click Add.
- Fill in the fields:
- Name — A friendly label (alphanumeric and hyphens only, 4–64 characters, must start and end with a letter or number).
- Account ID — Your numeric Brightcove Account ID.
- Client ID — The Brightcove API Client ID.
- Client Secret — The Brightcove API Client Secret.
- Click Test and Save to validate the credentials with Brightcove and save the account.
Editing an account:
Click the edit icon on an existing account row. You can update the name, account ID, or client ID/secret. The client secret field shows as empty when editing — leave it blank to keep the existing secret, or enter a new value to update it.
Deleting an account:
Click the delete icon and confirm. This removes the account credentials from the Azure Key Vault. Any web parts on pages that reference this account will show an error until reconfigured.
Testing an account:
Click the Test button on an existing account to verify the stored credentials can still authenticate with Brightcove. This is useful for diagnosing issues when API credentials have been rotated in Video Cloud Studio.
4. Content Management
The Content Management page allows you to upload videos, manage playlists, and edit content metadata directly from SharePoint without needing to switch to Brightcove Video Cloud Studio. The page is organized into two tabs: Upload for ingesting new videos and editing their details, and Playlists for creating and managing playlists.
Where: Site → Site Pages → BrightcoveContentManagement.aspx
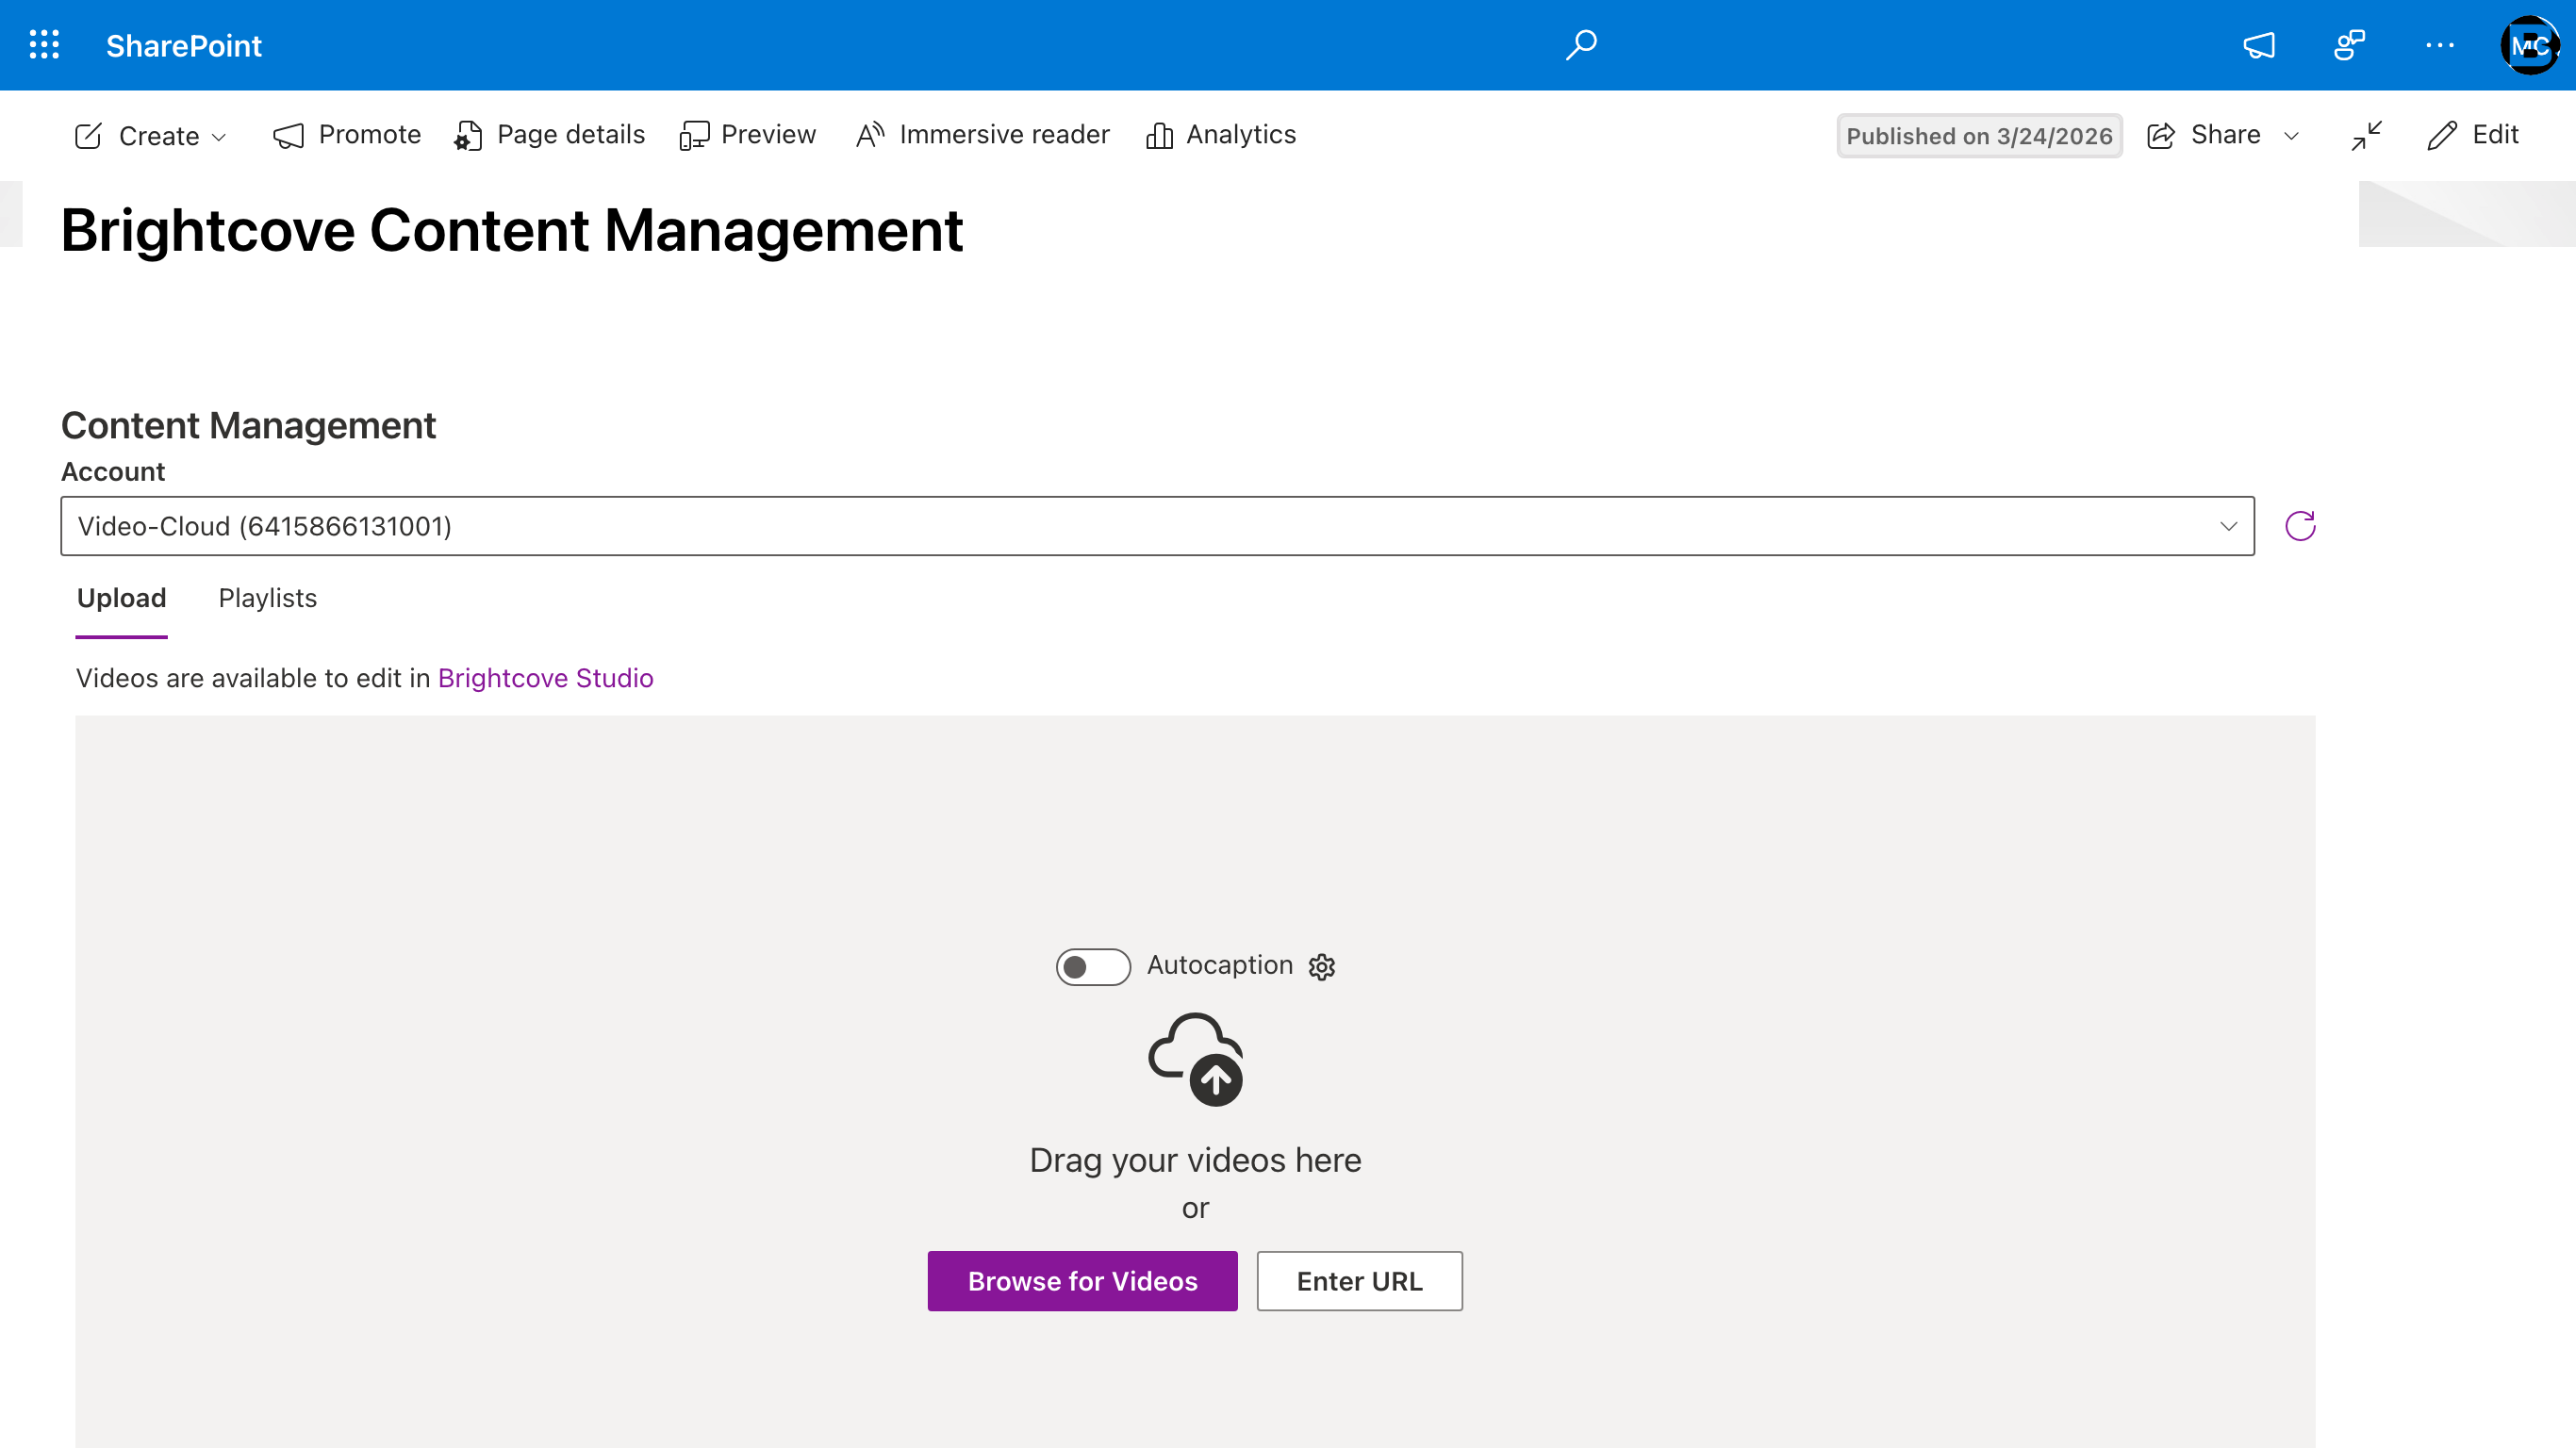
4.1 Selecting an account
At the top of the page, select the Brightcove account you want to work with from the Account dropdown. The dropdown shows all accounts configured in Connector Settings. After selecting an account, the page will load the video library for that account.
4.2 Uploading videos
- Select the target Brightcove account from the dropdown.
- Click Upload.
- You'll see an upload area with three options:
- Drag and drop one or more video files directly onto the upload area.
- Click Browse for Videos to select files from your computer.
- Click Enter URL to provide a URL to a hosted video file.

- Optionally, toggle Autocaption on before uploading to have Brightcove automatically generate captions for the uploaded video. Click the settings icon next to the toggle to configure the caption language (defaults to Auto-detect), add an optional label, and enable a custom dictionary for improved accuracy with specialized terminology. For more details on auto captioning, see Generating Captions for Videos in the Brightcove documentation.
- Upload begins immediately once files are added. Each video will appear as a processing card showing the filename, a progress bar, the assigned Video ID, and the source file name. The status message will indicate that the video is being ingested and renditions are being created.
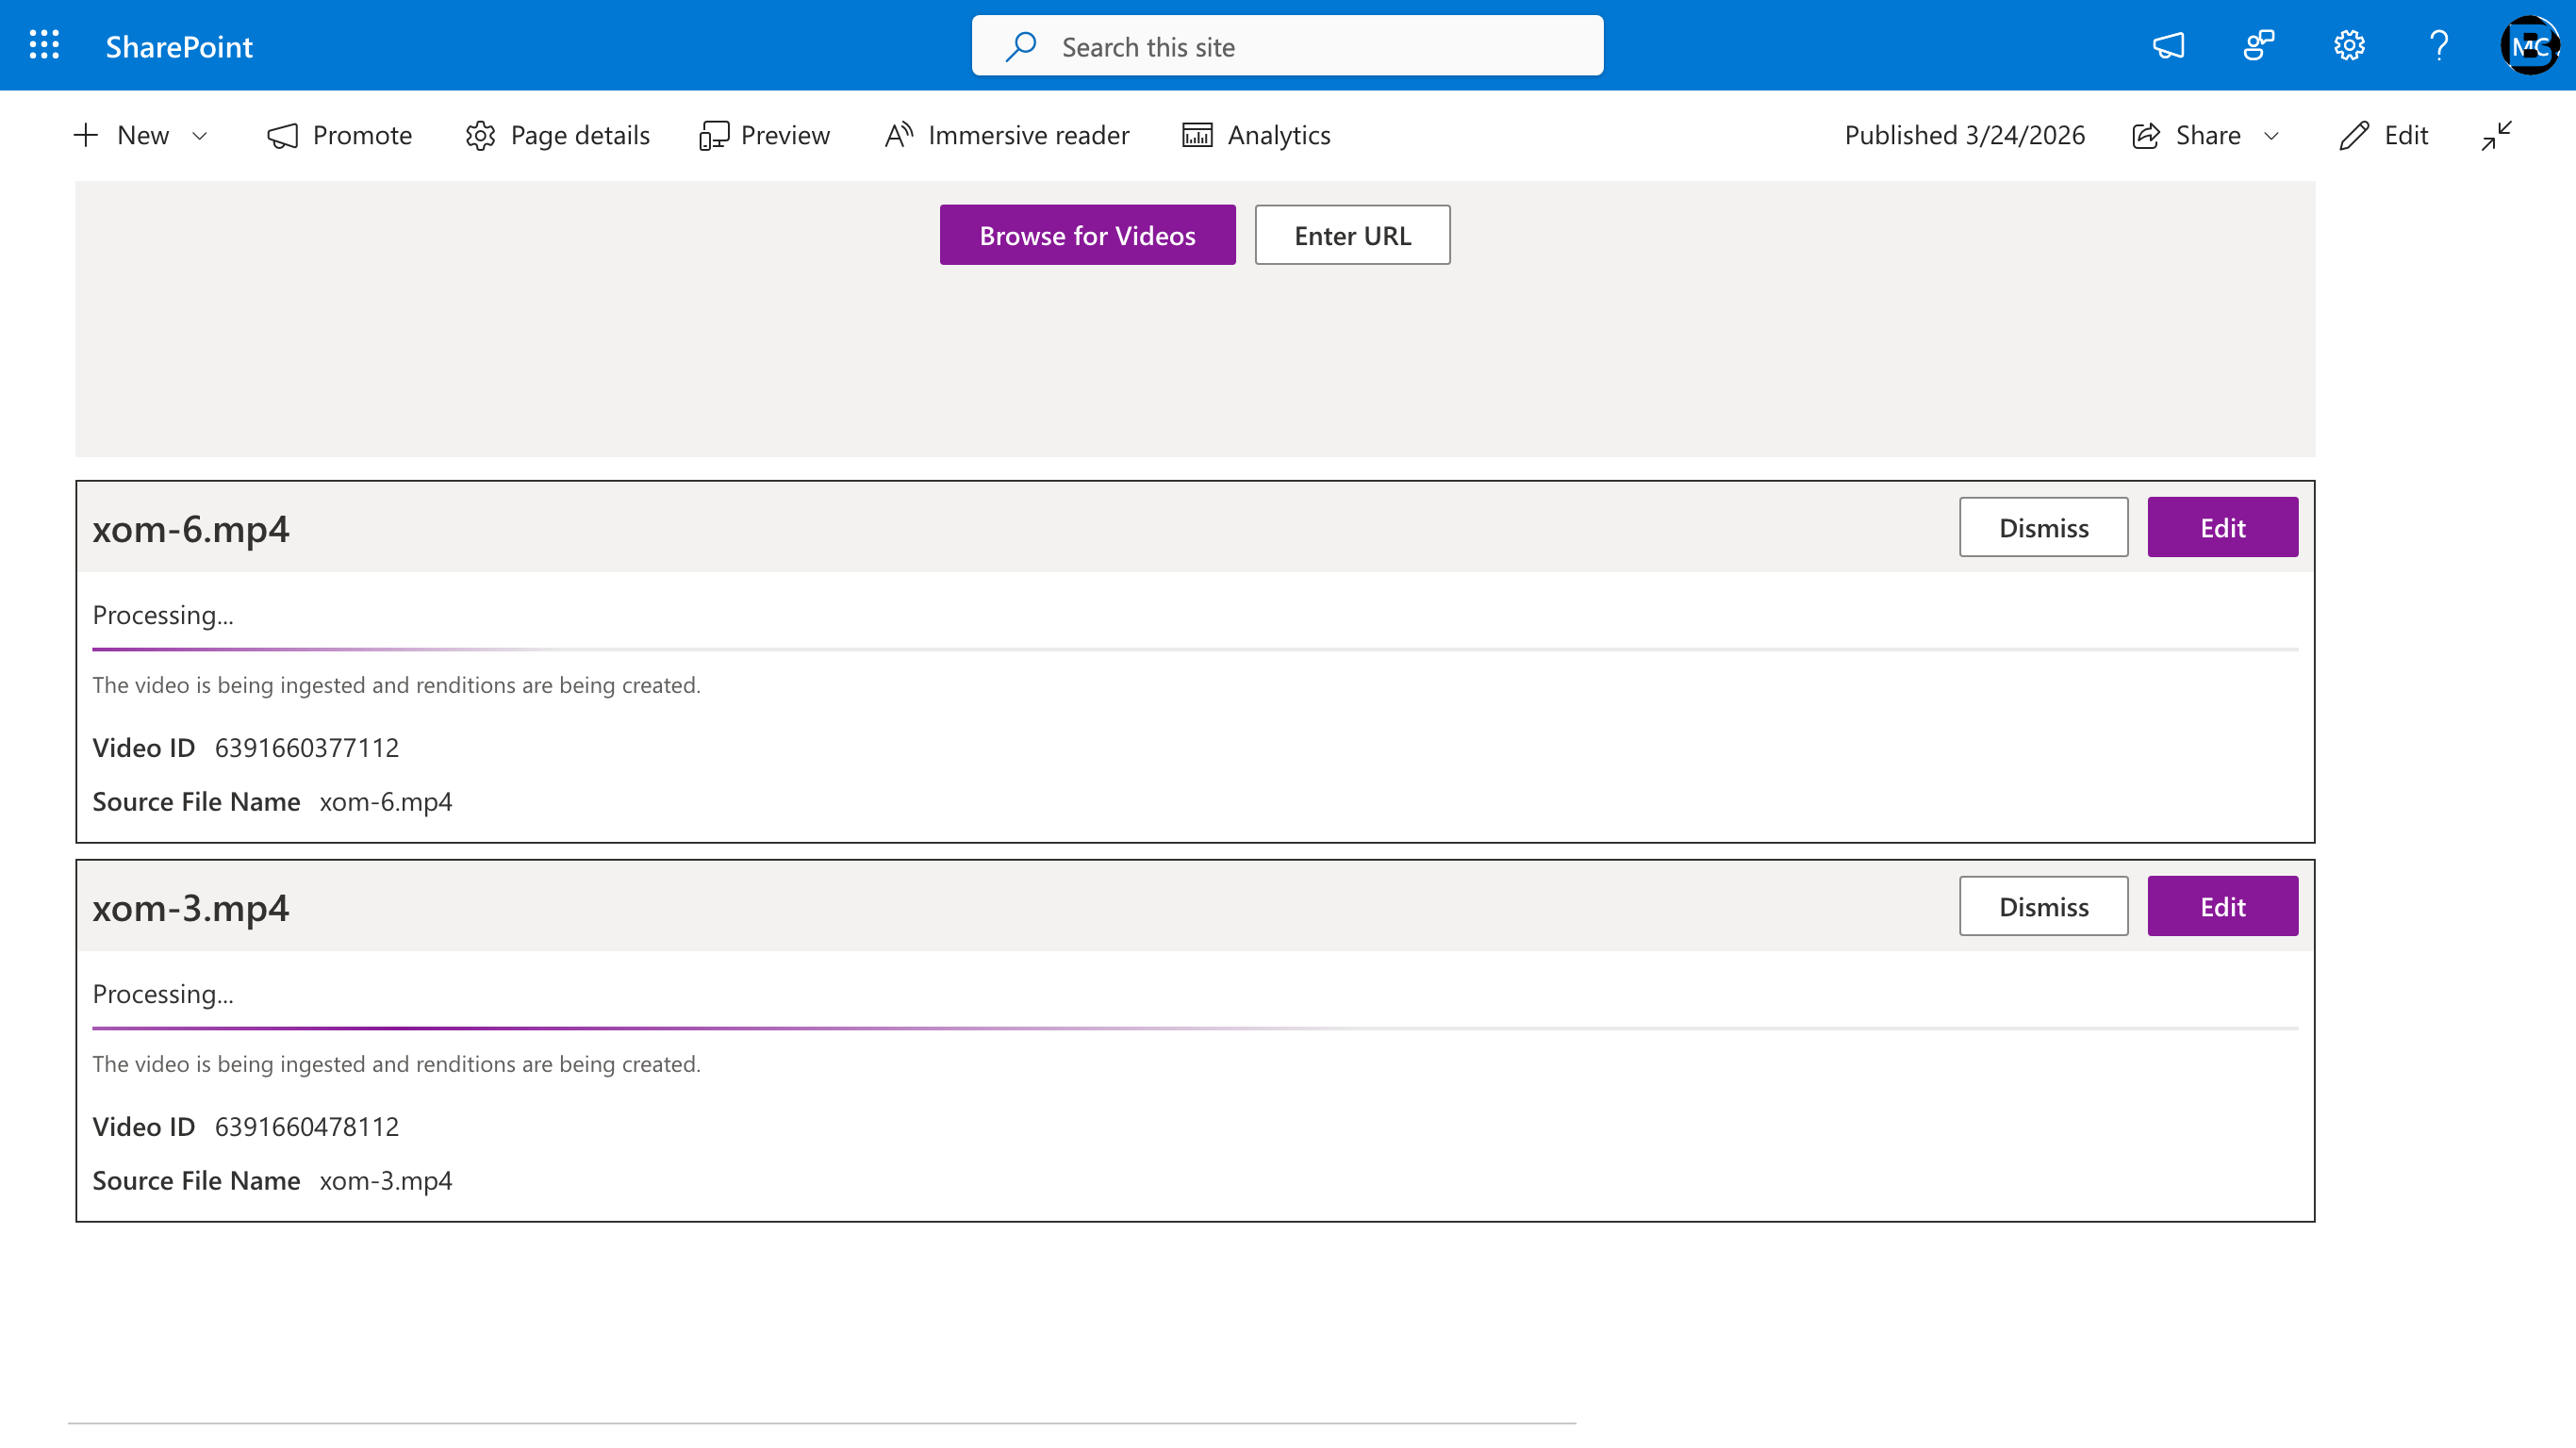
- While a video is processing, click the Edit button on its card to set the video details:
- Name (defaults to the filename)
- Short Description (optional)
- Tags (optional)
- Reference ID (optional)
- Folder (optional — select from existing Video Cloud folders)
- Status (Active / Inactive)
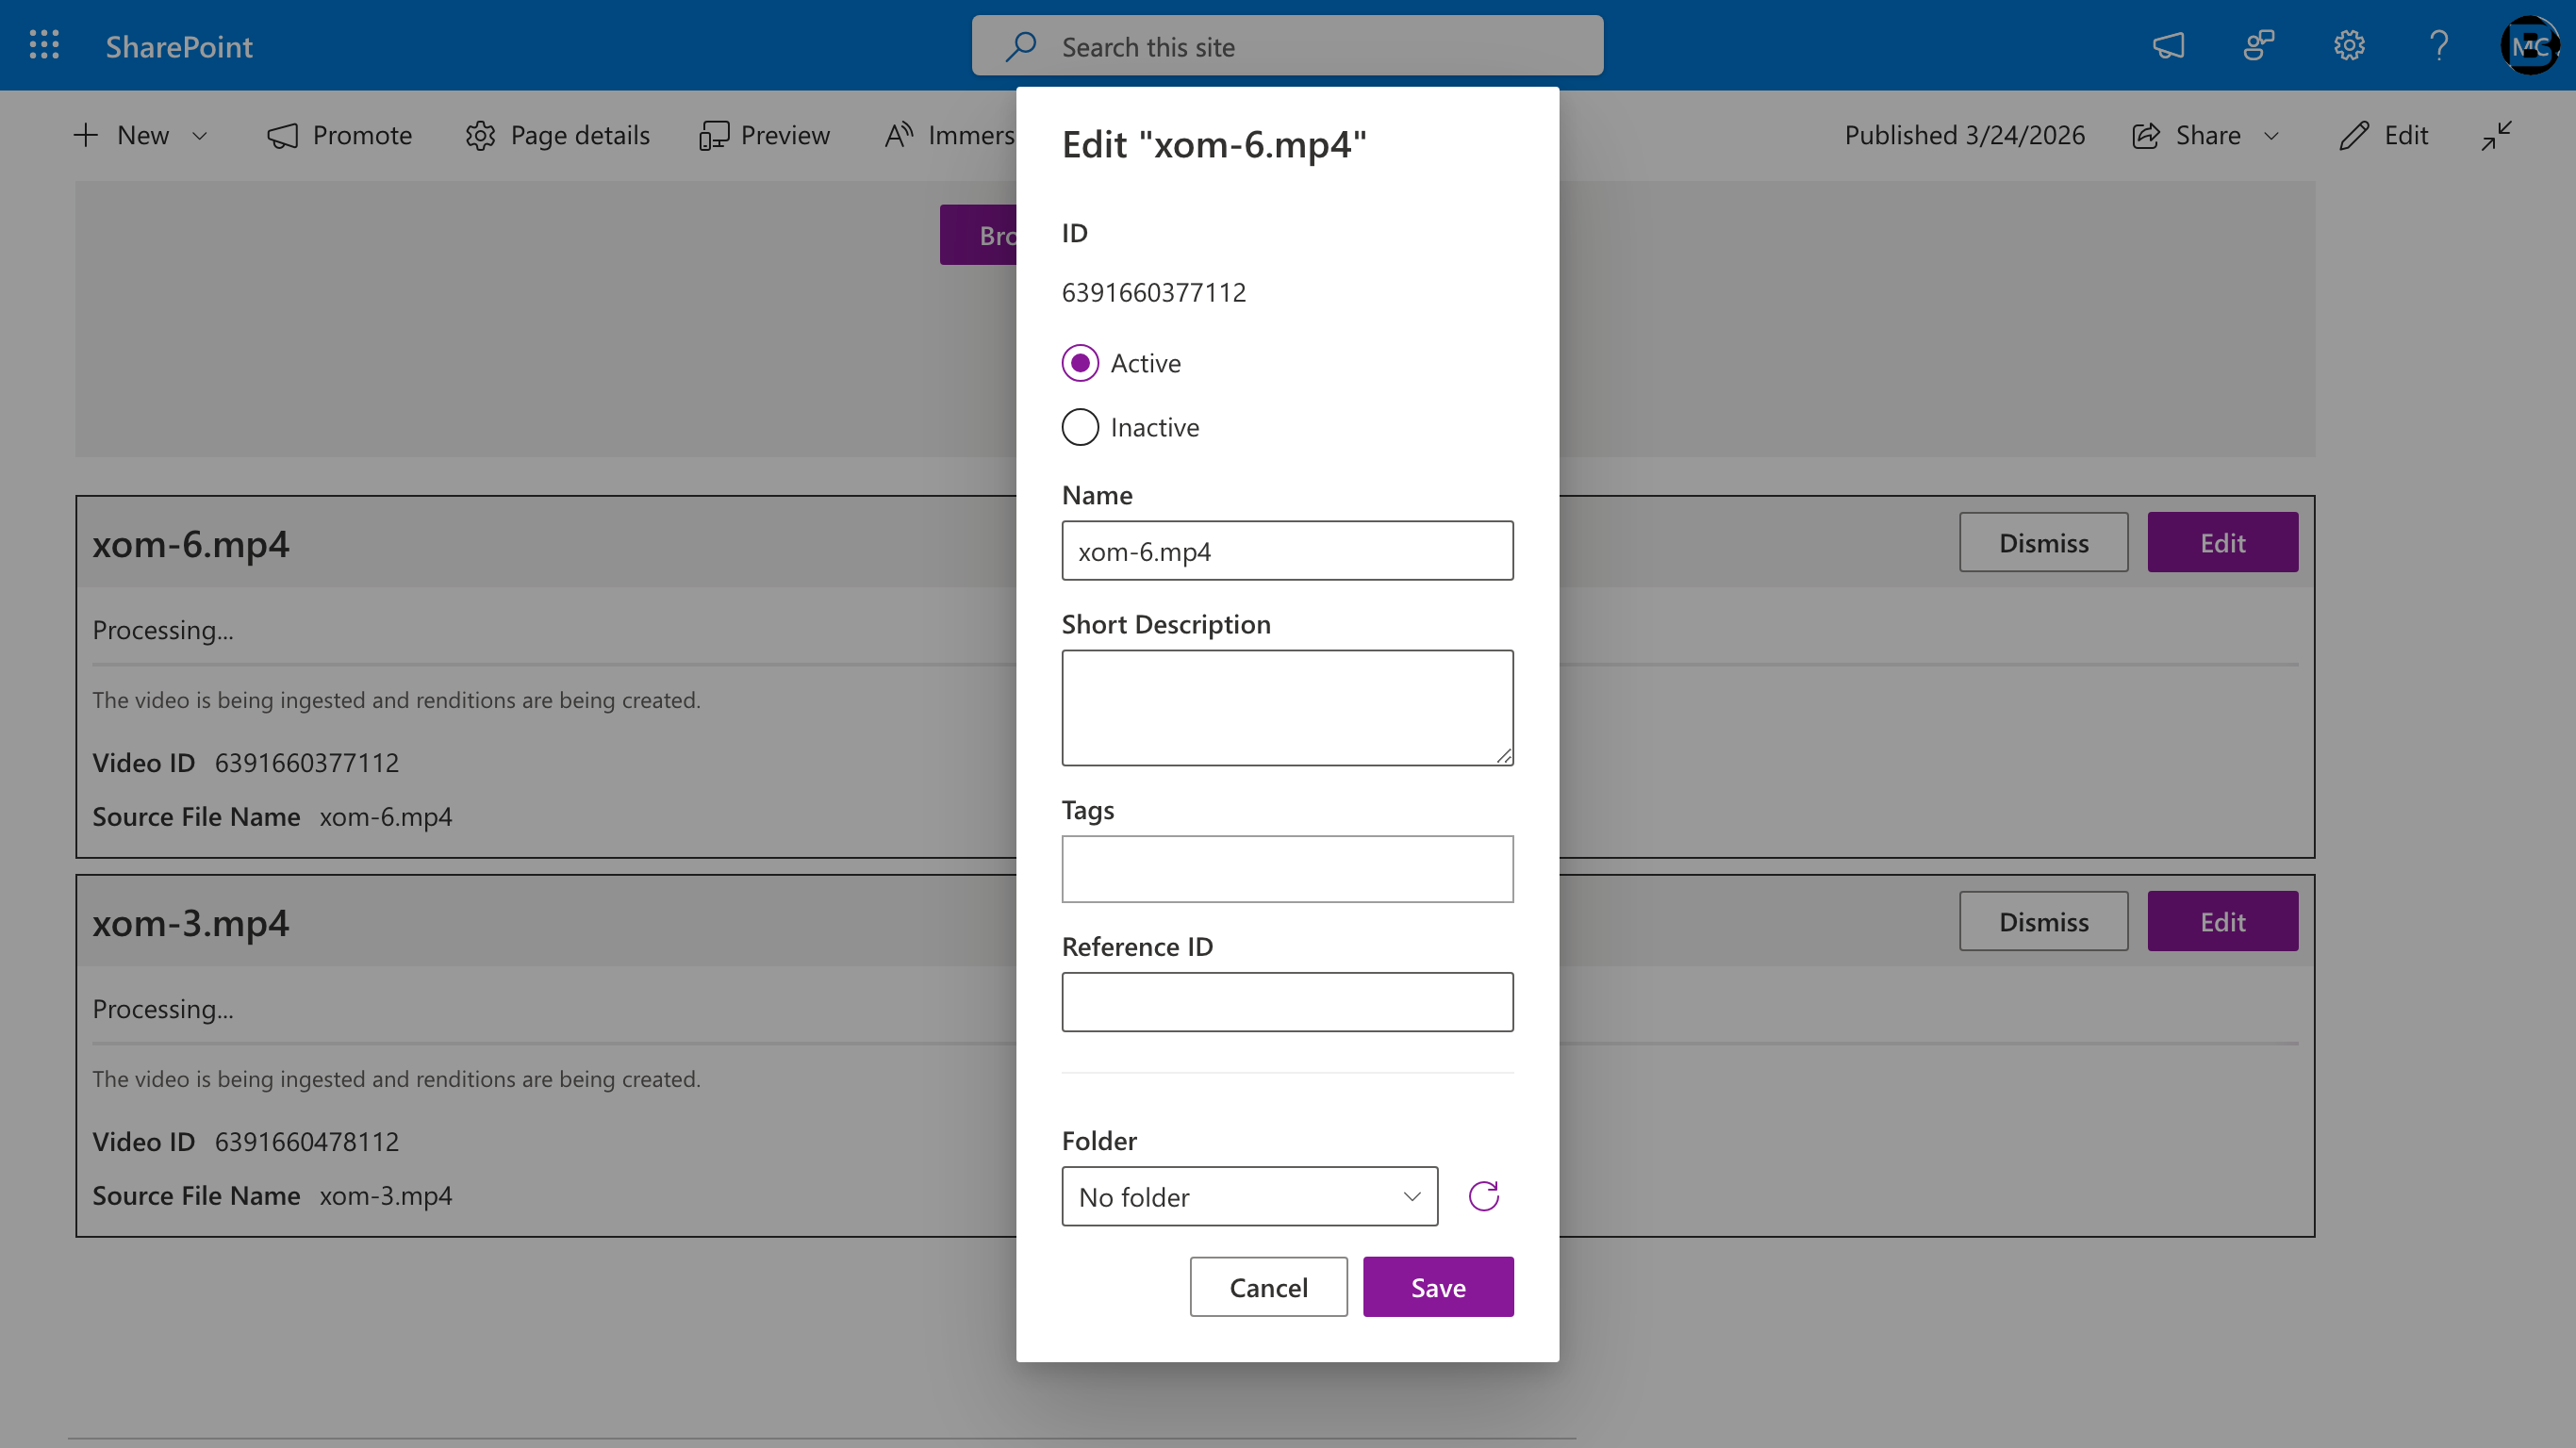
- Click Save in the edit dialog to apply your changes, or Cancel to close without saving. You can also click Dismiss on a processing card to remove it from the list (this does not cancel the upload).
4.3 Managing playlists
The Playlists tab provides full create, edit, and delete capabilities for both manual and smart Brightcove playlists. Changes sync to Video Cloud immediately and are reflected in the Brightcove Playlist web part wherever it's embedded.
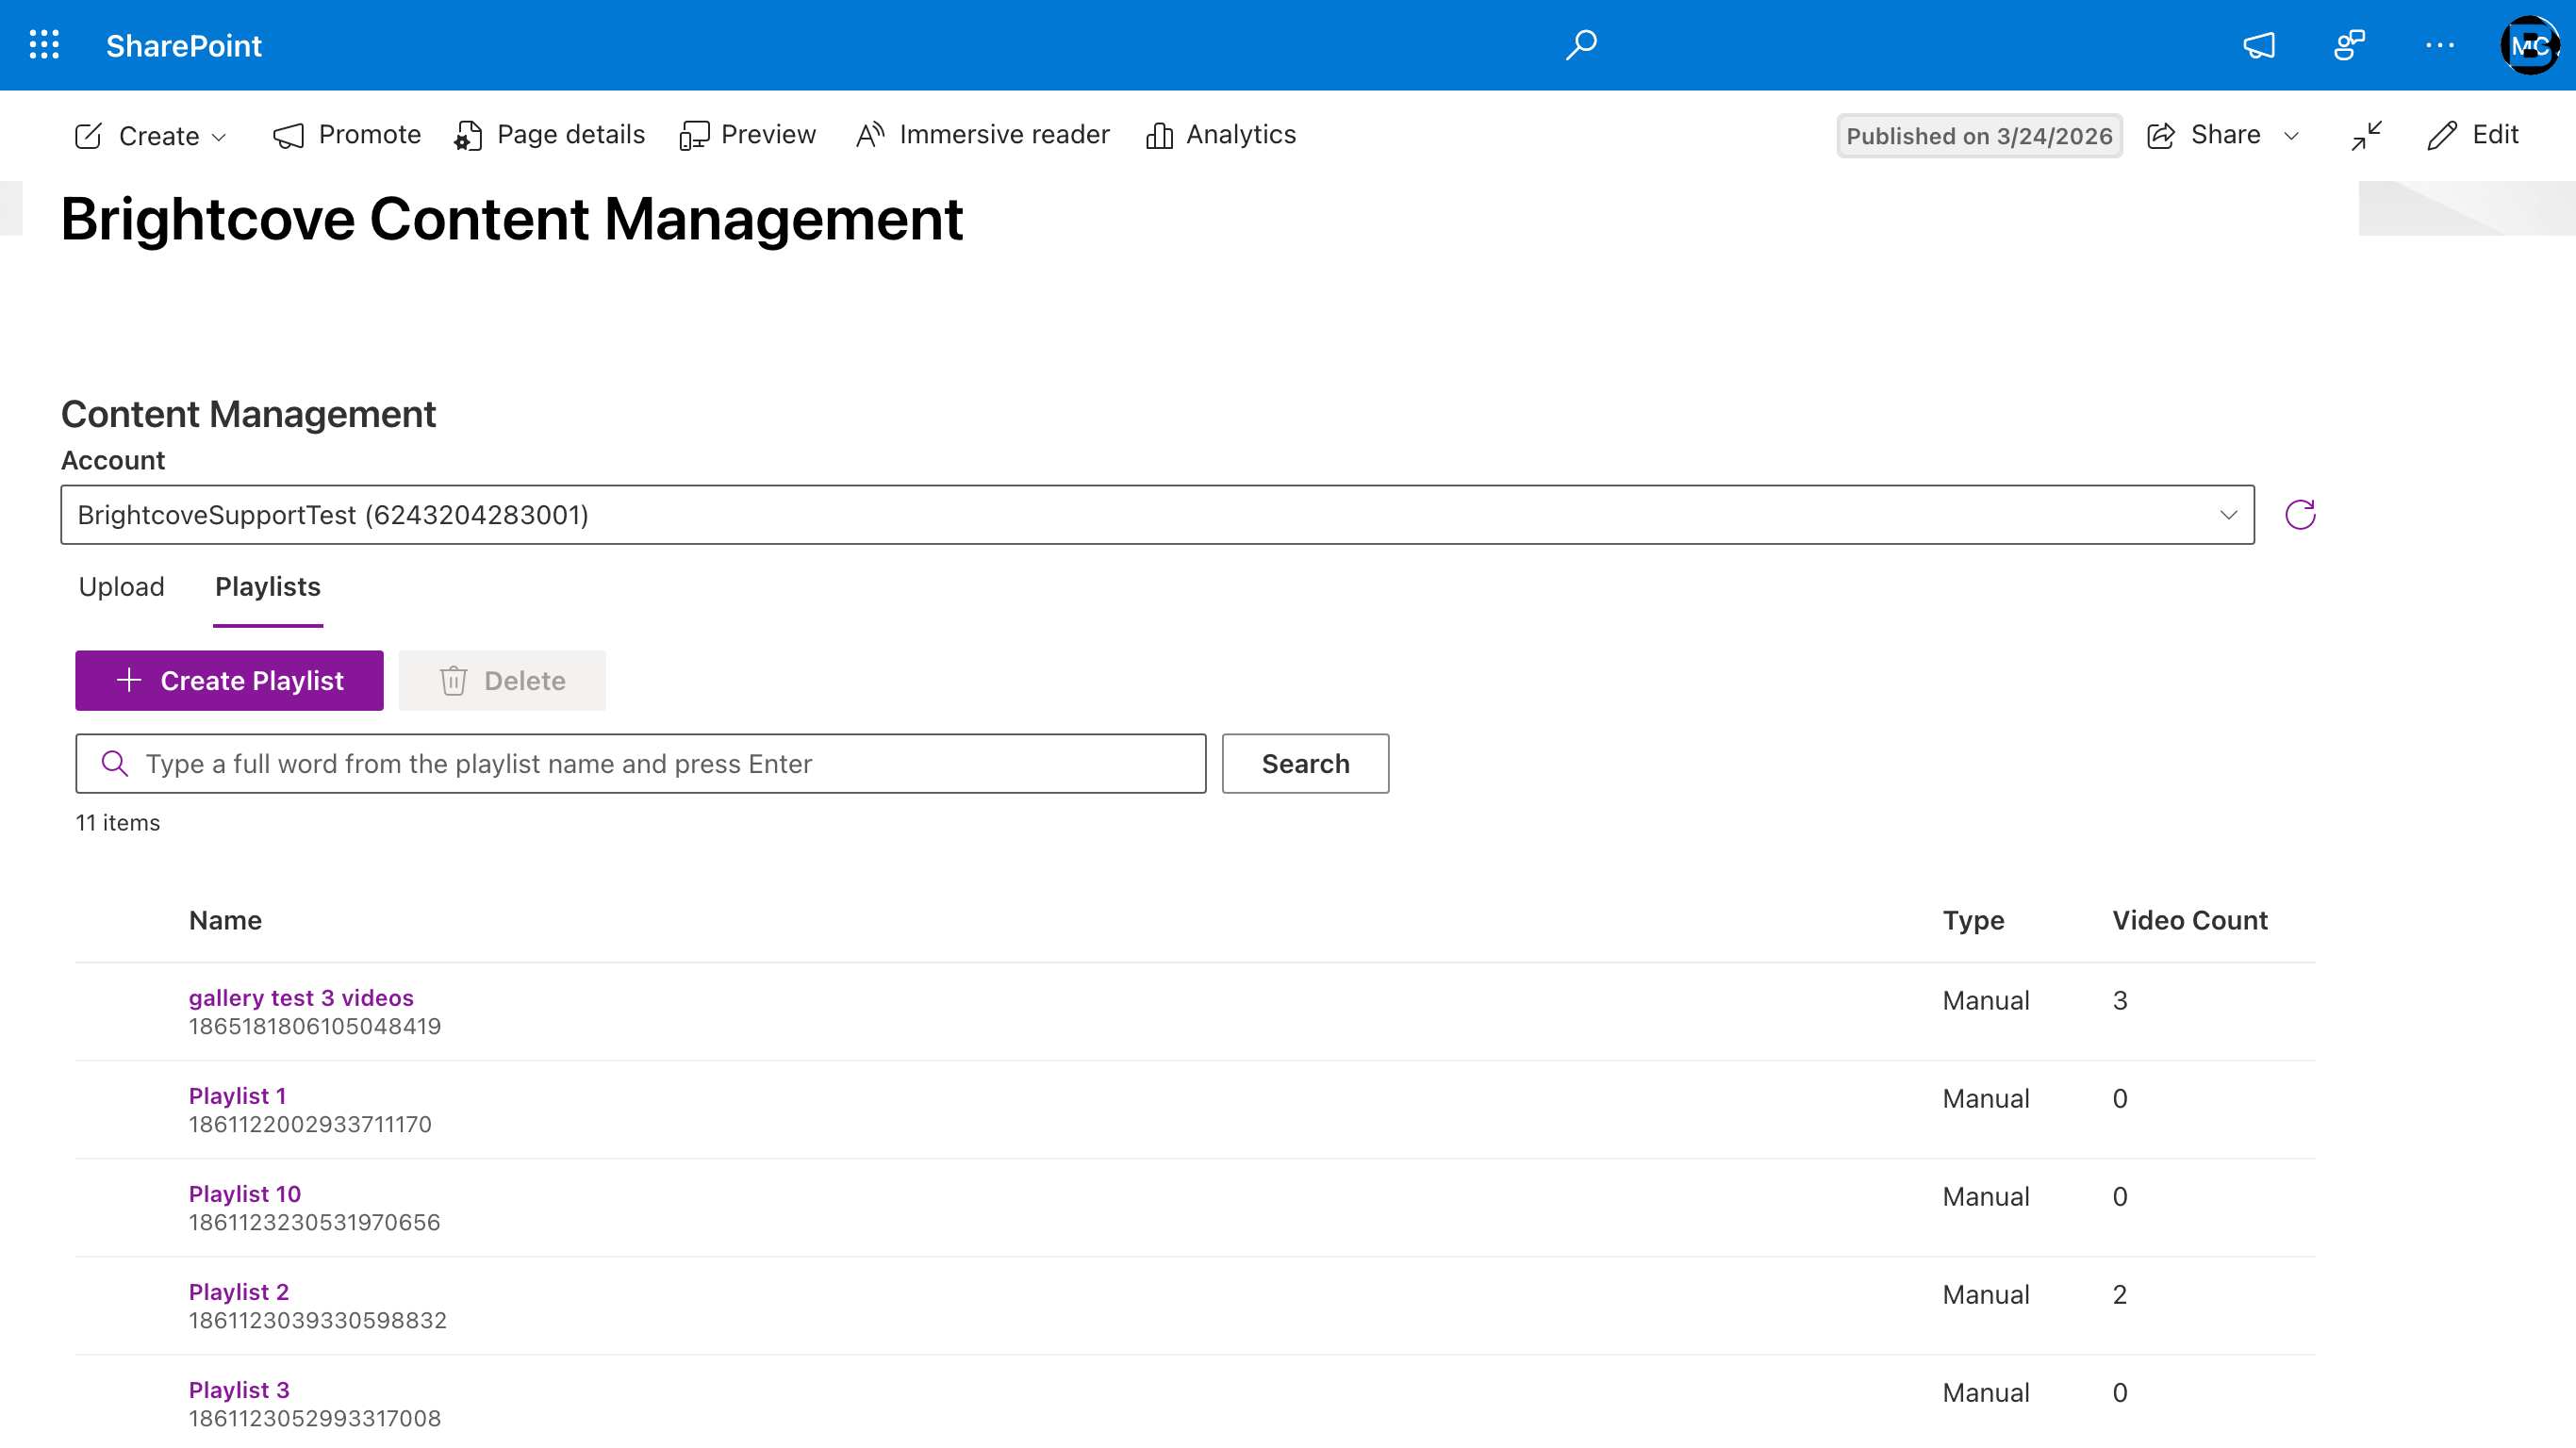
The playlist list shows existing playlists for the selected Brightcove account with three columns:
- Name — The playlist name. Click to open the playlist's settings dialog.
- Type — Manual or Smart.
- Video Count — Number of videos in the playlist. Manual playlists show a number; smart playlists display
---because their video count is dynamic.
The list defaults to sorting by name ascending. Use the search box to filter by name — type a full word from the playlist name and press Enter.
4.3.1 Creating a playlist
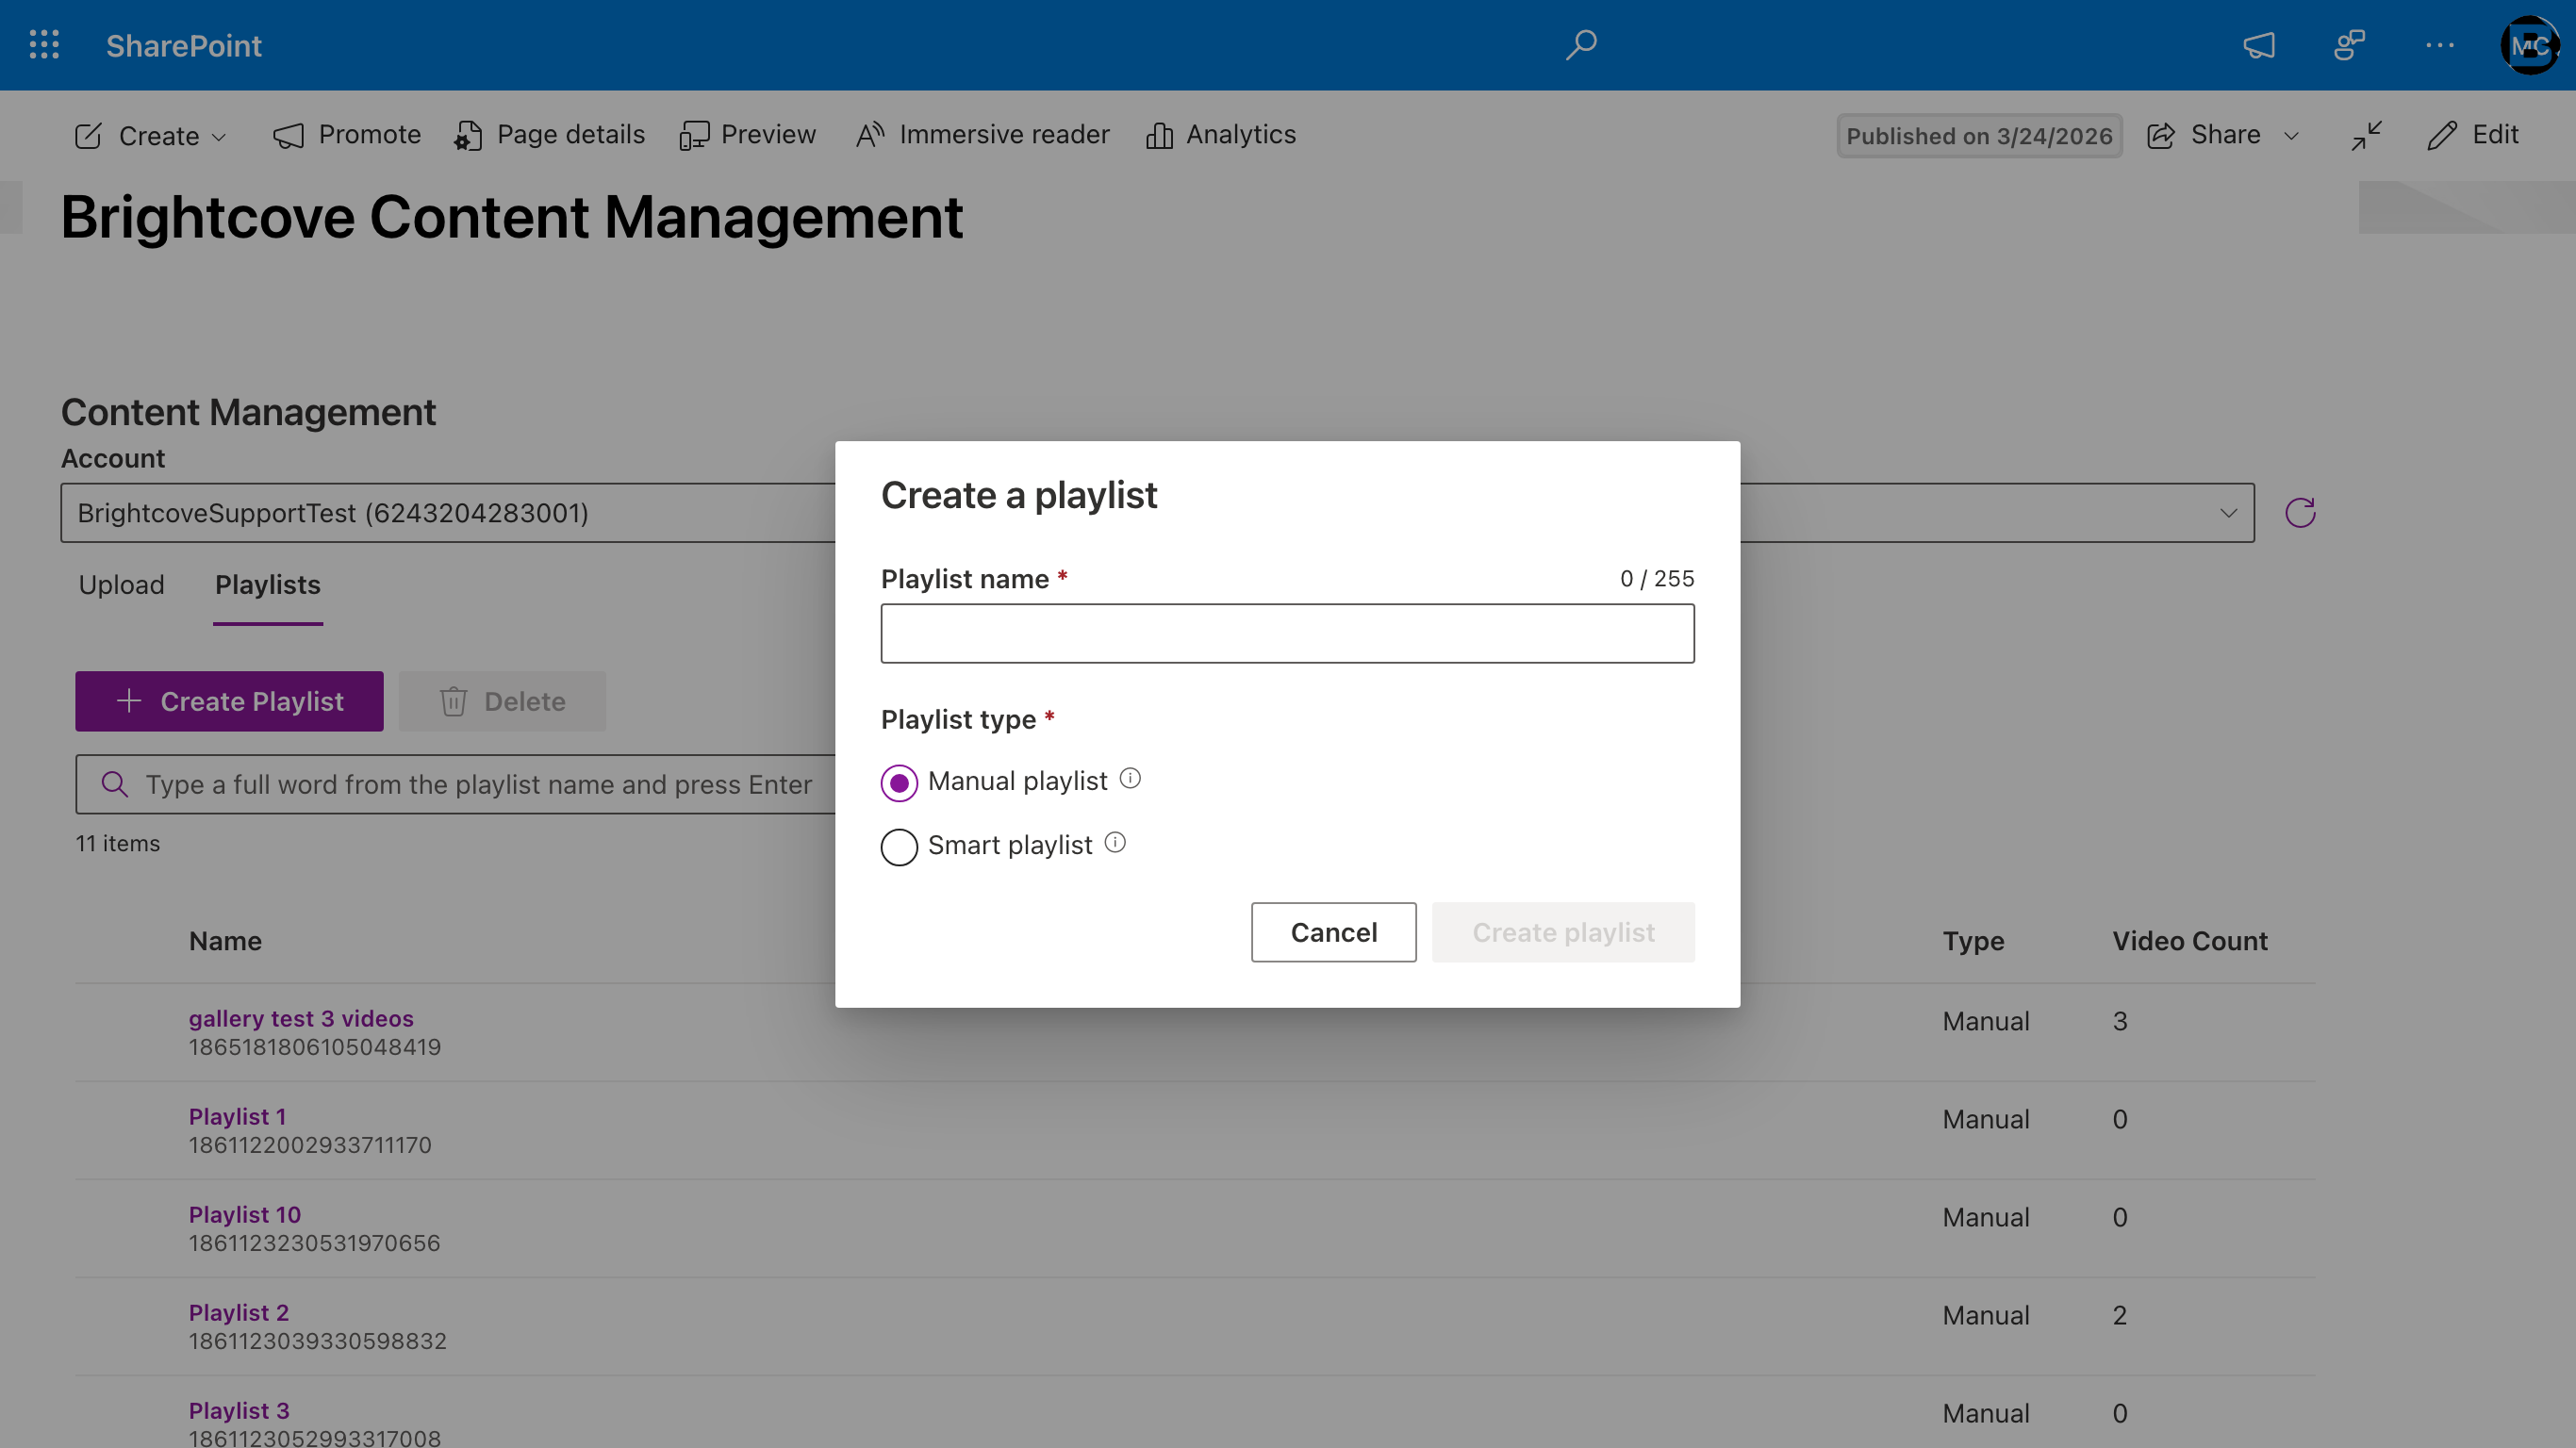
- Click Create Playlist.
- In the dialog, enter a Playlist name (up to 255 characters) and choose a Playlist type:
- Manual playlist — You explicitly select which videos appear in the playlist and control their order.
- Smart playlist — Videos are matched dynamically based on parameters you define (tags, name, date, etc.).
- Click Create playlist to save and open the new playlist's settings dialog for further configuration.
4.3.2 Editing a manual playlist
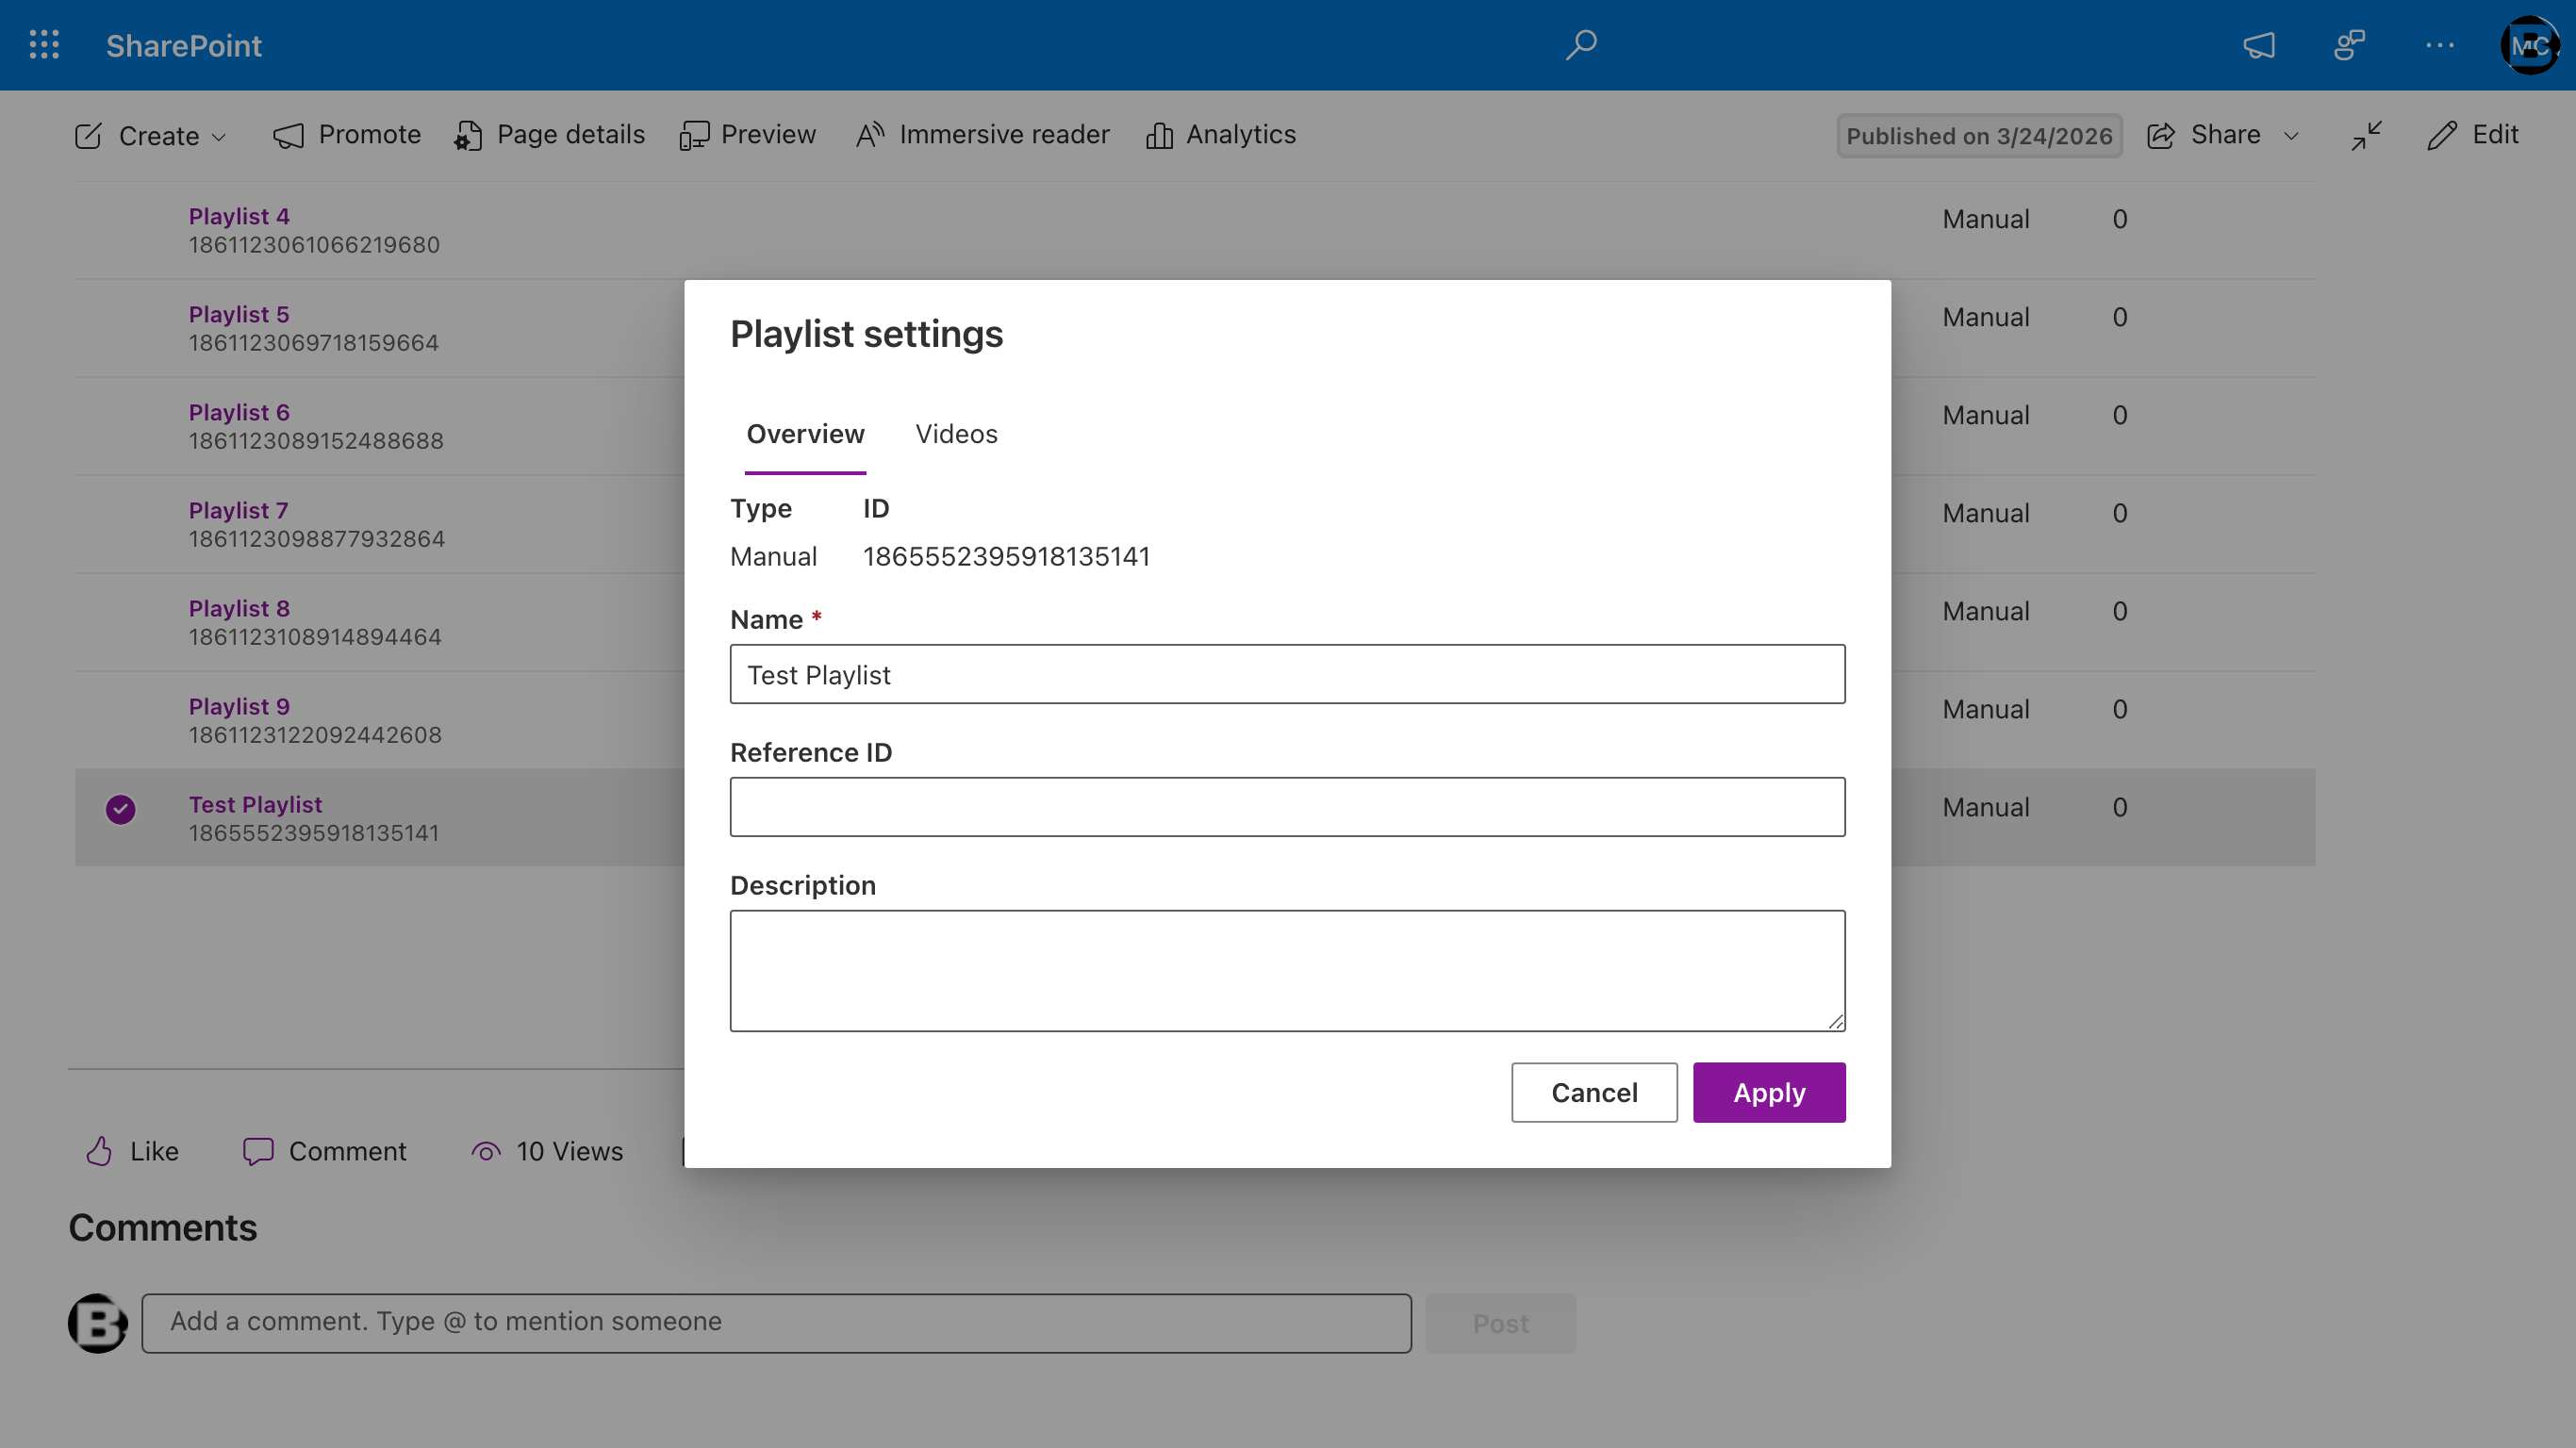
Click a playlist name in the list to open the Playlist settings dialog. Manual playlists have two tabs: Overview and Videos.
The Overview tab lets you edit the playlist's name, reference ID, and description. The Type and ID fields are read-only.
The Videos tab lists the videos in the playlist with controls to reorder, remove, or open each video in Studio. Click Add more videos to insert additional videos at the end of the playlist.
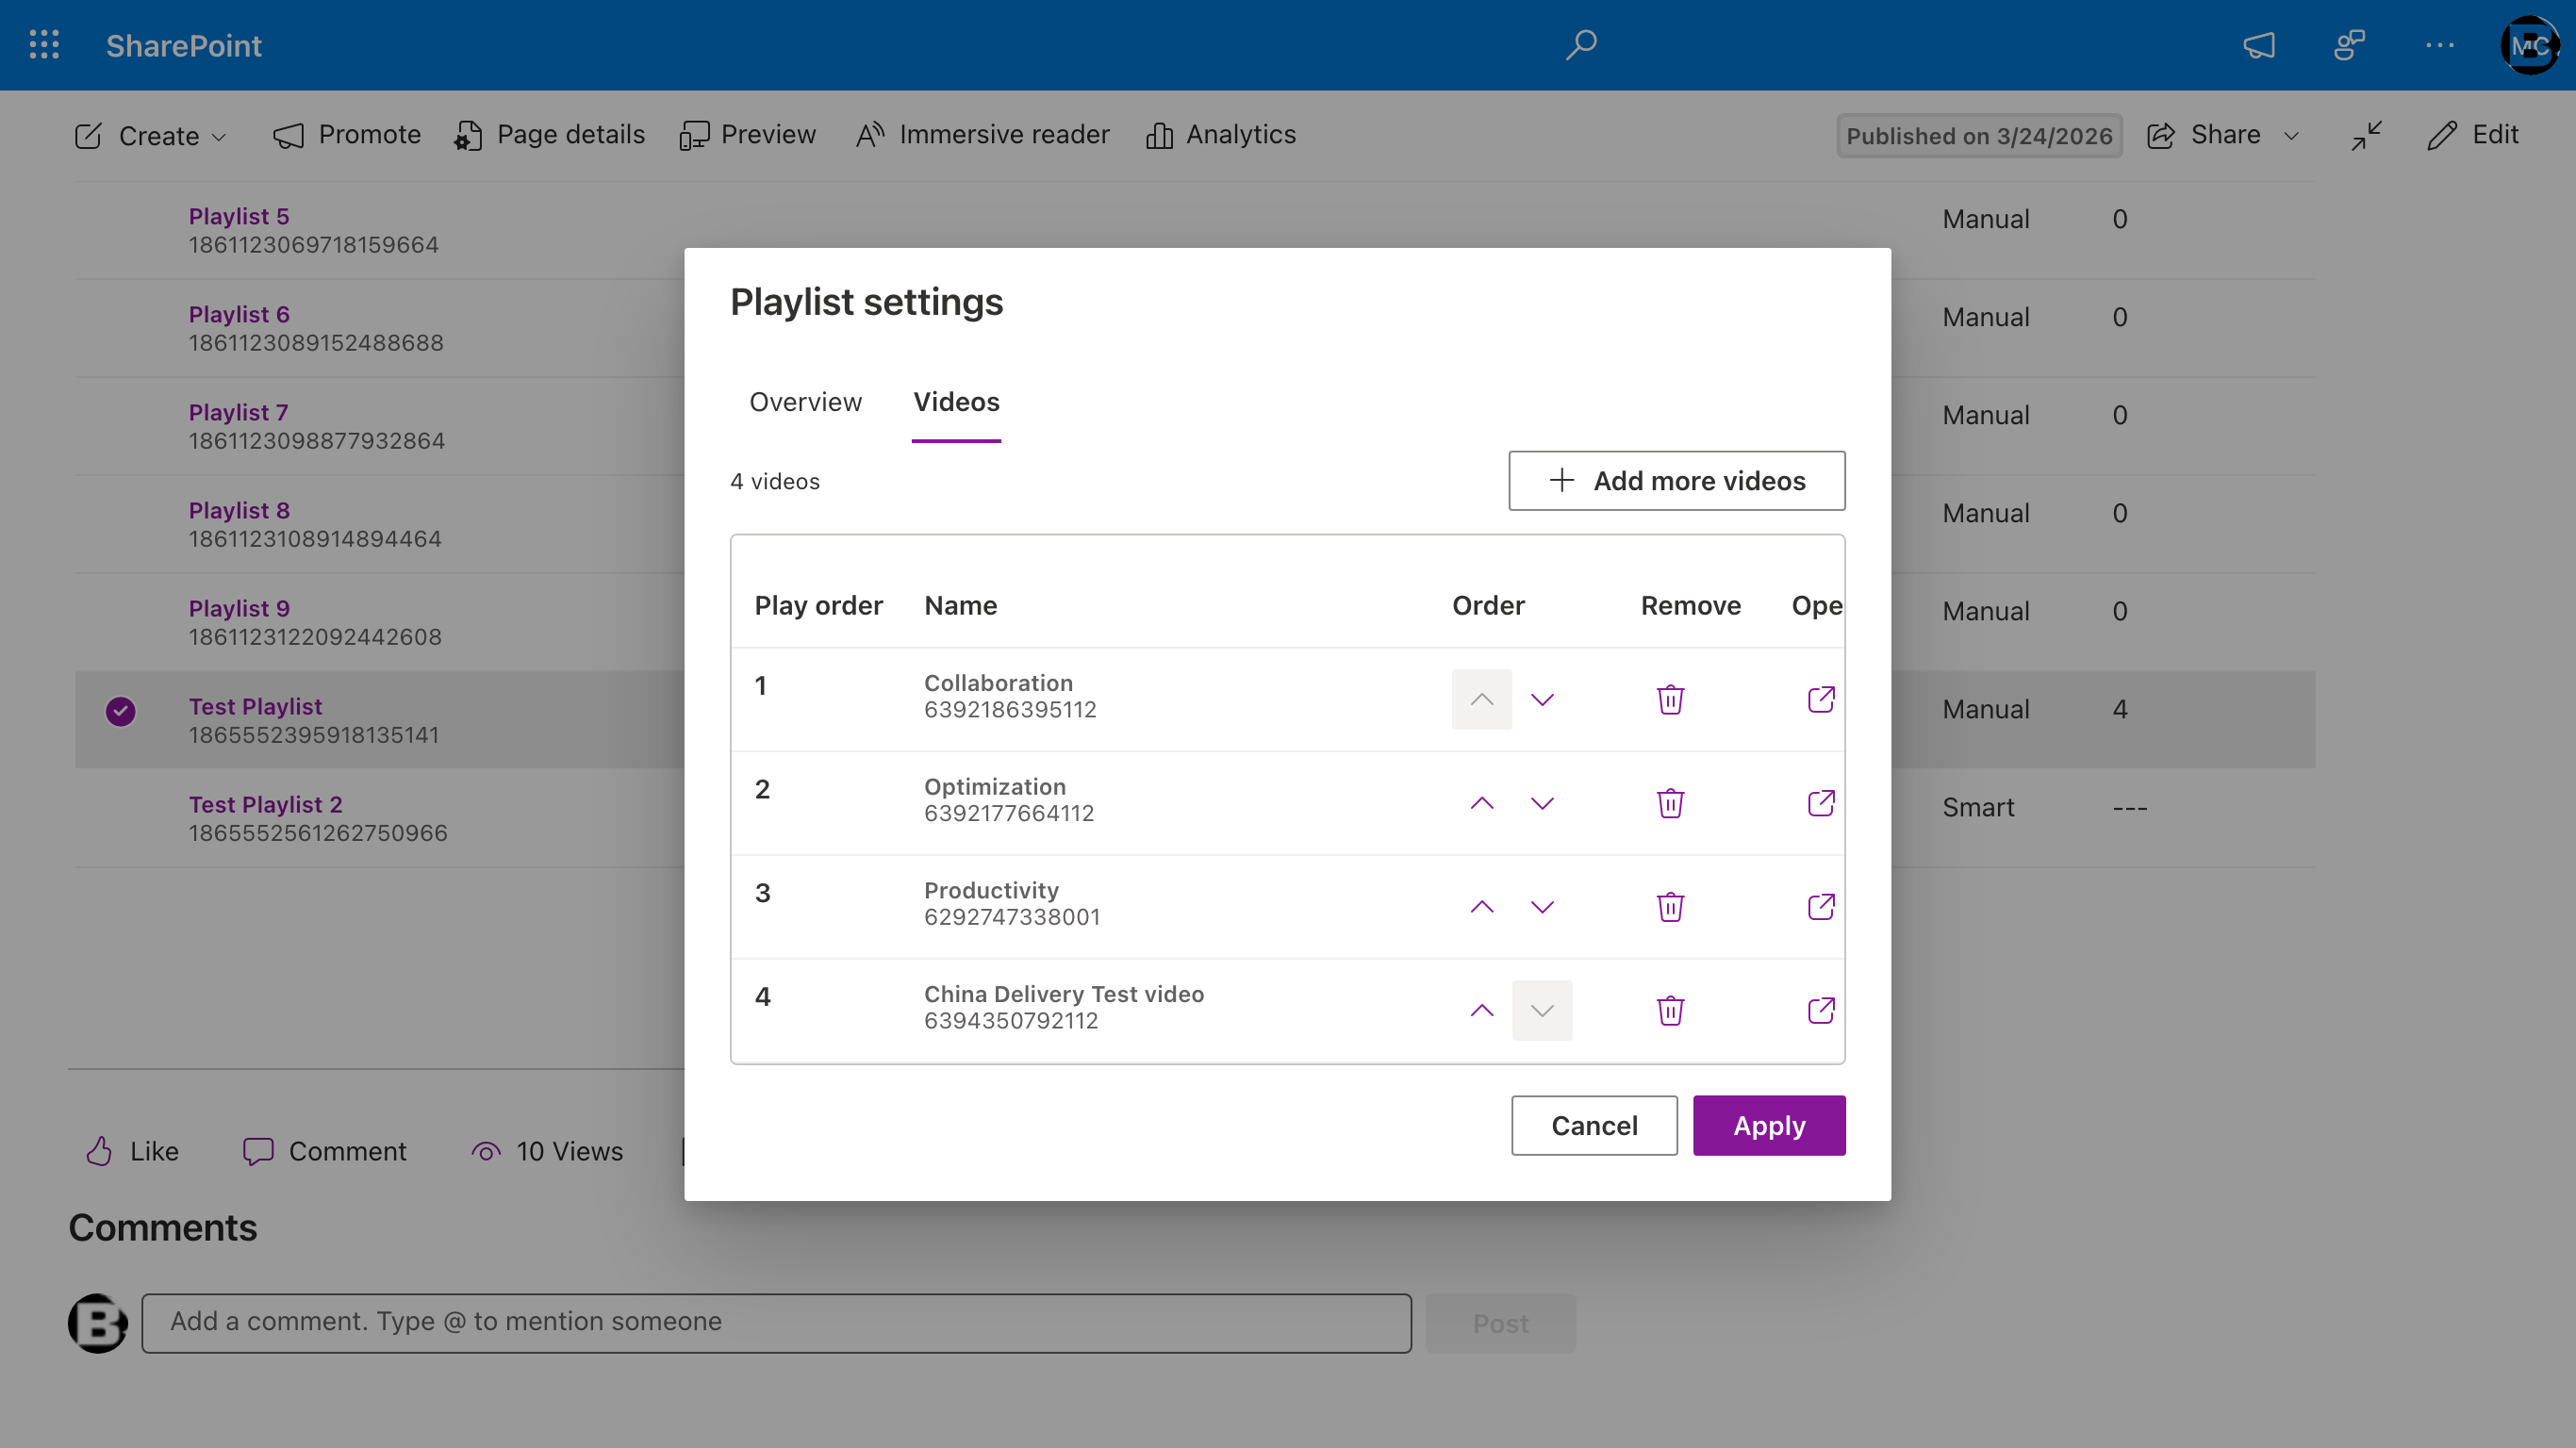
- Play order — The numeric playback position. Use the up/down arrows in the Order column to move a video earlier or later in the playlist.
- Remove — Removes the video from this playlist. The video itself remains in your Brightcove account.
- Open — Opens the video in Brightcove Studio in a new tab.
Click Apply to commit your changes, or Cancel to discard them.
Adding videos. Click Add more videos on the Videos tab to open the add-videos dialog. Videos already in the playlist are filtered out automatically so you don't add duplicates.
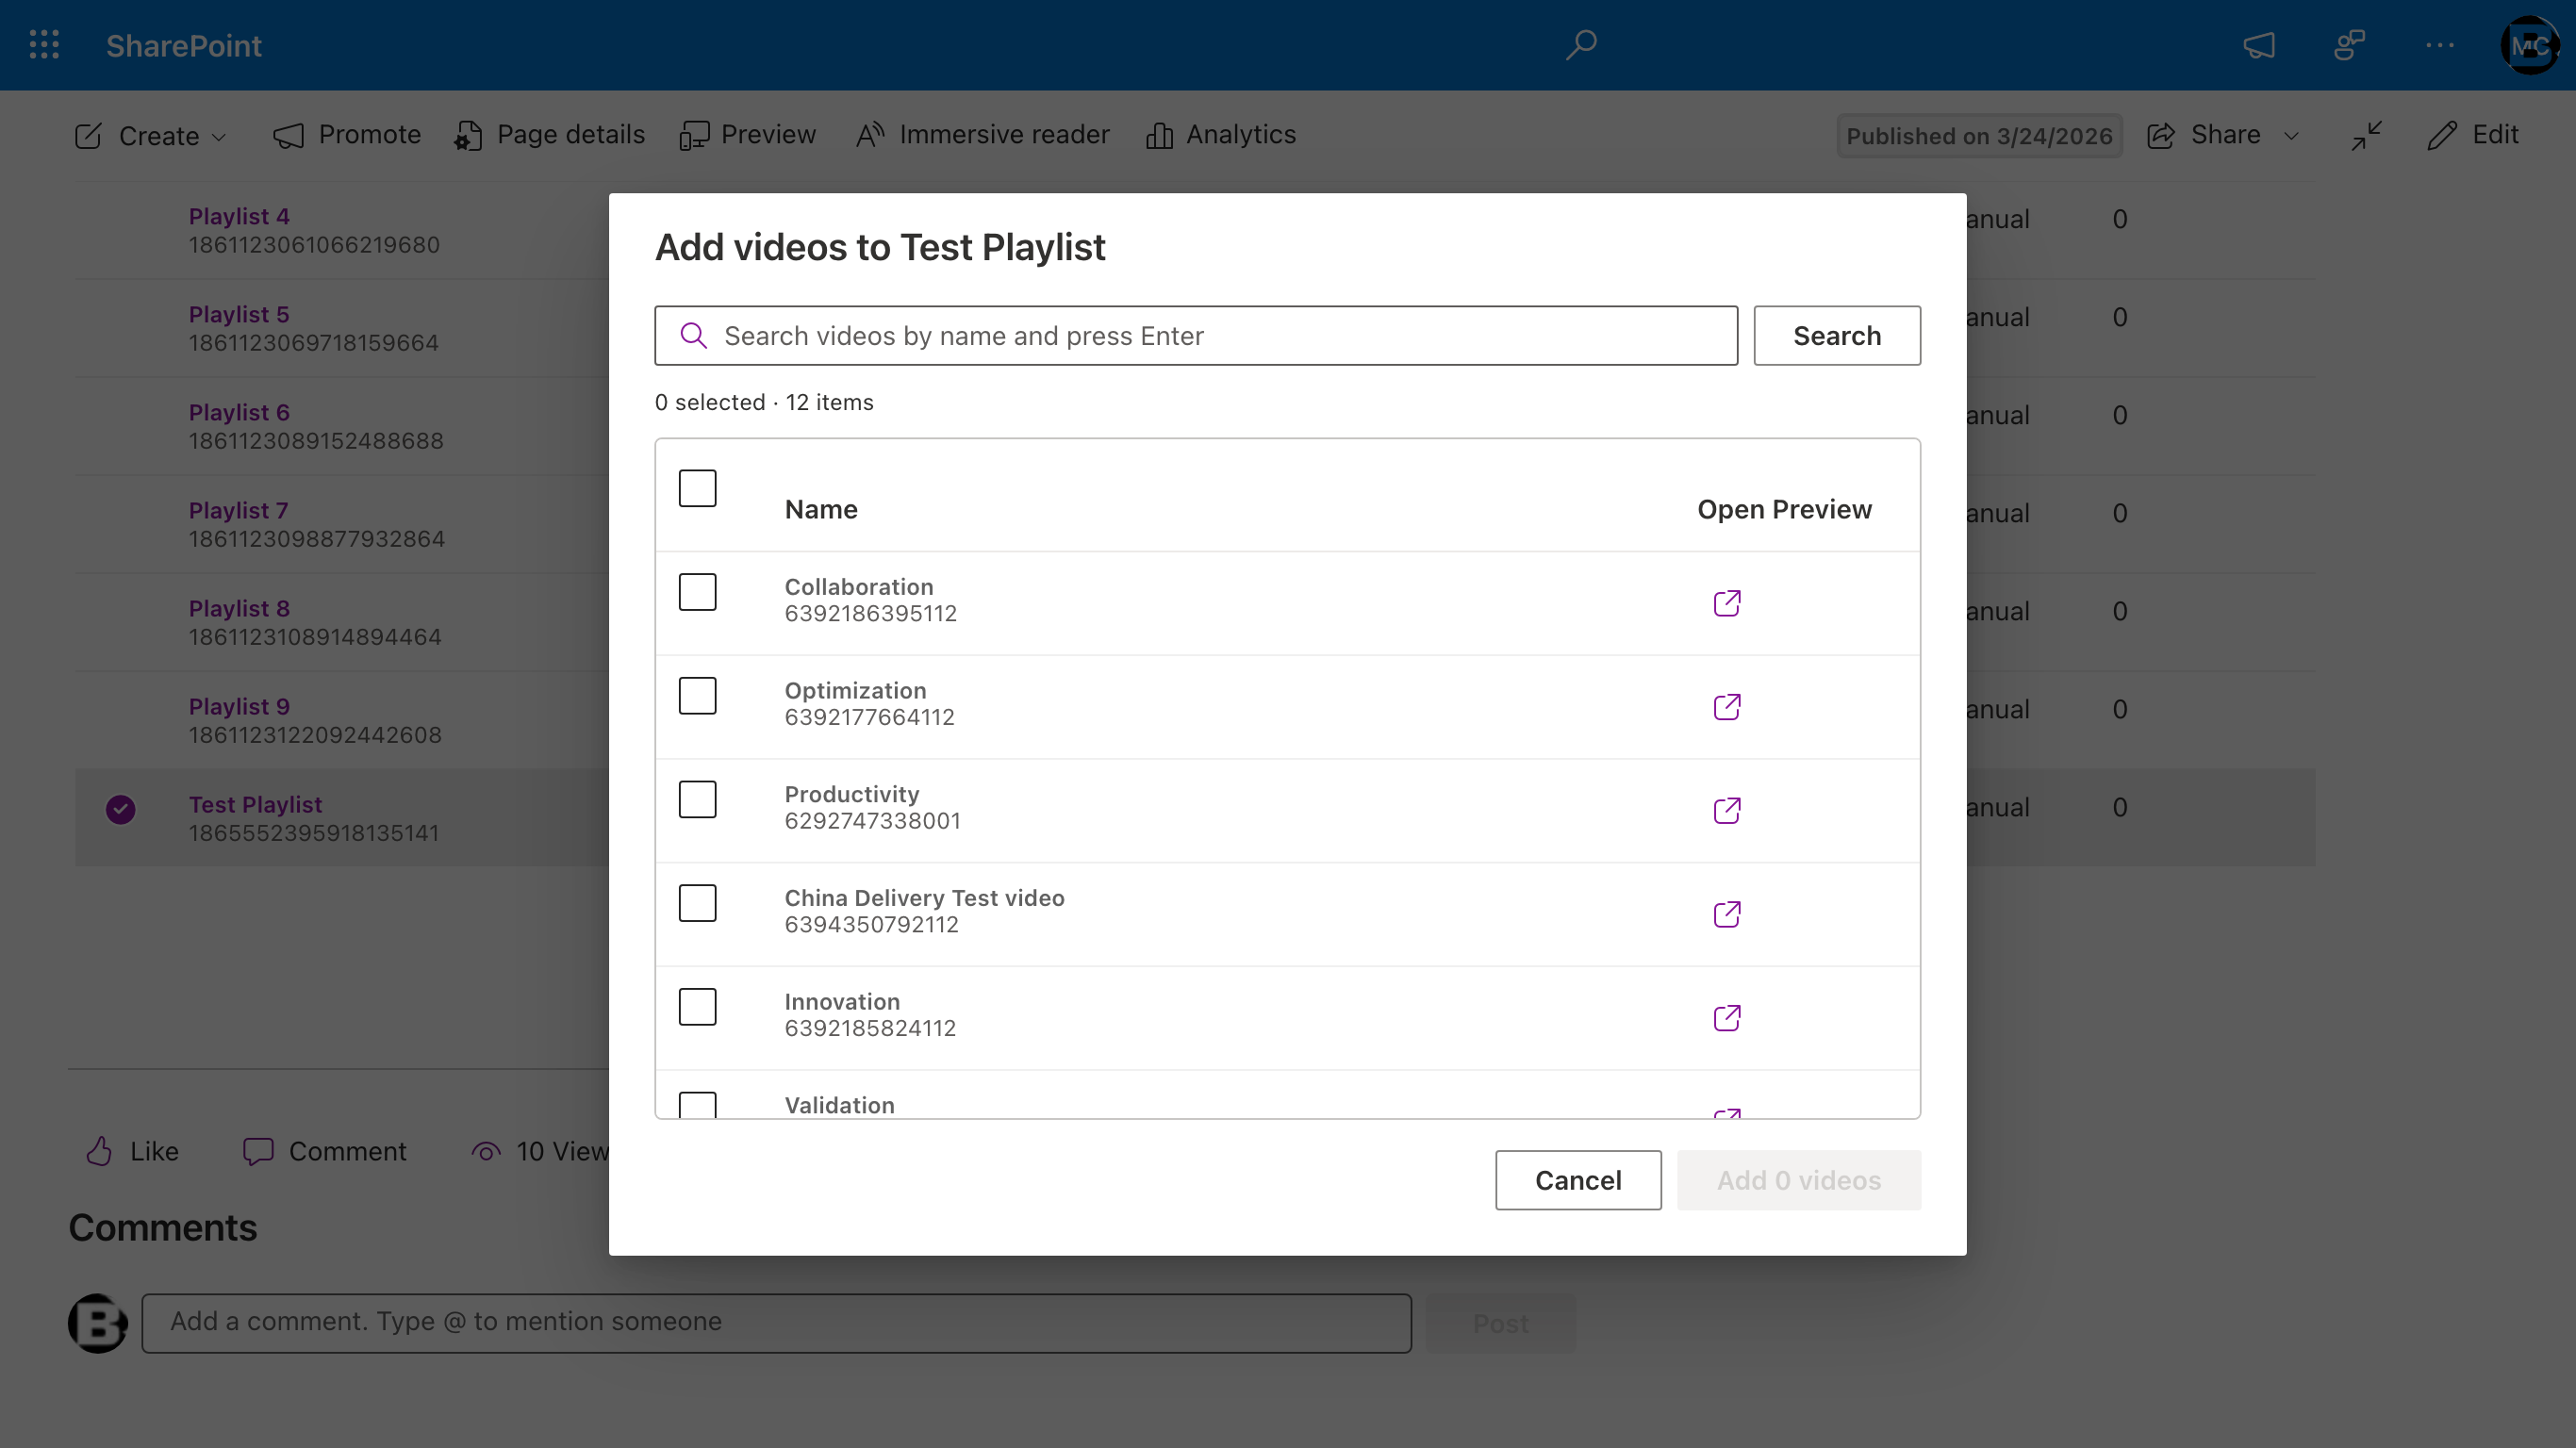
- Use the search box to find videos by name. Search uses a full-word phrase match — type a complete word and press Enter.
- Check one or more videos in the list, then click Add N videos to append your selection to the end of the playlist.
4.3.3 Editing a smart playlist
Smart playlists have three tabs: Smart, Overview, and Videos.
The Smart tab is where you define the matching criteria. Configure:
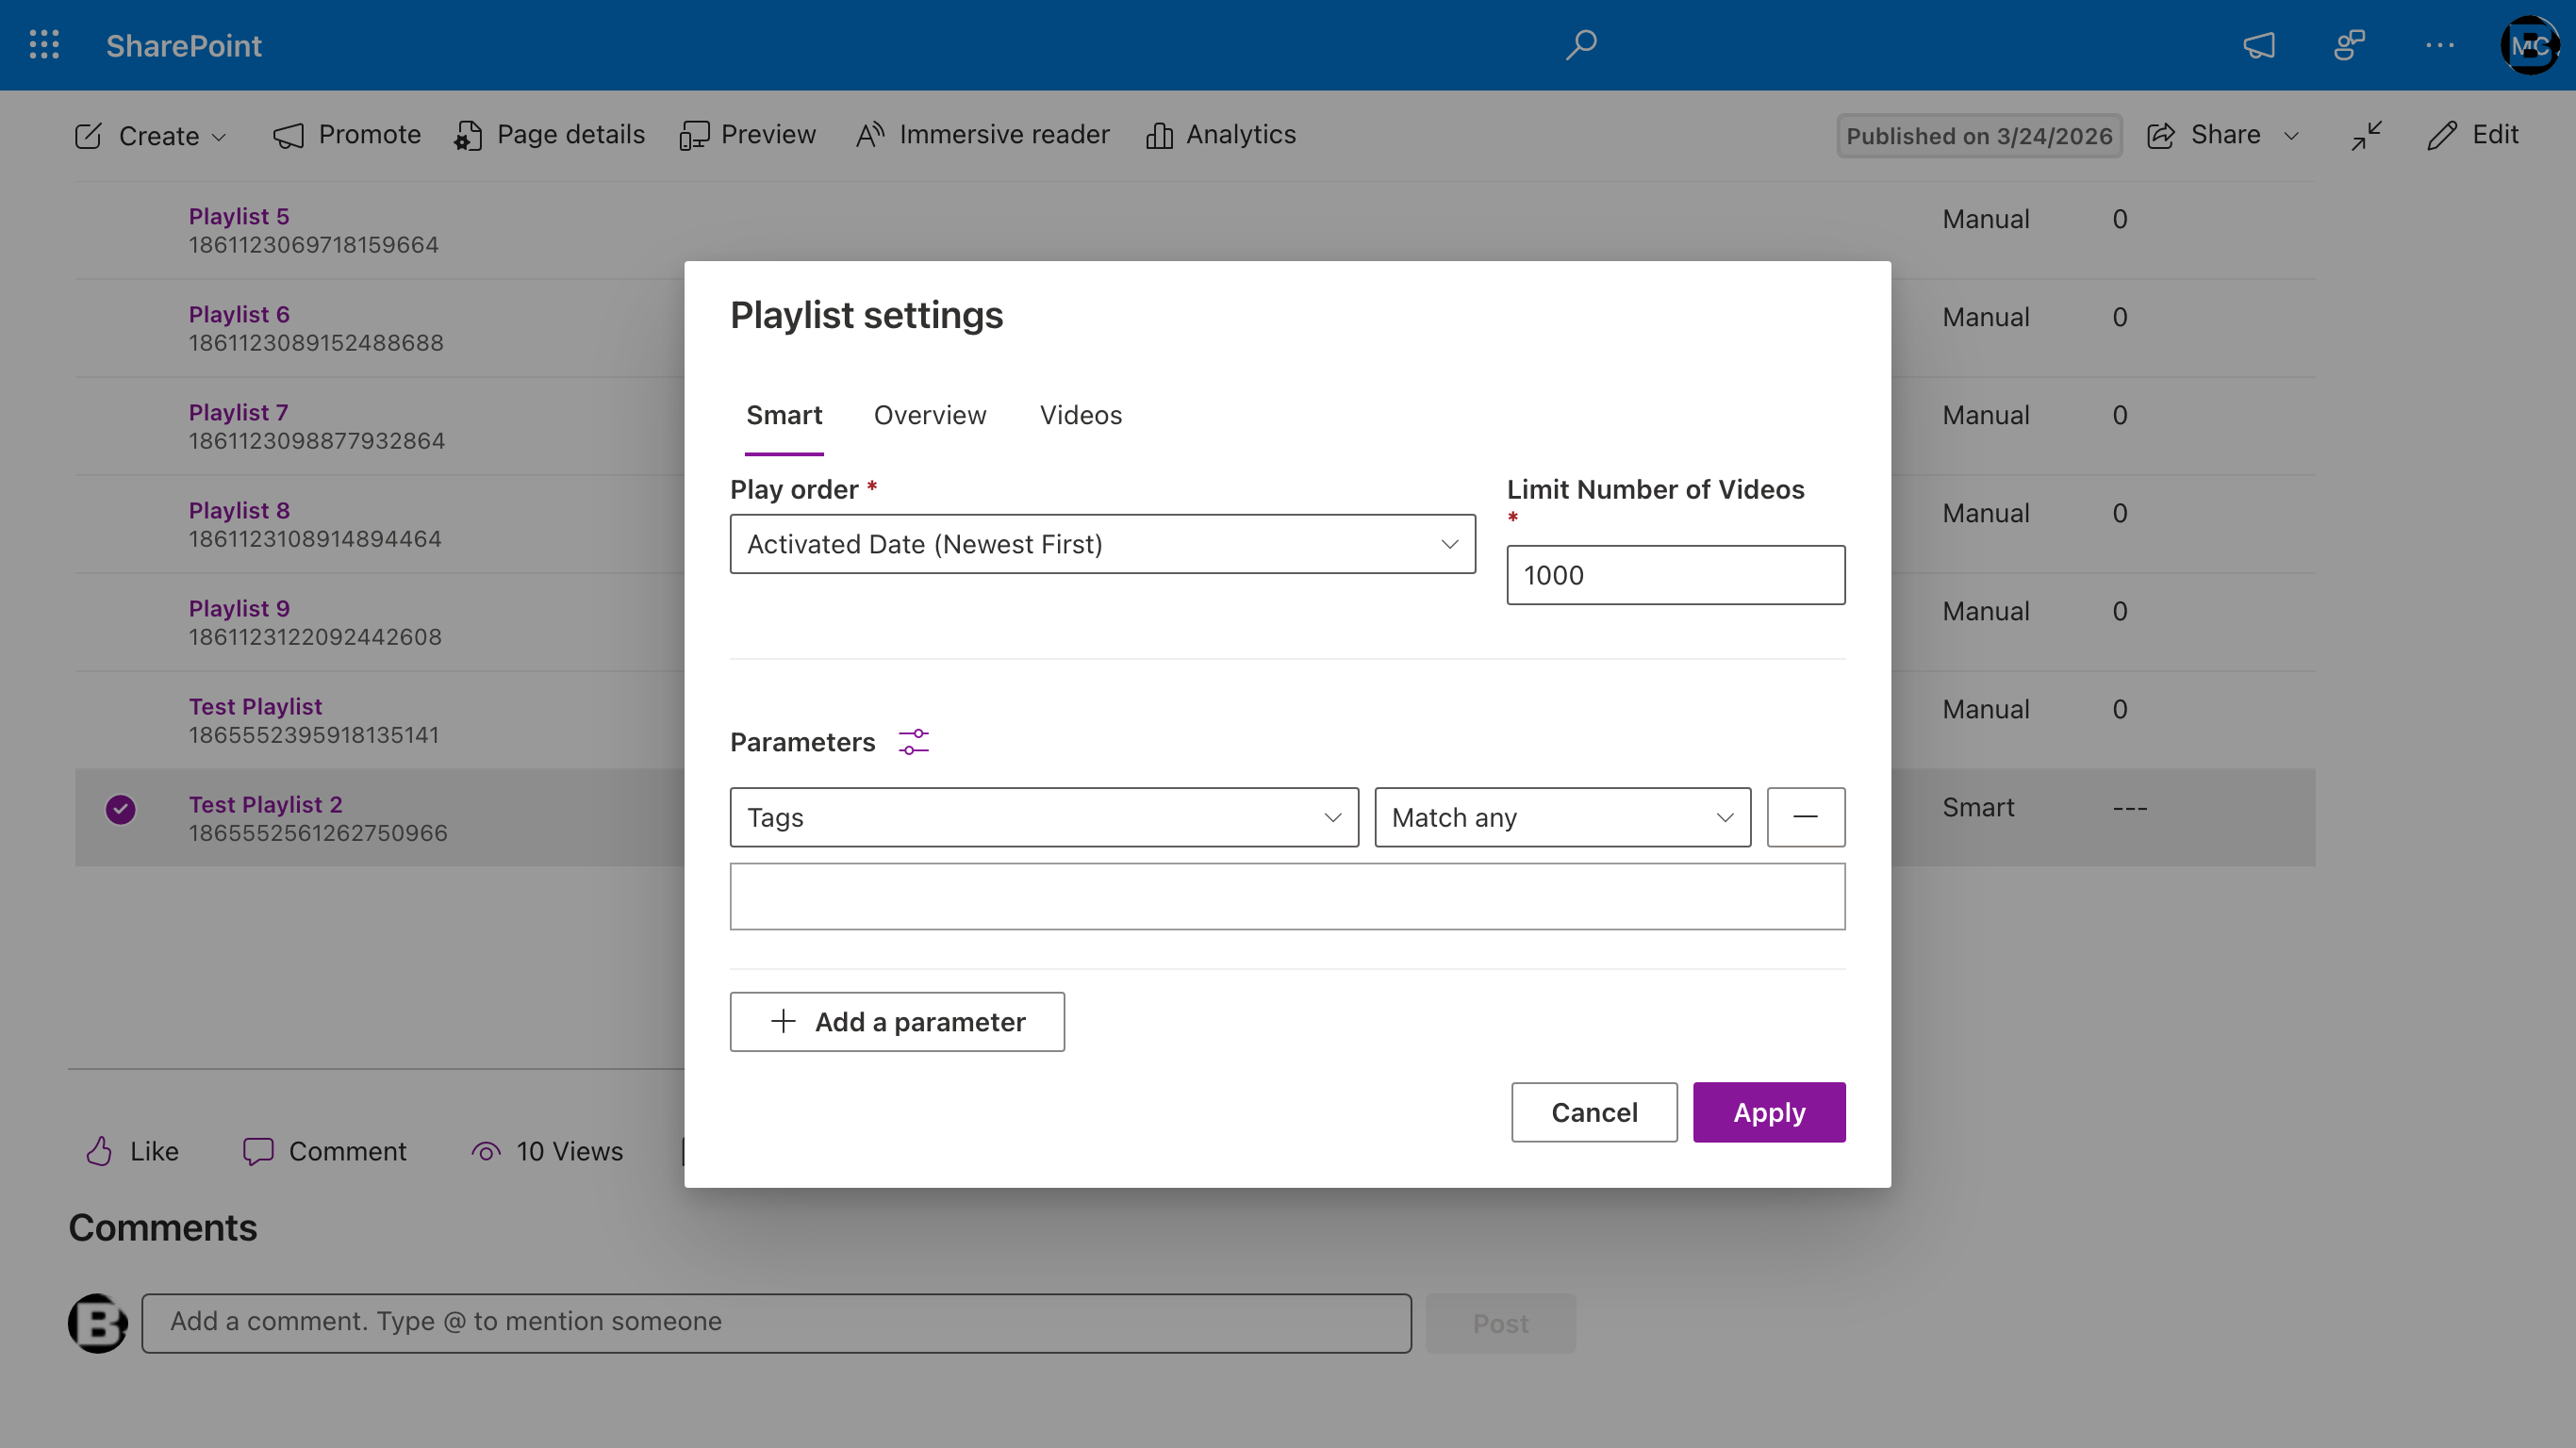
- Play order — The order in which matched videos play. Options include Alphabetical, Activated Date (newest/oldest first), Total Plays, Trailing Week Plays, Start Date (newest/oldest first), and Last Activated Date.
- Limit Number of Videos — The maximum number of videos the playlist returns (up to 1000).
- Parameters — One or more criteria that videos must match. Each parameter has a type (Tags, Name, Description, Activated Date, Last Activated Date, Reference ID, etc.) and a value. Click Add a parameter to chain additional criteria.
- Combine parameters — Click the equalizer icon next to the Parameters header to toggle between Match all (a video must satisfy every parameter) and Match any (a video matches if it satisfies any single parameter). This matches Brightcove Studio's smart playlist behavior.
The Videos tab on a smart playlist is read-only — it shows the dynamic result of applying your criteria. A human-readable summary of the active criteria appears at the top of the tab.
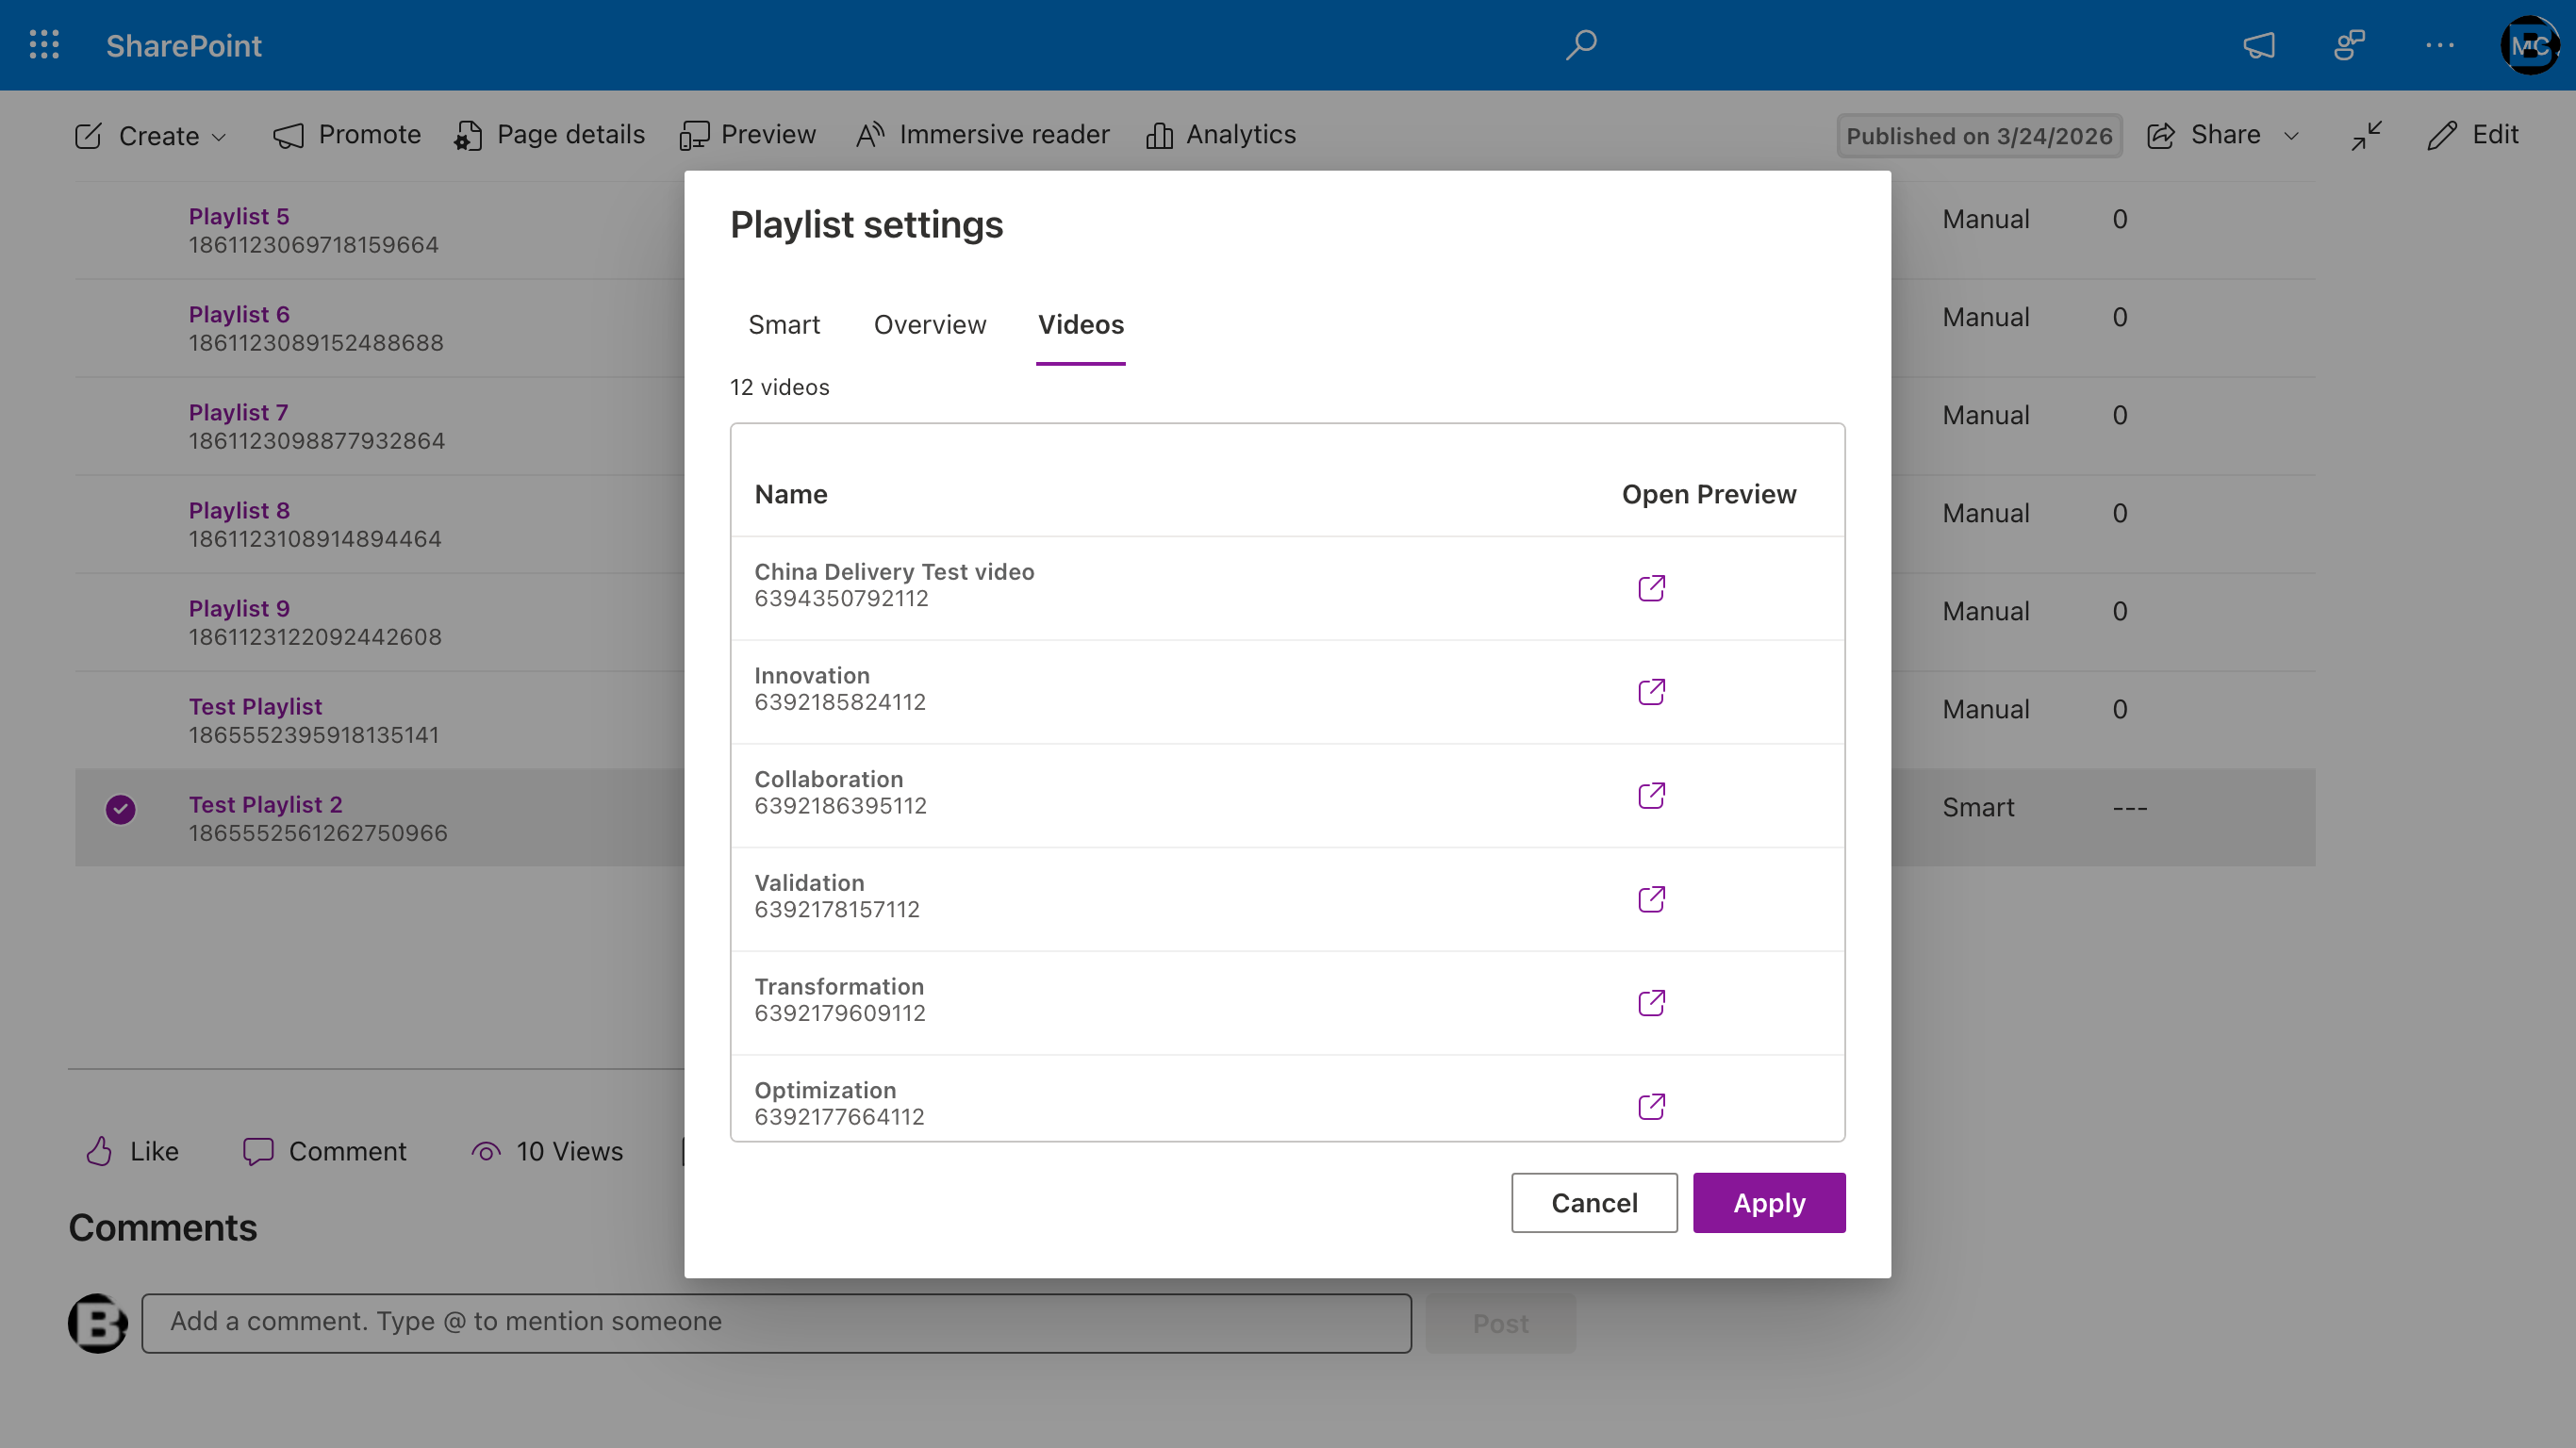
To change which videos appear in a smart playlist, modify the criteria on the Smart tab and click Apply.
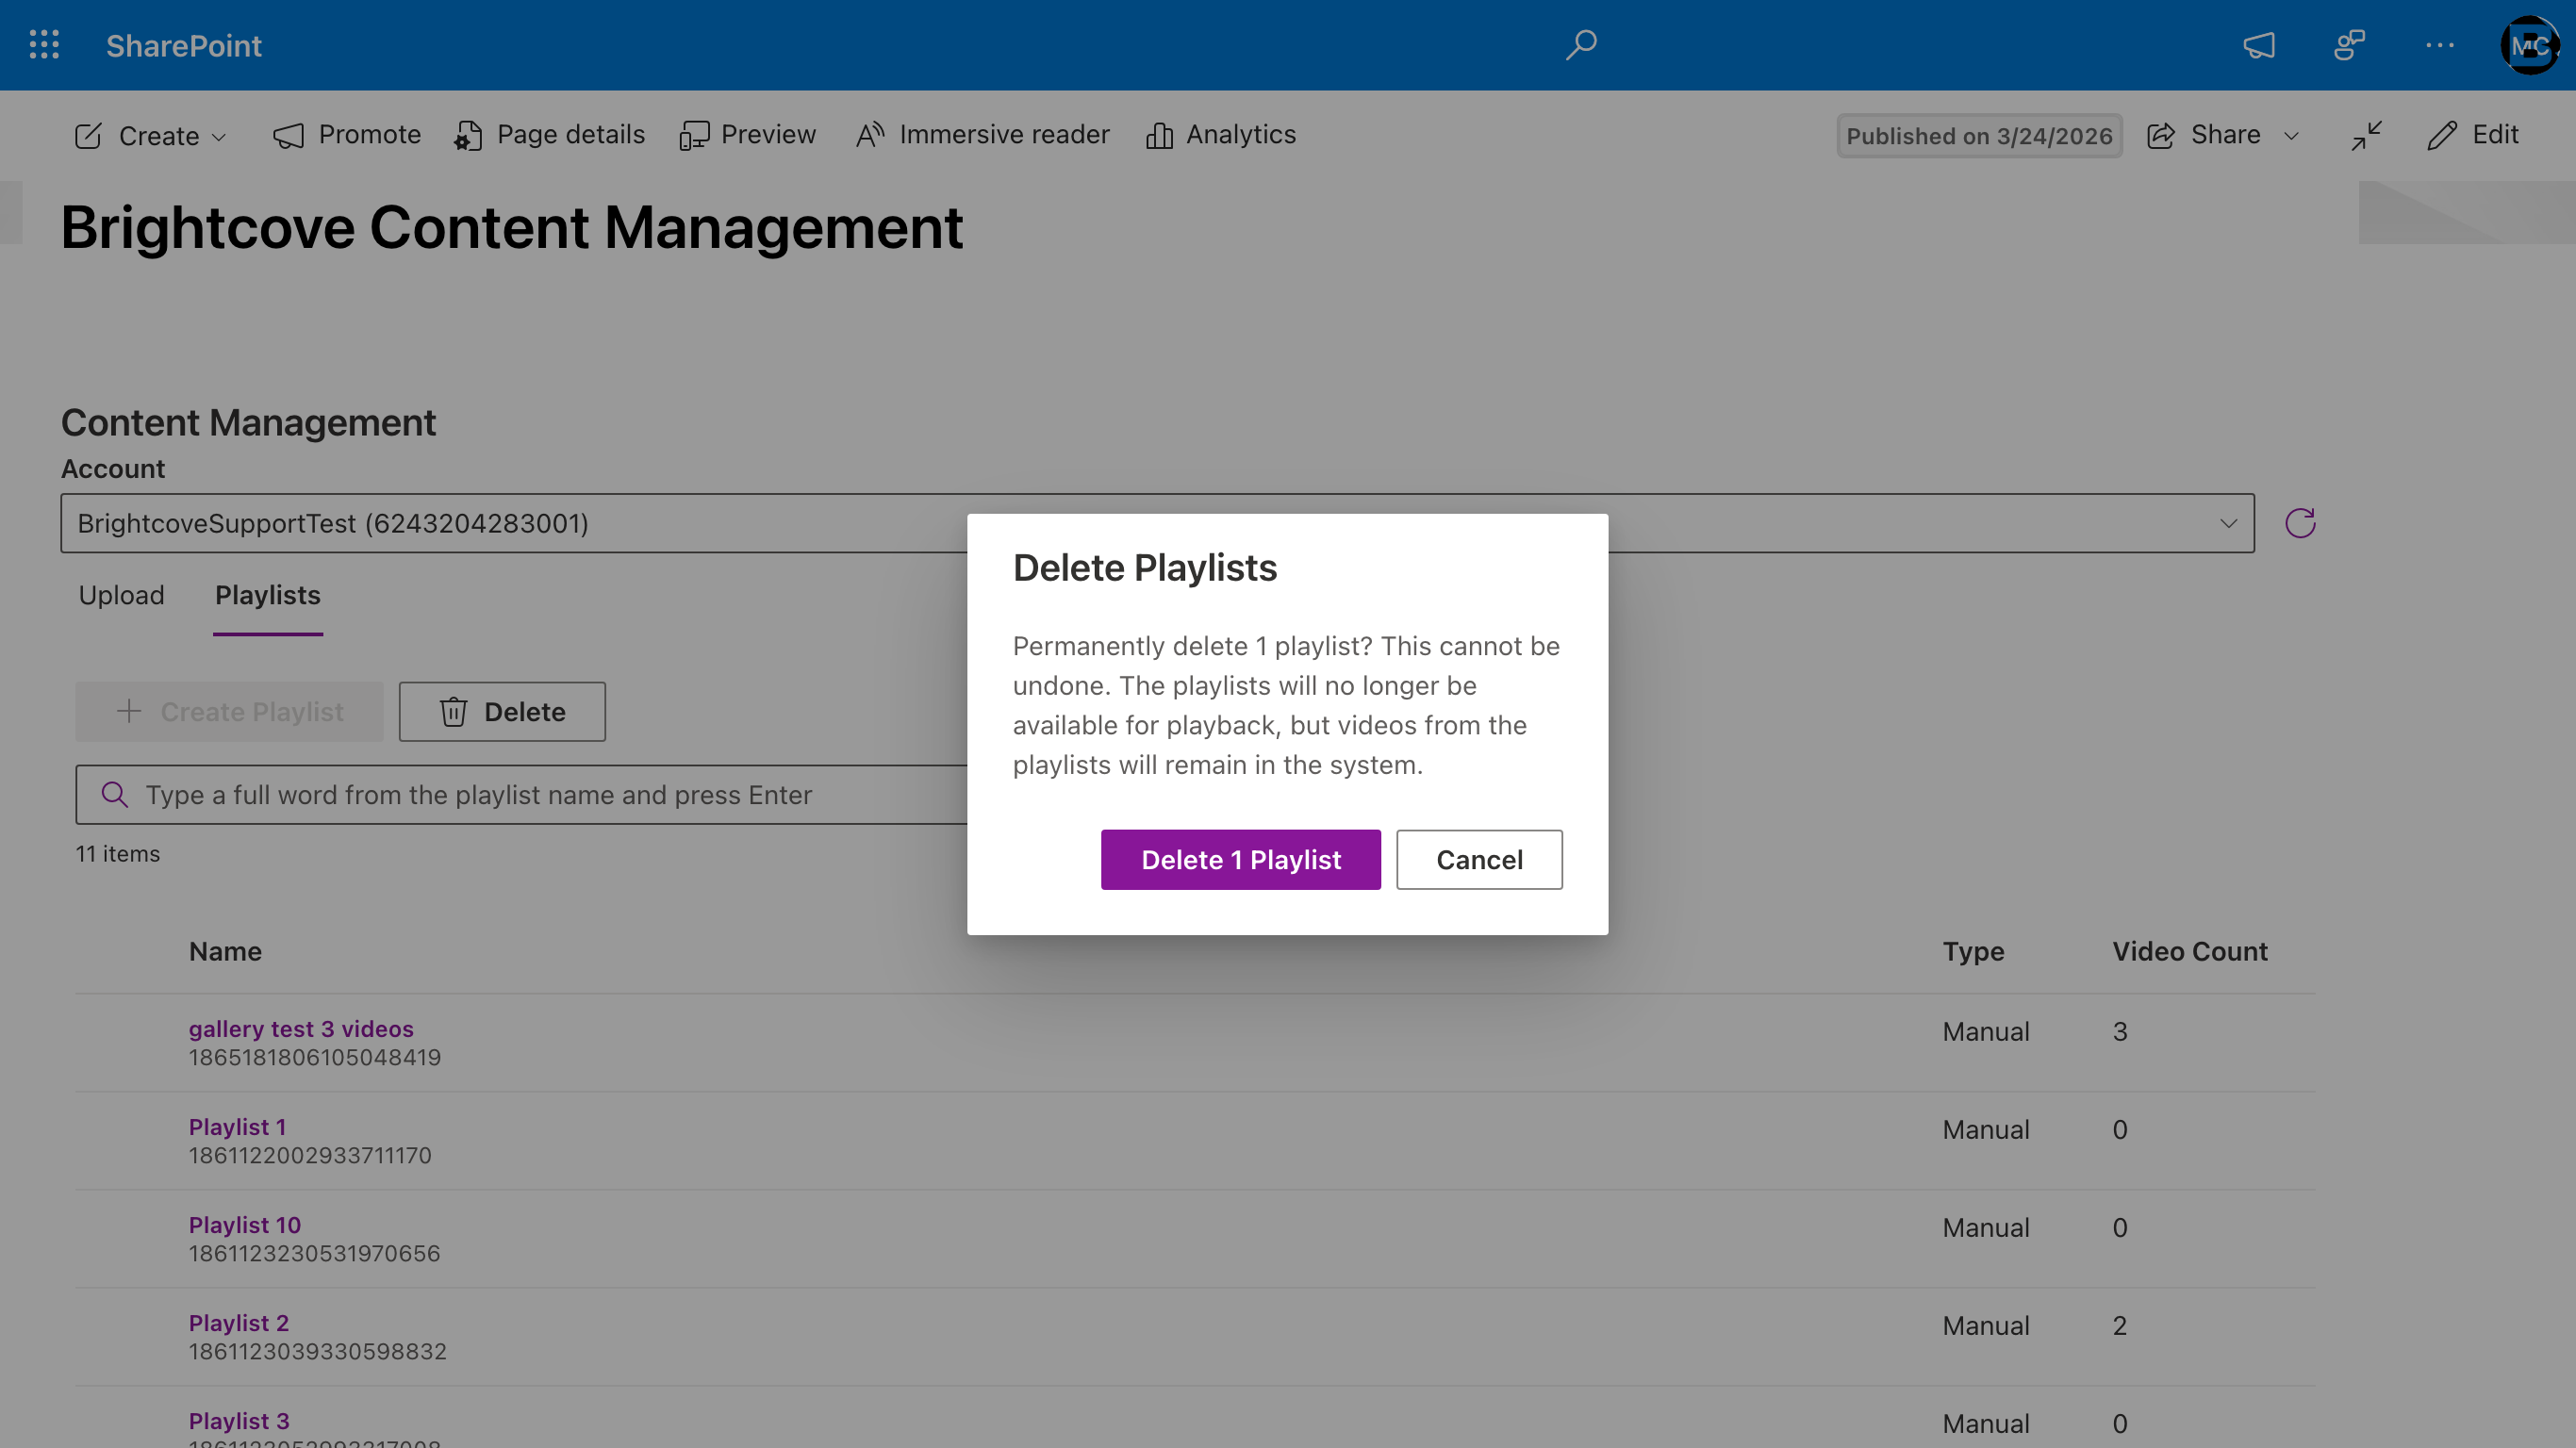
4.3.4 Deleting playlists
To delete a playlist, select it in the list using the checkbox on the left, then click Delete. Confirm the deletion in the dialog.
4.4 Limitations in this release
The following content management features are planned for future releases:
- Creating and managing In-Page Experiences from SharePoint
For now, use Brightcove Video Cloud Studio directly for experience management.
5. Embedding content with web parts
The connector provides three web parts for embedding Brightcove content on SharePoint pages. All three are available in the SharePoint web part toolbox when editing a modern page.
5.1 How to add a Brightcove web part
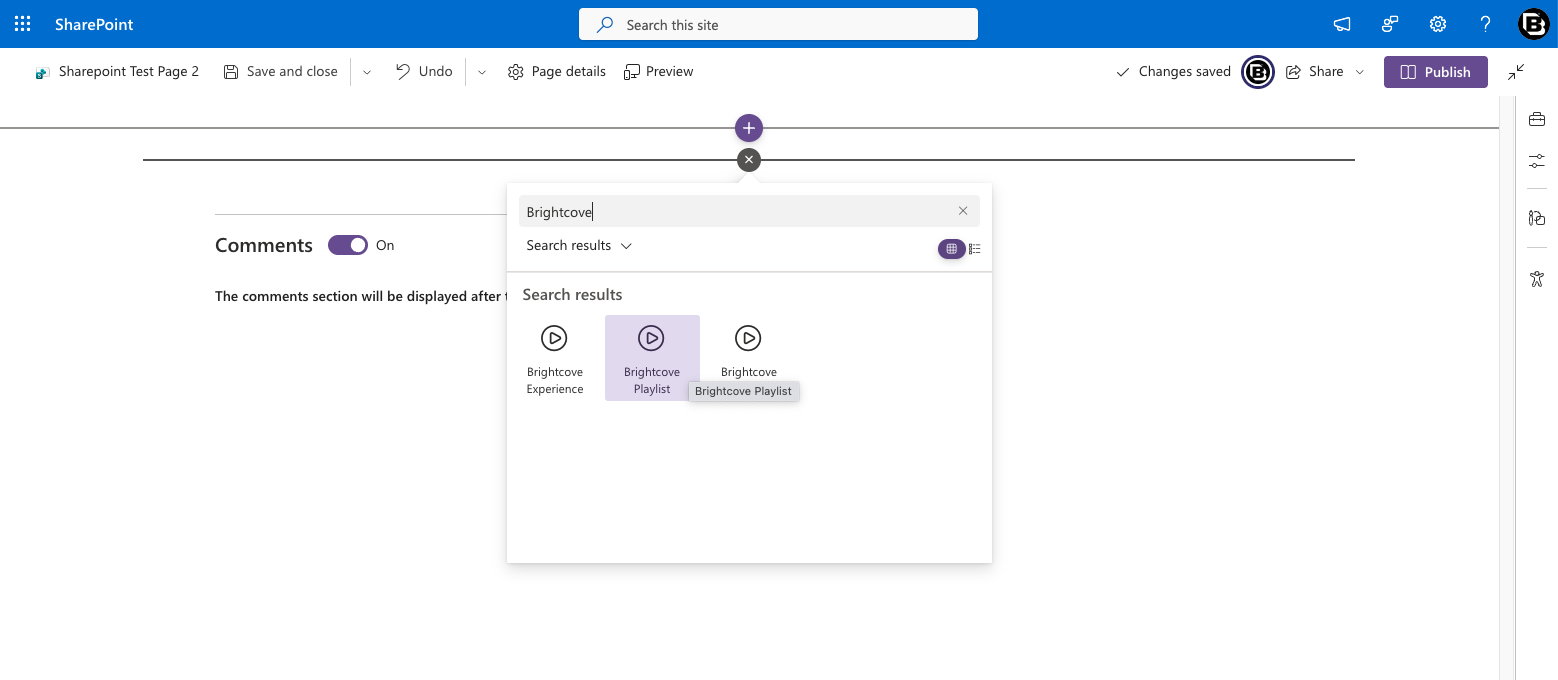
- Navigate to a SharePoint page and click Edit.
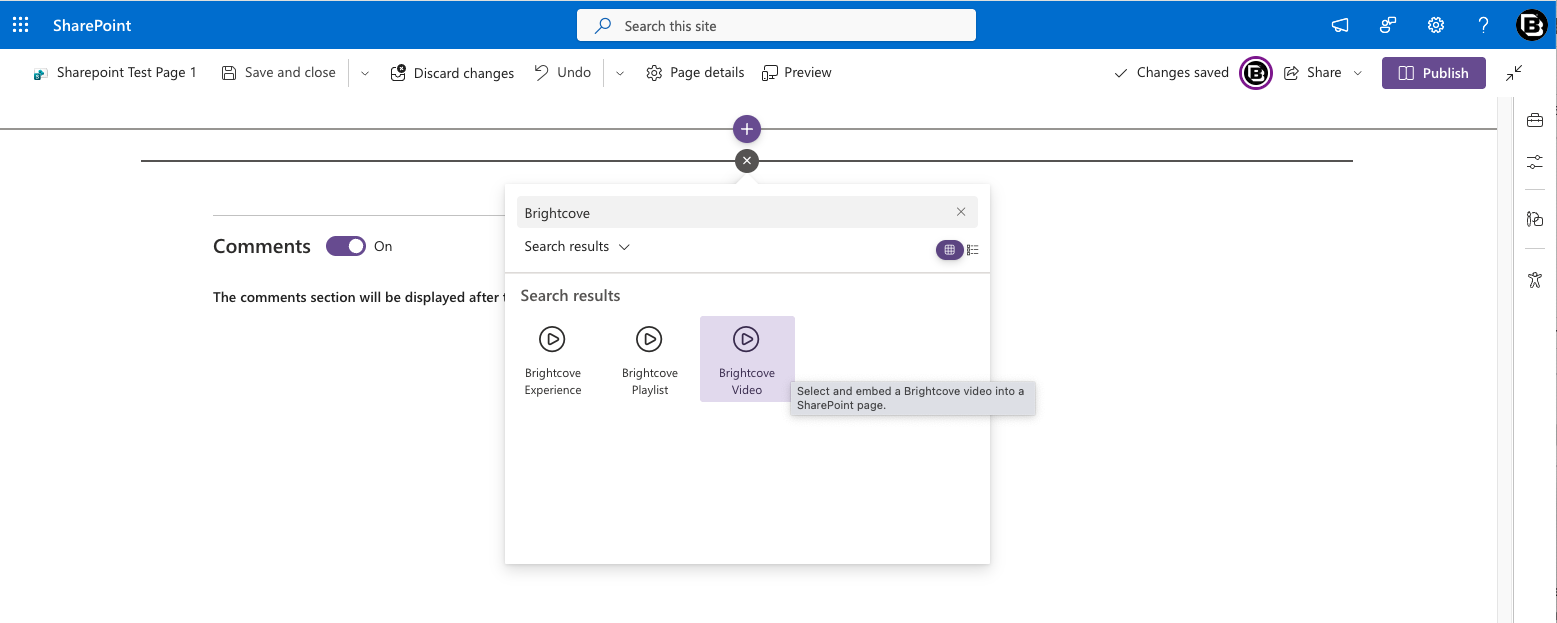
- Click the + icon where you want to add the web part.
- In the toolbox search bar, type Brightcove.
- Select the web part you want: Brightcove Video, Brightcove Playlist, or Brightcove Experience.
- The web part will appear on the page with a prompt to configure it.
- Click the web part or open its property pane (pencil icon) to begin configuration.
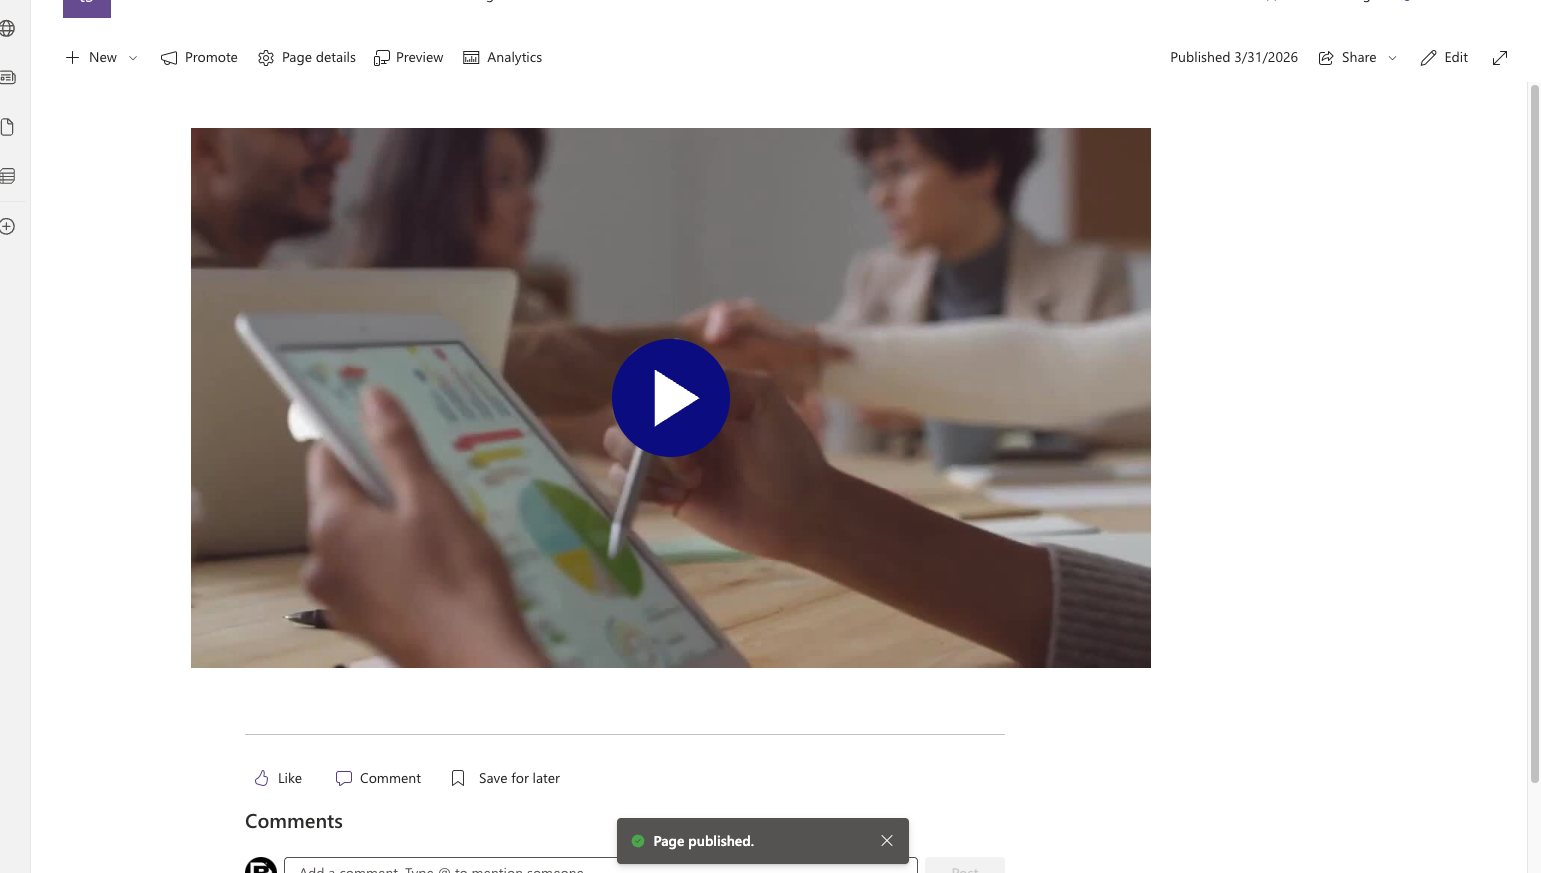
- After configuring, Publish or Republish the page to make the embedded content visible to viewers.
5.2 Brightcove Video web part
Embeds a single Brightcove video on the page.
Getting started:
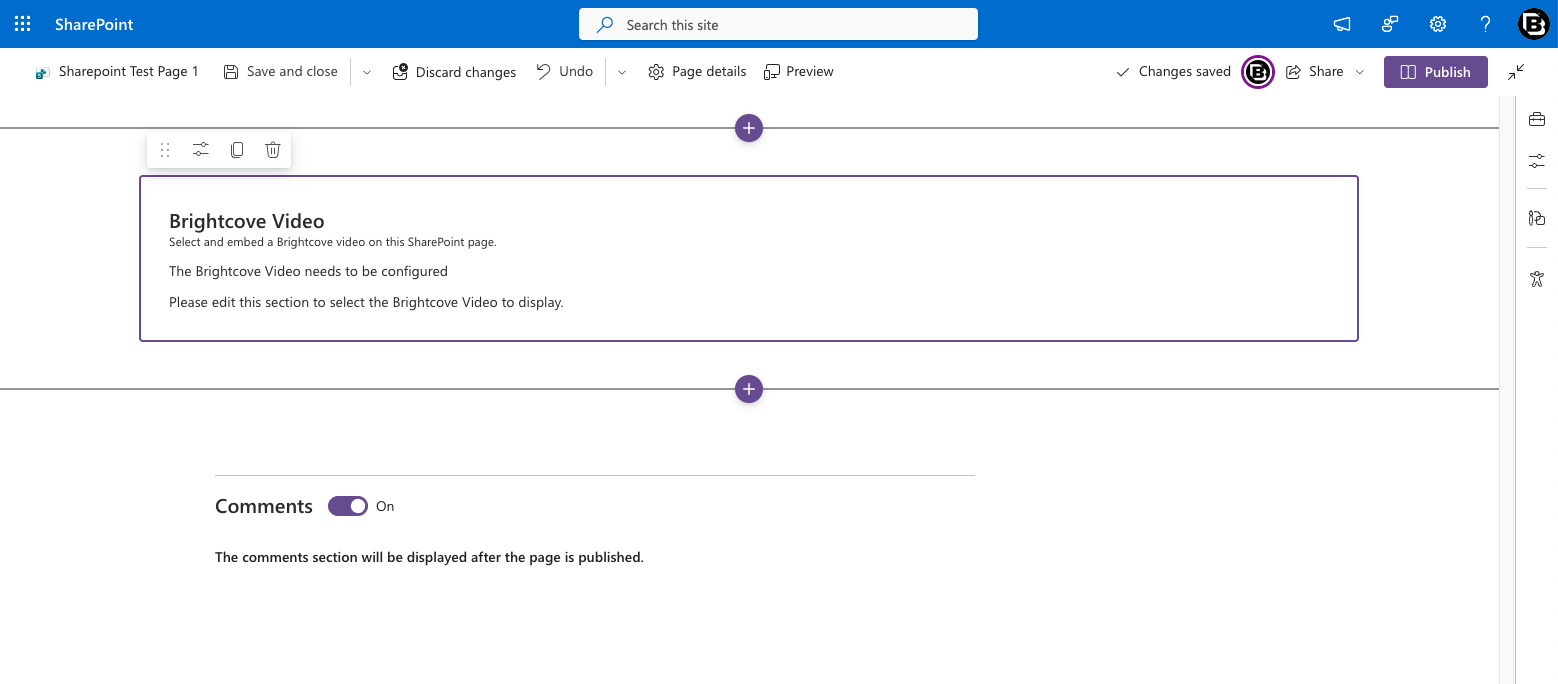
- Add the web part to a page. Before a video is selected, the web part displays a placeholder message: "The Brightcove Video needs to be configured. Please edit this section to select the Brightcove Video to display."
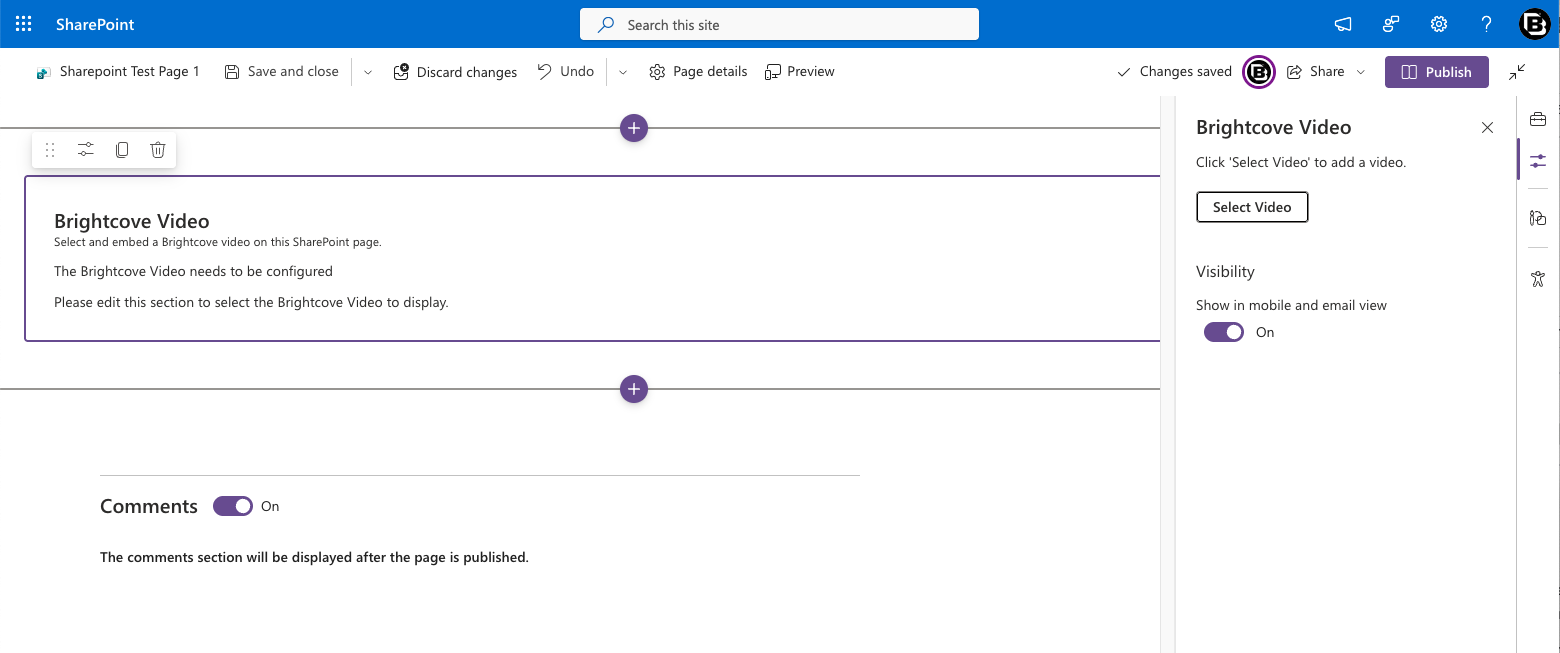
- Open the property pane (click the pencil icon or click the web part). You'll see a Select Video button and a Visibility toggle.
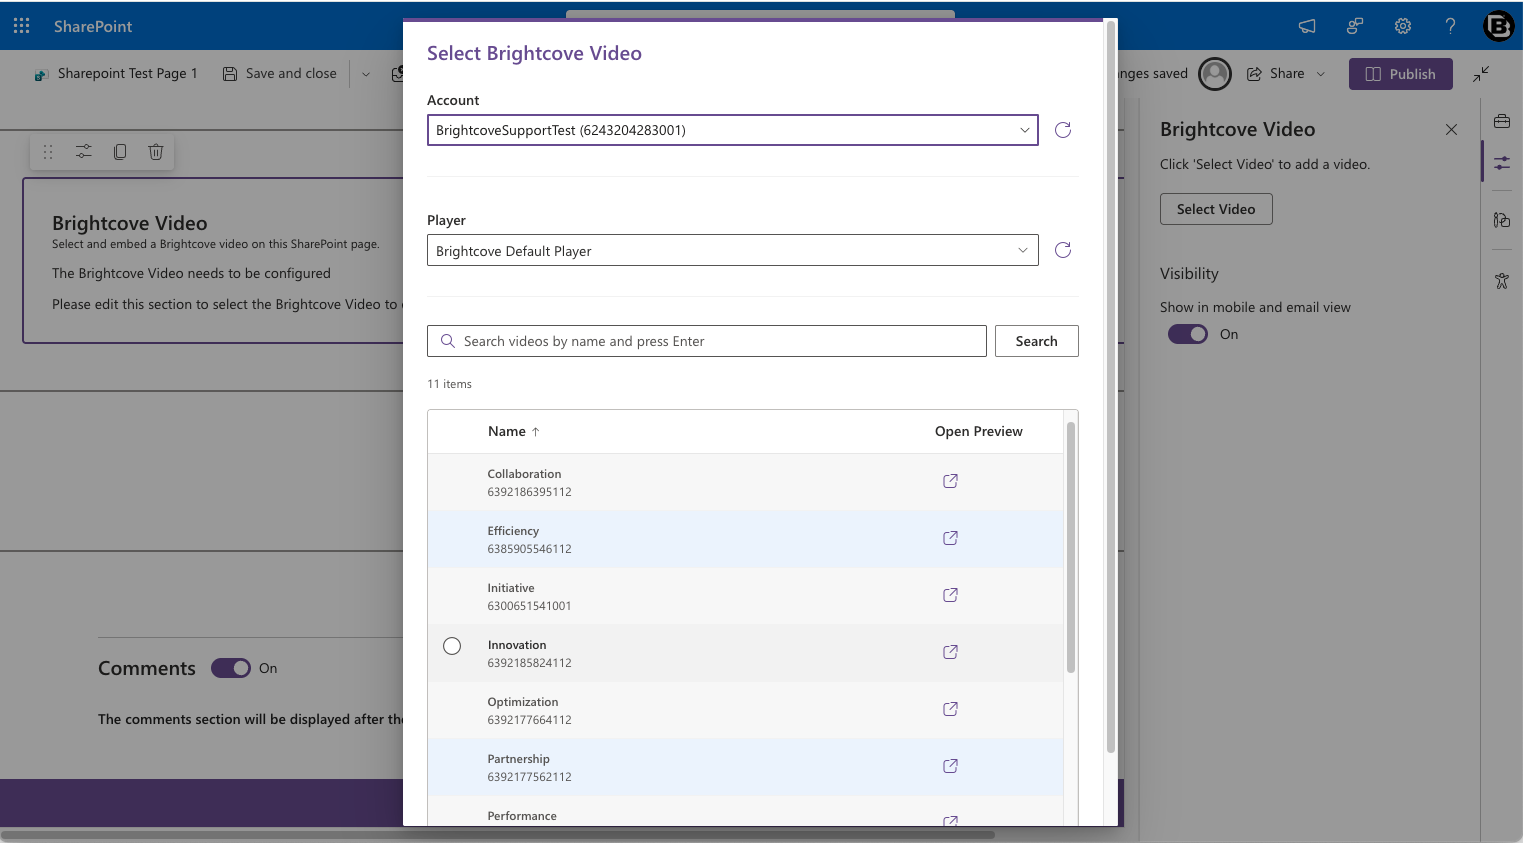
- Click Select Video to open the content selector dialog.
- In the dialog:
- Account — Choose which Brightcove account to browse.
- Player — Select the player to use for rendering (defaults to Brightcove Default Player).
- Folder — Optionally filter the video list by a Video Cloud folder (defaults to All videos).
- Search — Type a video name and press Enter to search. The list shows up to 100 videos at a time; use search to find videos beyond the first 100.
- Select a video from the list. Click the Open Preview icon next to any video to preview it in a new tab before selecting.
- Click Insert to confirm your selection.
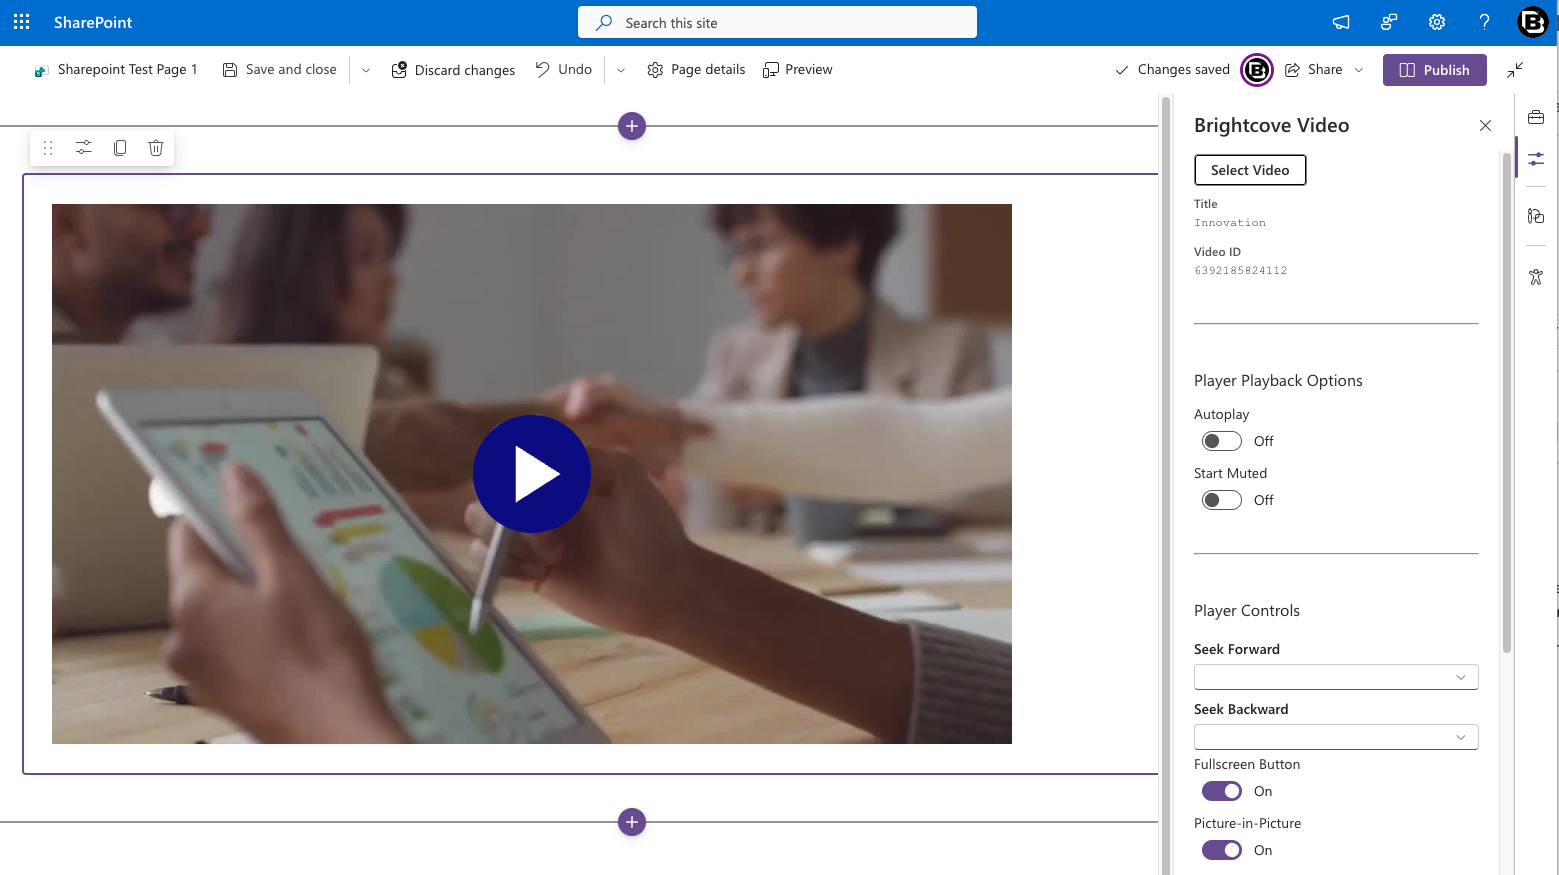
Once a video is selected, the web part renders the video on the page and the property pane displays the Title and Video ID along with four configuration groups.
Visibility
| Option | Description | Default |
|---|---|---|
| Show in mobile and email view | Controls whether the web part appears in mobile layouts and in SharePoint email digests (e.g., when a News post is sent via email). When included in an email, a static placeholder is rendered — the video does not play inline in the email itself. Recipients click through to the SharePoint page to watch the video. | On |
Player Playback Options
| Option | Description | Default |
|---|---|---|
| Autoplay | Start playing the video automatically when the page loads. Note: browsers may block autoplay when sound is enabled; the player will mute automatically if blocked. | Off |
| Start Muted | Begin playback with the volume muted. | Off |
Player Controls
| Option | Description | Default |
|---|---|---|
| Seek Forward | Adds a skip-forward button to the control bar. Options: Off, 5 seconds, 10 seconds, 30 seconds. | Off |
| Seek Backward | Adds a skip-backward button to the control bar. Options: Off, 5 seconds, 10 seconds, 30 seconds. | Off |
| Fullscreen Button | Show or hide the fullscreen toggle in the player controls. | On |
| Picture-in-Picture | Show or hide the picture-in-picture button, allowing viewers to pop the video out into a floating mini-player. | On |
| Control Bar Size | Adjust the size of the player control bar. Options: Compact, Normal, Large. | Compact |
Player Size Options
| Option | Description | Default |
|---|---|---|
| Player Sizing | Responsive — The player fills the available width and maintains the chosen aspect ratio. Fixed — The player renders at the exact width and height you specify. | Responsive |
| Aspect Ratio | The proportional relationship between width and height. Options: 1:1, 3:2, 4:3, 16:9, 21:9, 9:16, Custom. | 16:9 |
| Max Width (responsive) / Width (fixed) | In responsive mode, sets the maximum width the player will expand to. In fixed mode, sets the exact width. | 800 |
| Height | Only editable in fixed mode with a custom aspect ratio. Otherwise calculated automatically from the width and aspect ratio. | 540 |
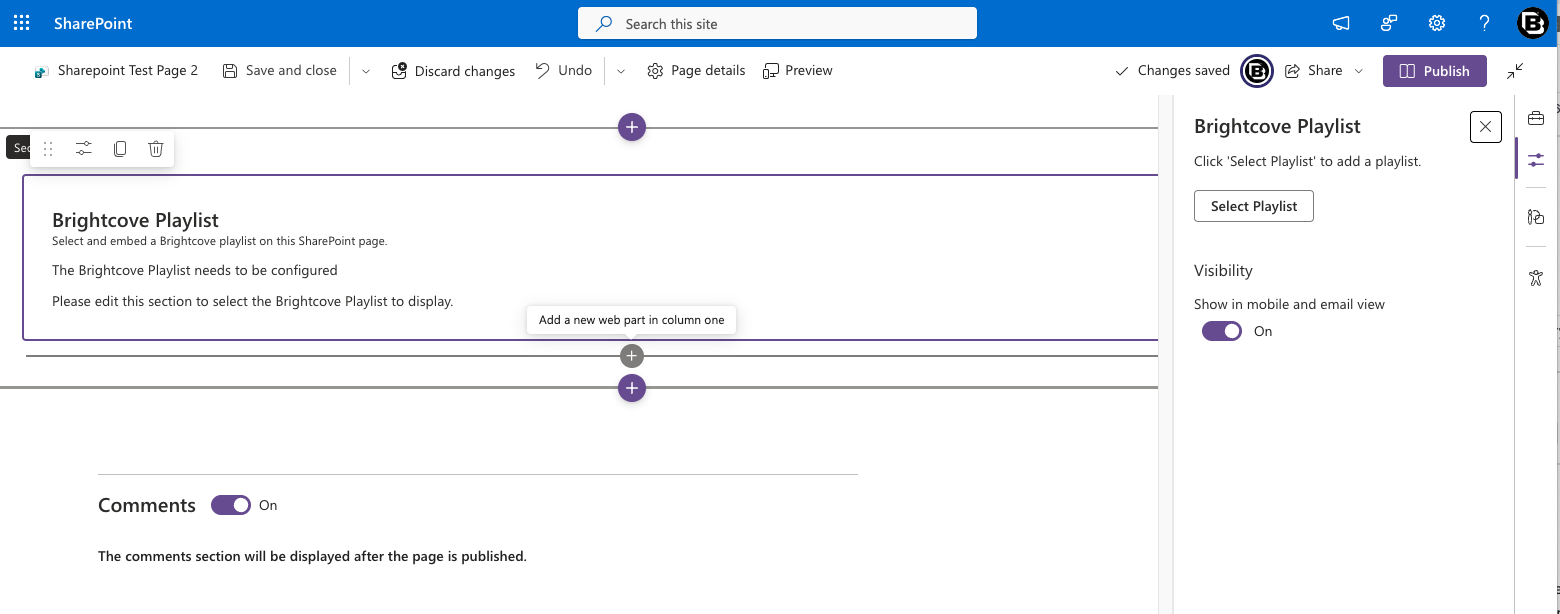
5.3 Brightcove Playlist web part
Embeds a Brightcove playlist on the page, showing multiple videos with a playlist layout.
Getting started:
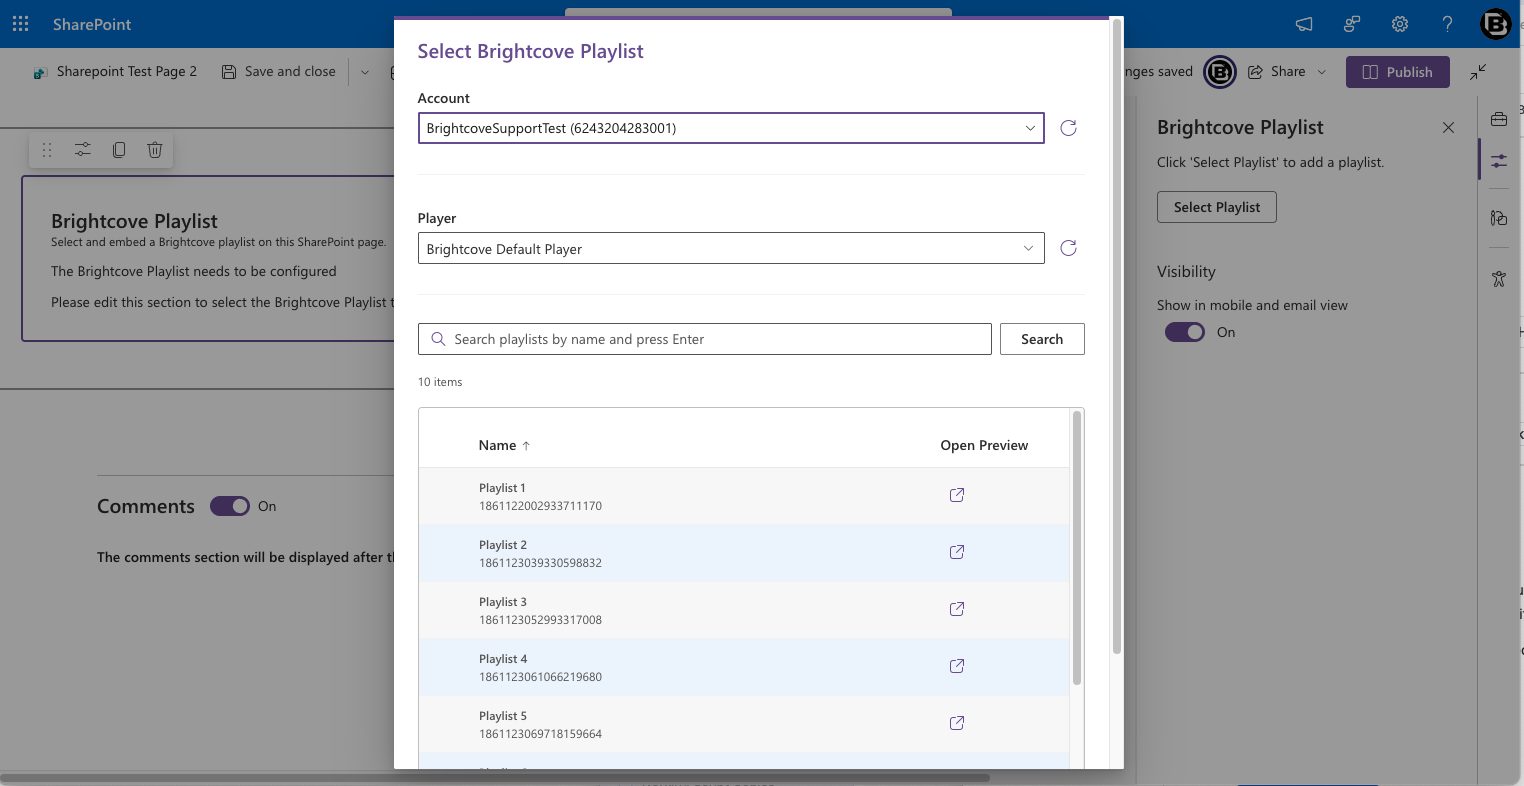
- Open the property pane and click Select Playlist.
- In the content selector dialog, choose a Brightcove Account, then browse or search for a playlist. Select a Player to use for rendering.
- Click Insert to confirm your selection.
Once a playlist is selected, the property pane displays the same three configuration groups as the Video web part: Player Playback Options, Player Controls, and Player Size Options. The options and defaults are identical — see Section 5.2 for details.


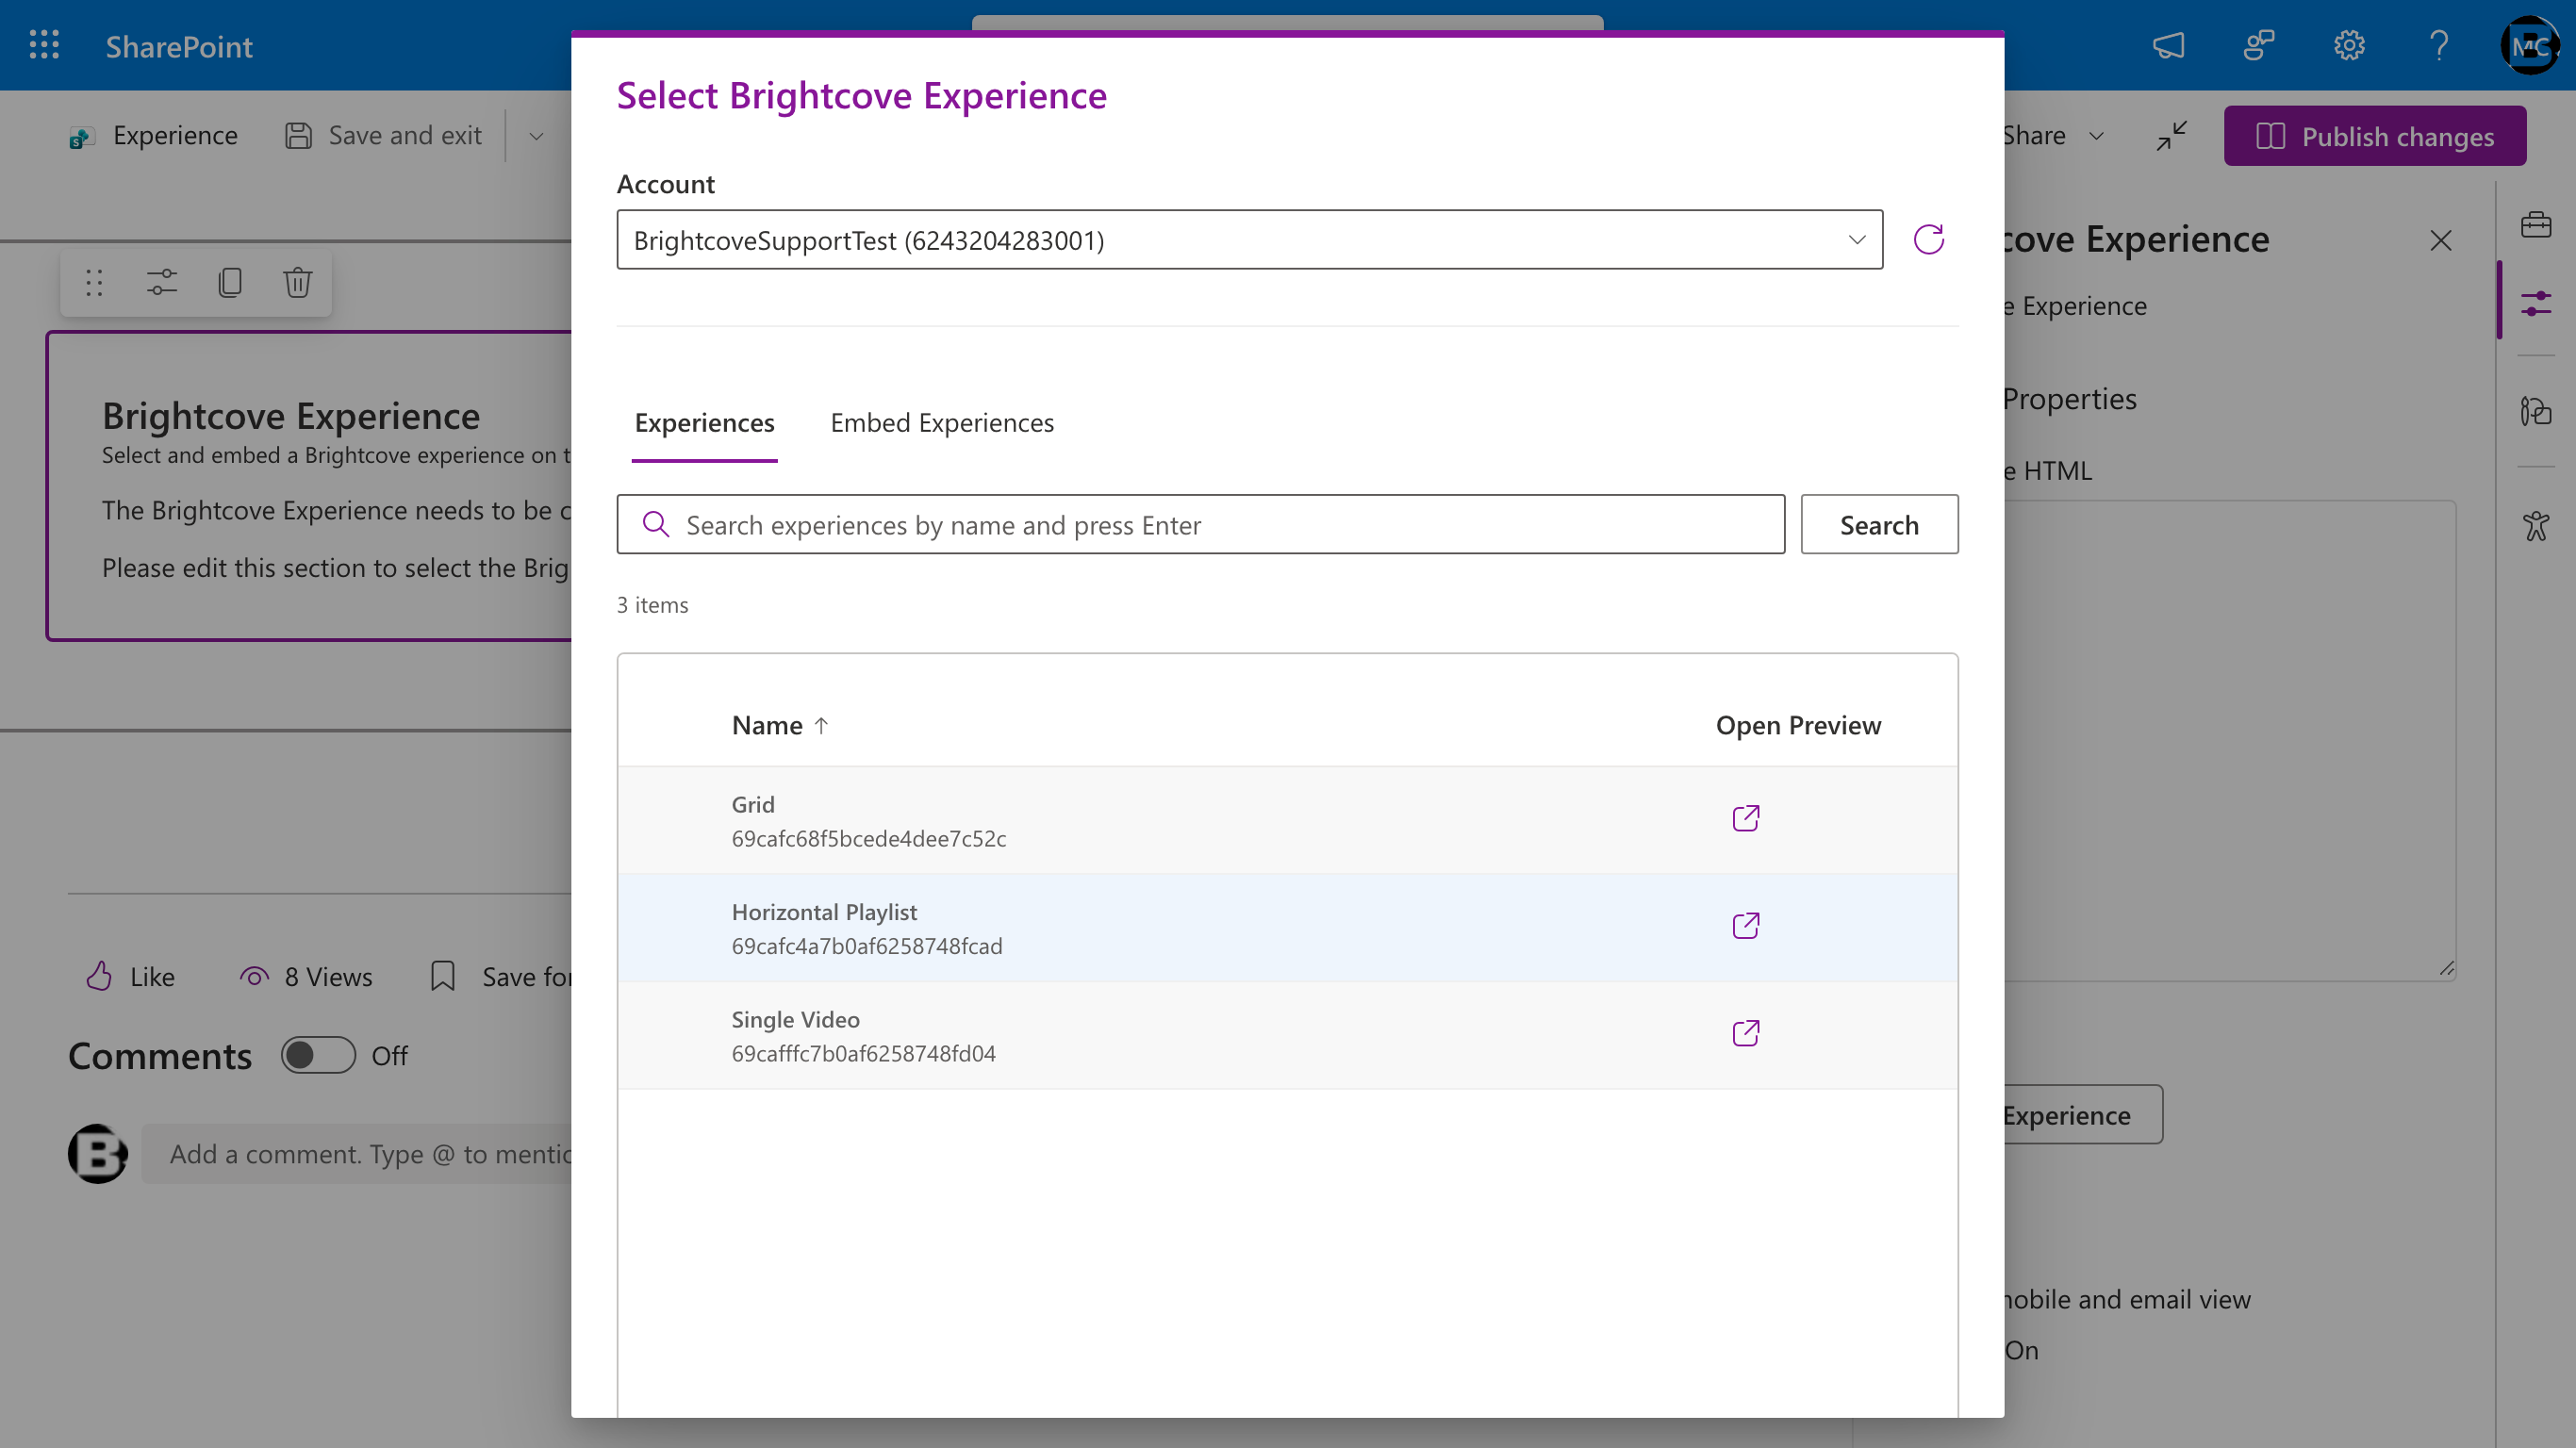
5.4 Brightcove Experience web part
Embeds a Brightcove In-Page Experience (IPX) on the page. The connector supports two types of experiences, accessed via separate tabs in the content selector dialog:
- Experiences — Legacy IPX experiences created in the Gallery module of Video Cloud Studio (Grid, Horizontal Playlist, Single Video, and other classic templates).
- Embed Experiences — New-generation experiences built with Brightcove's Embed Builder, hosted on
*.ipx.bcvp0rtal.com. These are the long-term replacement for the legacy templates.
Getting started:
- Add the web part to a page. Before an experience is selected, the web part displays a placeholder message: "The Brightcove Experience needs to be configured. Please edit this section to select the Brightcove Experience to display."
- Open the property pane (click the pencil icon or click the web part). You'll see a Custom Properties section with an empty Experience HTML text area, a Select Experience button, and a Visibility toggle.
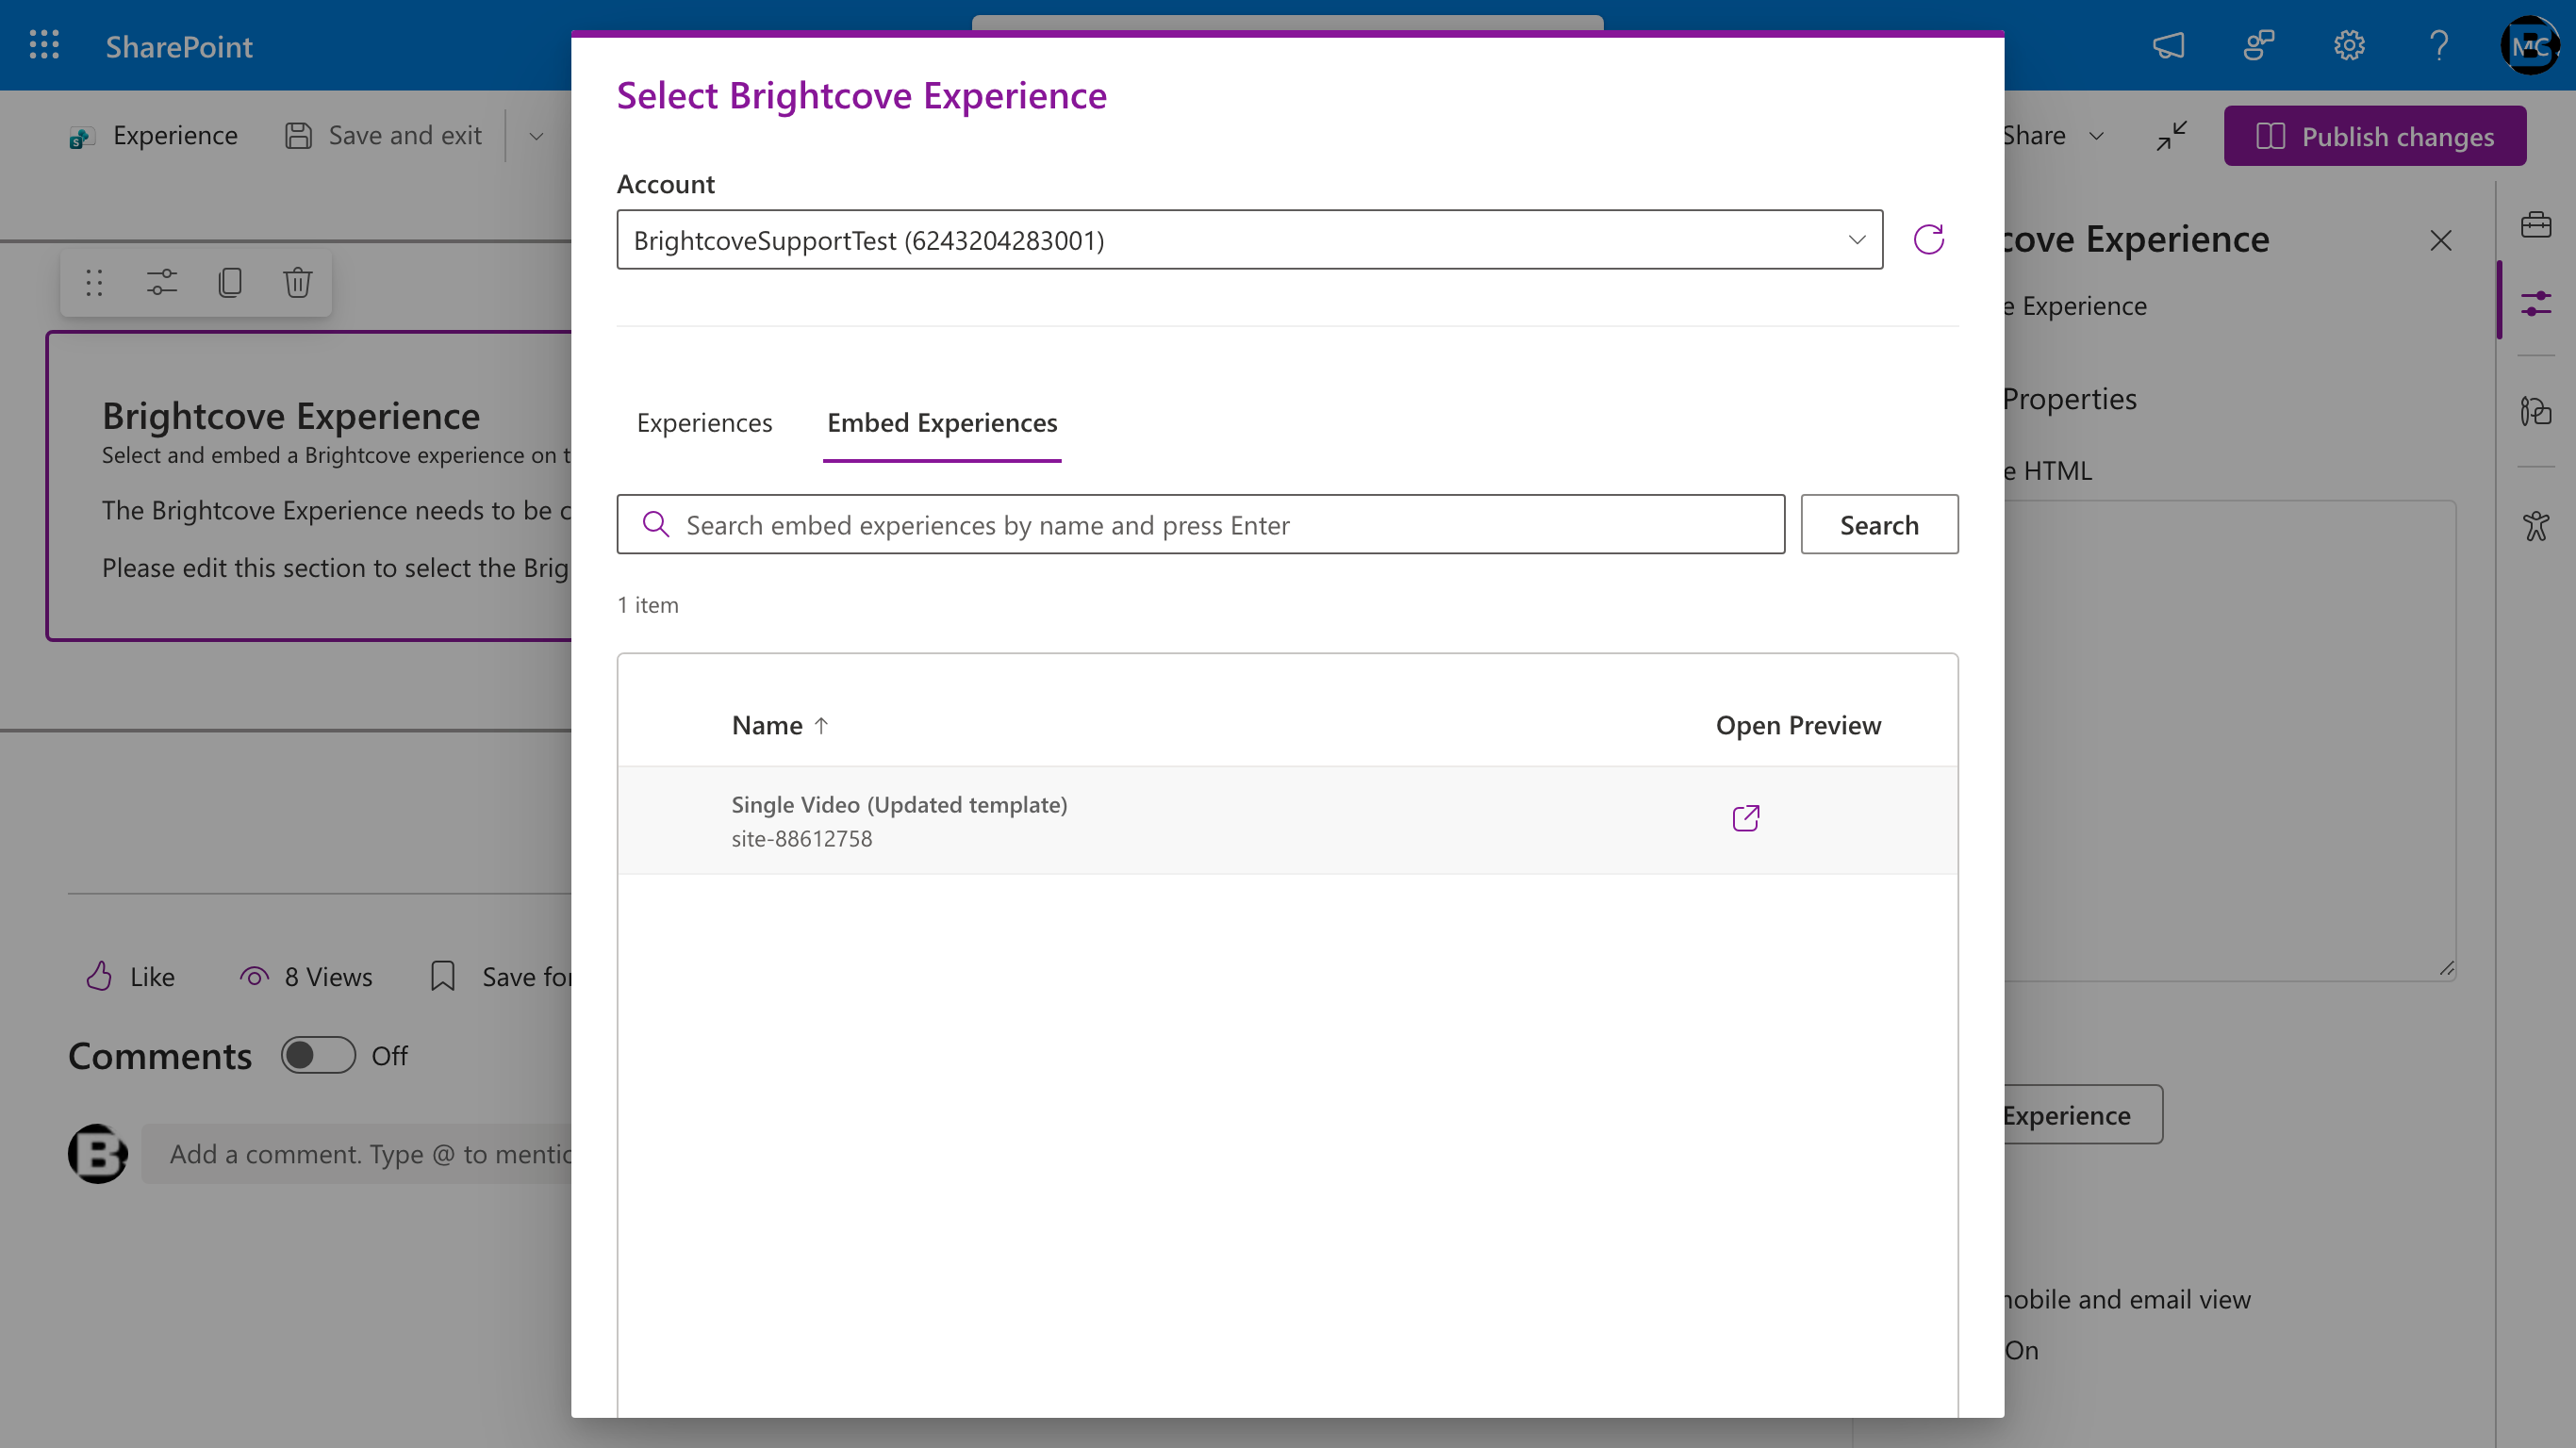
- Click Select Experience to open the content selector dialog.
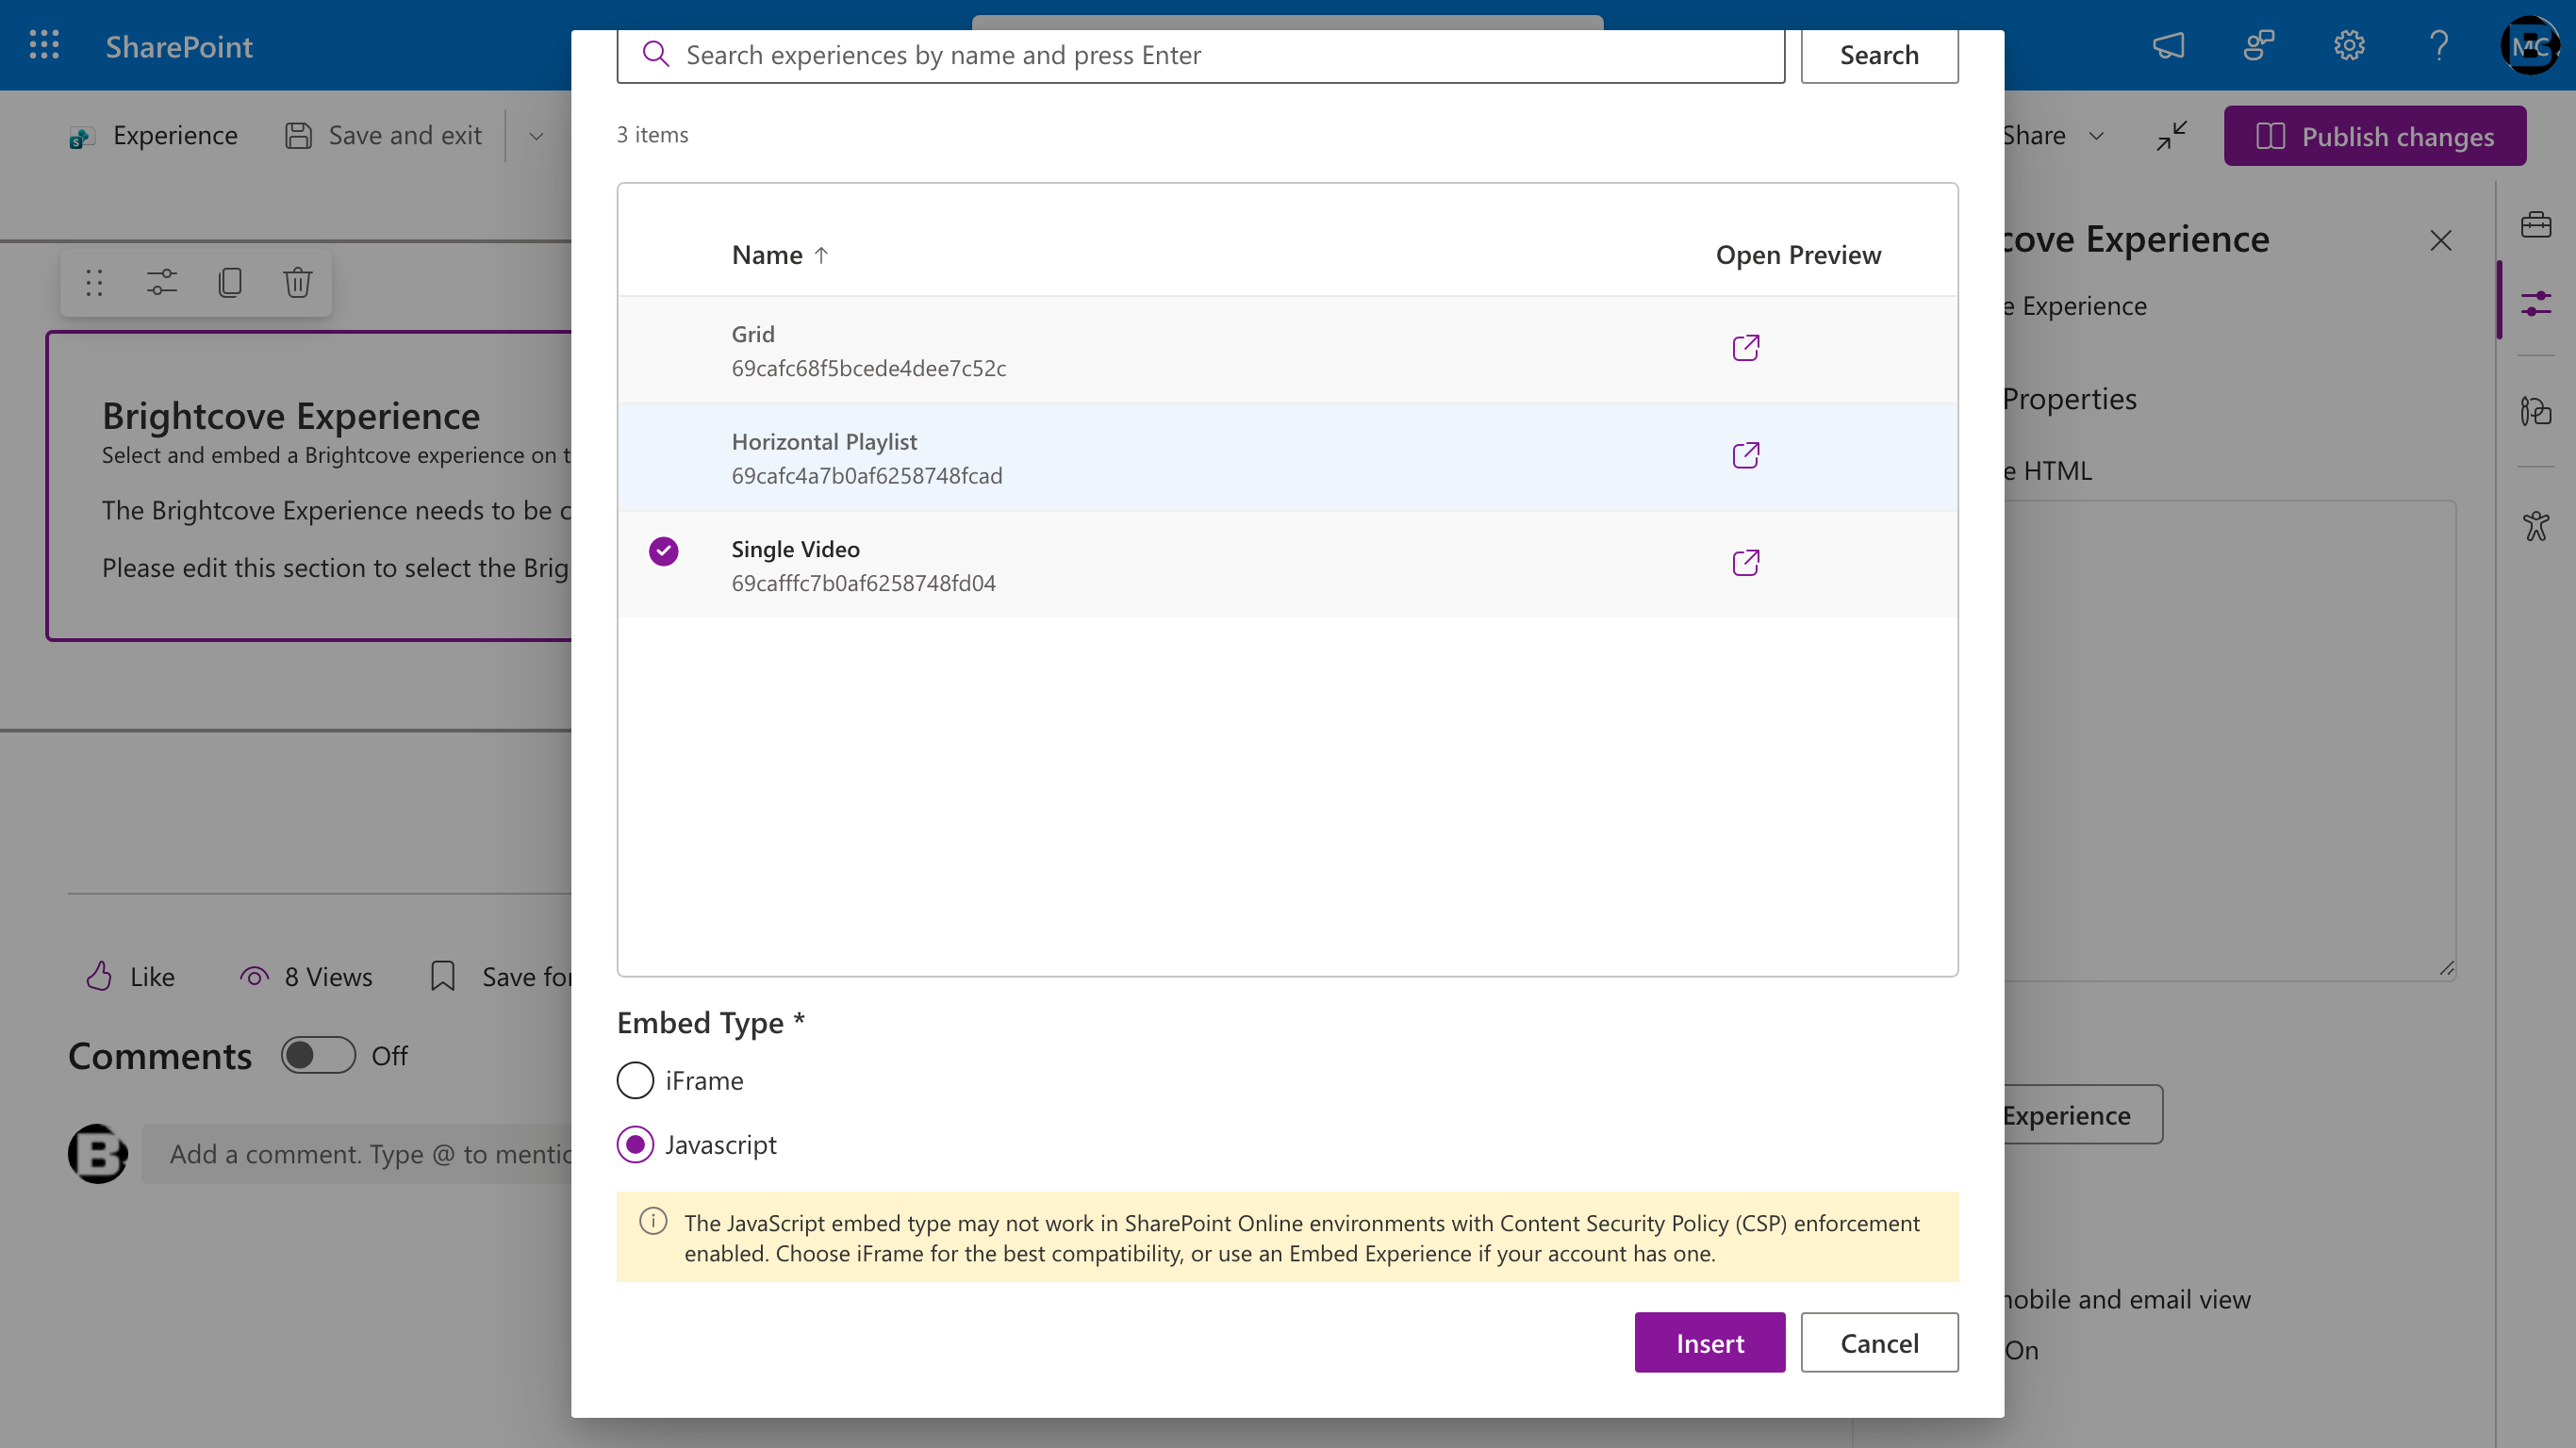
- Choose which type of experience you want to embed by selecting the appropriate tab:
- Experiences tab — for legacy IPX experiences. You'll also choose an Embed Type (iFrame or Javascript) at the bottom of the dialog.
- Embed Experiences tab — for new Embed Builder experiences. No Embed Type choice is needed; Embed Builder always renders via iframe + helper script.
- In the dialog:
- Account — Choose which Brightcove account to browse.
- Search — Type an experience name and press Enter to filter the list.
- Select an experience from the list. Click the Open Preview icon next to any experience to preview it in a new tab.
- Click Insert to confirm your selection.
Once an experience is selected, the web part renders the experience on the page. The property pane shows the generated embed code in the Experience HTML text area (read-only). Use the copy icon below the text area to copy the embed code to your clipboard.
Unlike the Video and Playlist web parts, the Experience web part does not offer playback, control, or sizing options in the property pane. The experience layout, player configuration, and sizing are all controlled within the experience itself via Brightcove Video Cloud Studio's Gallery module.
Visibility
The property pane includes the same Show in mobile and email view toggle as the Video and Playlist web parts. See Section 5.2 for details on how this works.
Embed Experiences (Embed Builder)
The Embed Experiences tab lists experiences built with Brightcove's Embed Builder. These are hosted on *.ipx.bcvp0rtal.com and render via an iframe plus a small helper script (in-page-manager.min.js) loaded from players.brightcove.net. Only published Embed Builder sites appear in this list.
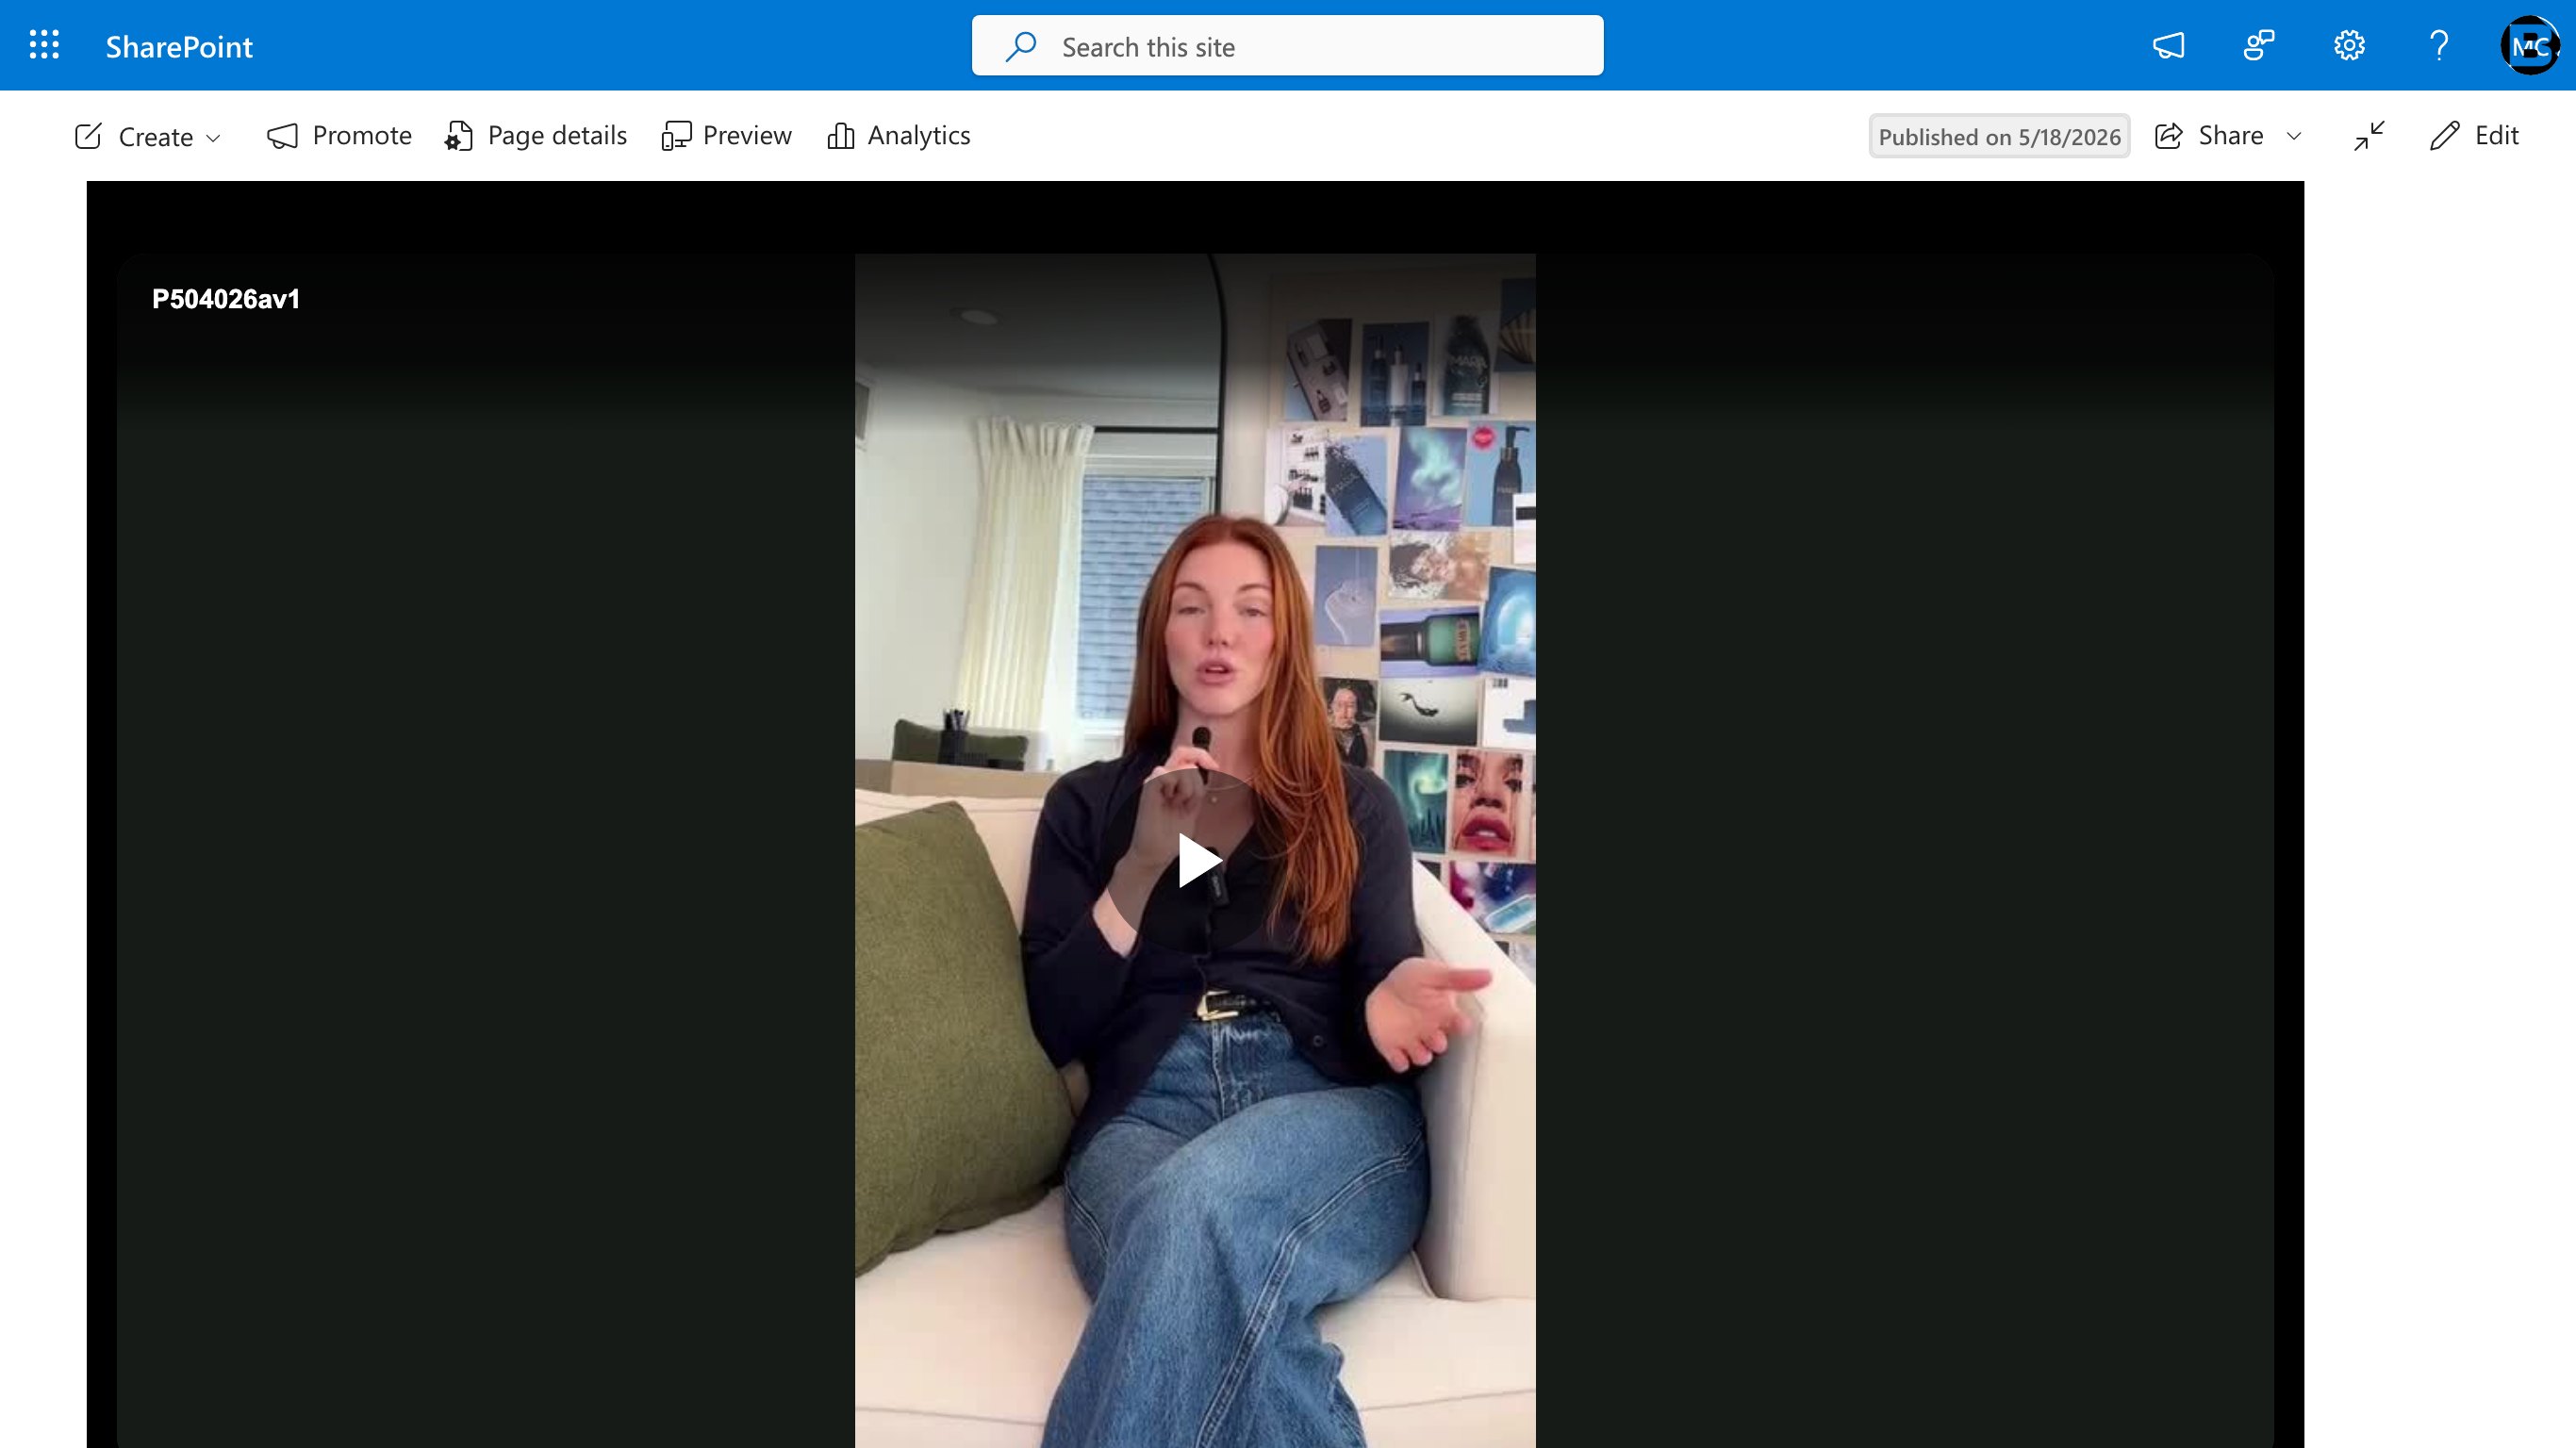
Embed Experiences do not require an Embed Type choice — they always render via the same iframe + helper-script pattern. Once inserted, the experience renders on the published page like this:
Embed types: iFrame vs. JavaScript (Experiences tab only)
The Embed Type radio at the bottom of the selector dialog applies only to the Experiences tab (legacy IPX). It determines how the legacy experience is embedded on the SharePoint page. Embed Experiences (the new Embed Builder templates) always render via iframe + helper script and do not expose this choice.
iFrame embed
The experience is rendered inside an HTML <iframe> element.
- This is the default and recommended choice for most deployments.
- Works in most SharePoint configurations without additional setup.
- Content is sandboxed inside the iframe.
JavaScript embed
The experience is rendered directly into the SharePoint page's using an inline Brightcove script tag.
- Required when you use Brightcove domain restrictions (also called "Content Security" in the player settings in Studio) to restrict playback to specific domains. Since the experience runs directly on the SharePoint page, the restriction domain should be your SharePoint tenant URL (e.g.,
*.sharepoint.com). - Requires that your SharePoint admin has added
https://players.brightcove.net/as a trusted script source in the SharePoint Admin Center (SharePoint Admin Center → Advanced → Script Sources). See the Installation Guide, Section 5.1.
Choosing the right embed type:
| Scenario | Recommended Embed Type |
|---|---|
| Standard embedding, no domain restrictions | iFrame |
| Domain-restricted content (Brightcove Content Security) | JavaScript |
| Embedding in Outlook / email-visible pages | iFrame (JavaScript embeds are stripped from emails) |
| Simplest setup, fewest dependencies | iFrame |
6. Working with multiple Brightcove accounts
The connector supports connecting multiple Brightcove Video Cloud accounts to a single SharePoint site. This is useful for organizations that manage separate accounts for different brands, departments, or regions.
6.1 How it works
- Each Brightcove account is added separately in the Connector Settings page with its own API credentials.
- When adding a web part to a page, the author selects which account to browse content from using the Brightcove Account dropdown in the property pane.
- Each web part instance is tied to a single account. To show content from different accounts on the same page, add multiple web parts and configure each with the appropriate account.
6.2 Account credential requirements
- Each set of API credentials (Client ID + Client Secret) should be linked to a single Brightcove account. See the Installation Guide, Section 3 for details.
- If you use the same Client ID / Client Secret across multiple accounts, you will need to add a separate account entry in Connector Settings for each Account ID you want to access.
7. Tips and best practices
For site admins
- Test connection regularly — After Azure maintenance, credential rotation, or infrastructure changes, use the "Test Connection" button in Connector Settings to verify the proxy is still healthy.
- Rotate credentials proactively — When you rotate Brightcove API credentials in Video Cloud Studio, update the corresponding account entry in Connector Settings immediately to avoid service interruptions.
- Use descriptive account names — When managing multiple accounts, use clear names (e.g.,
marketing-prod,training-emea) so content authors can easily identify the correct account.
For content authors
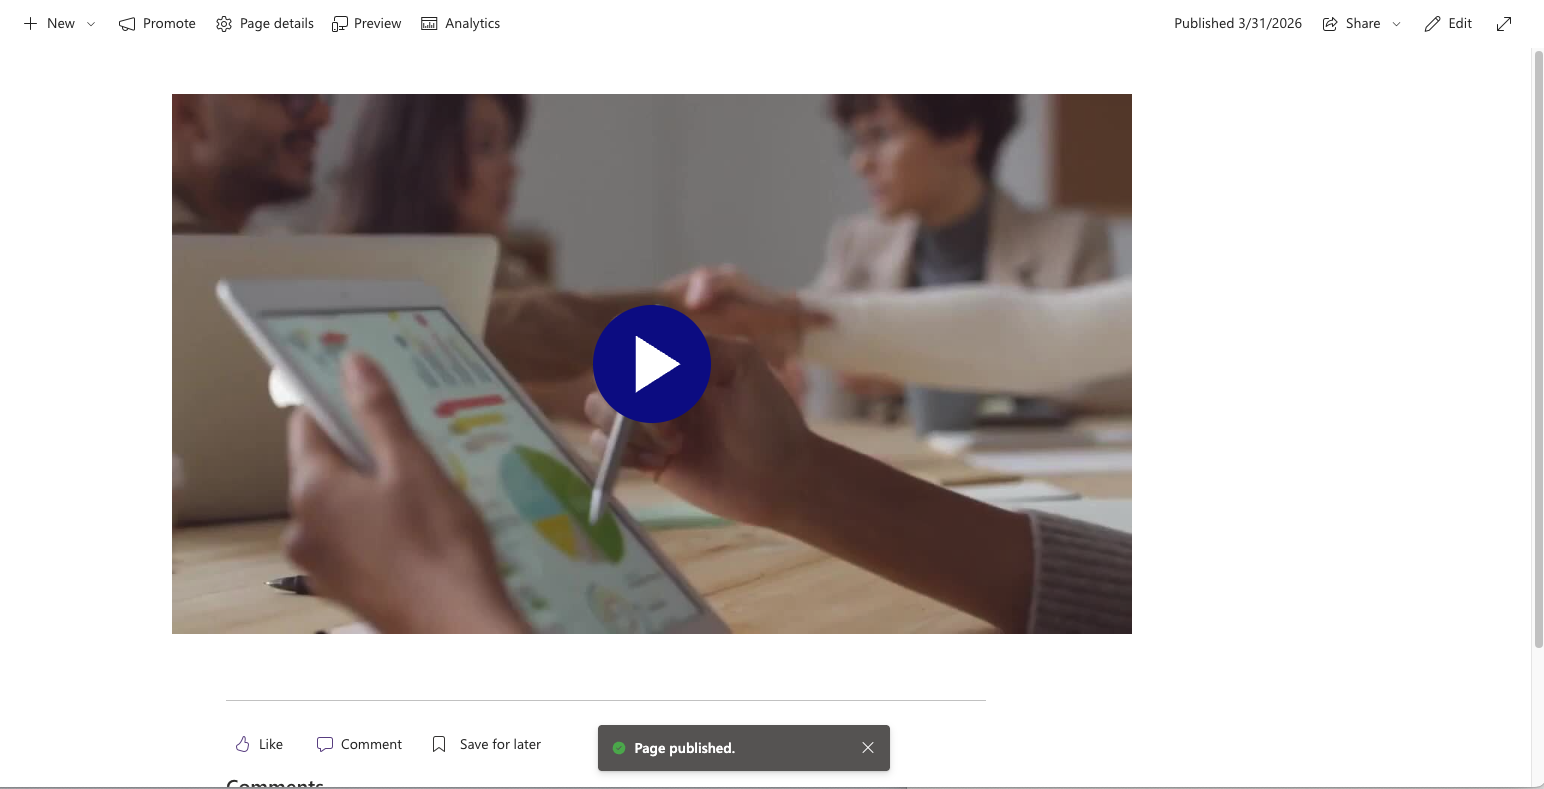
- Publish your page — Embedded Brightcove content may not play correctly in the SharePoint editor. Always publish (or republish) the page to see the final rendering.
- Check player compatibility — Ensure the player you select in the web part property pane is appropriate for the content type. Playlist players are needed for playlists; single-video players won't show playlist navigation.
- Use experiences for rich layouts — If you need more than a simple embedded video (e.g., a video gallery, featured video grid, or live event player), create an In-Page Experience in Brightcove Studio and embed it using the Experience web part.
- Draft experiences won't appear — Only published experiences show up in the Experience web part selector. If you don't see your experience, check that it's been published in Video Cloud Studio.
For content managers
- Upload from SharePoint — Use the Content Management page to upload and edit videos without switching to Video Cloud Studio. Changes made in SharePoint are immediately reflected in Video Cloud.
- Deactivate vs. delete — Setting a video to Inactive prevents playback but preserves the video in your account. Deletion must be done from Video Cloud Studio.
- Tags help discovery — Use consistent tagging when uploading videos. Tags are searchable in Video Cloud and help with playlist management.
8. Troubleshooting
Web part shows "needs to be configured"
This is the default state when a web part is first added. Open the property pane, select a Brightcove account, choose your content, and save.
No accounts appear in the web part dropdown
- Verify that at least one account has been added and saved in the Connector Settings page (Section 3.2).
- Verify the proxy connection test passes (Section 3.1).
- If you recently added the app to the site, try refreshing the page.
Video or playlist doesn't play on the published page
- Check that the video is Active in Brightcove (not deactivated or scheduled for a future date).
- If using domain restrictions in Brightcove, ensure your SharePoint tenant URL is in the allowed domains list.
- Make sure you have published the page — content may not render correctly in the SharePoint editor.
Blank area where the experience should be
- This typically indicates a JavaScript embed on the Experience web part where the script source hasn't been trusted. Ask your SharePoint admin to add
https://players.brightcove.net/in SharePoint Admin Center → Advanced → Script Sources. - Alternatively, re-select the experience using the iFrame embed type as a workaround.
"Connection failed" in Connector Settings
- Click Copy Support Bundle and share the diagnostic output with your Azure admin.
- Common causes: Function App is stopped or not deployed, CORS is misconfigured, API permission was not approved, or the App Registration is misconfigured.
- See the Installation Guide, Section 9 for detailed troubleshooting steps.
Upload fails in Content Management
- Verify the Brightcove API credentials have the required scopes: Dynamic Ingest: Create and Dynamic Ingest: Push Files. See the Installation Guide, Section 3.3.
- Check that the video file format is supported by Brightcove Video Cloud.
- Check the proxy connection — if the proxy is unreachable, all API operations will fail.
9. Frequently asked questions
Q: Do I need to re-embed all my existing Brightcove content from the legacy connector?
A: The legacy Add-In web parts and the new SPFx web parts are completely separate, so you will need to add the new Brightcove web parts and select your content in them. Whether existing content previously placed by the legacy connector continues to render after Microsoft retires the Add-In framework on April 2, 2026 is not something Brightcove can guarantee — this depends on how Microsoft handles previously embedded content. We recommend proactively re-embedding your content using the new web parts before the retirement date. For questions about the Add-In retirement's impact on existing page content, consult Microsoft's SharePoint Add-In retirement documentation or your Microsoft representative.
Q: Can I use the connector in Microsoft Teams or Viva?
A: Not in this release. Teams and Viva Connections support are planned for a future release. The v1.0.0.0 release supports SharePoint Online only.
Q: Can I use the connector on SharePoint on-premises?
A: No. The v1.0.0.0 release requires SharePoint Online (M365) and an Azure subscription. SharePoint Server (on-premises) is not supported.
Q: Does the connector work with Brightcove's content security / domain restrictions?
A: Yes. For all content types, you need to add your SharePoint tenant domain (e.g., *.sharepoint.com) to the player's Allowed Domains list in Video Cloud Studio (Players → Content Restriction → Domain restrictions). The Video and Playlist web parts will then work seamlessly with no additional SharePoint-side configuration. For the Experience web part:
- For legacy IPX experiences (the Experiences tab), you must use the JavaScript embed type and ensure your SharePoint admin has added
https://players.brightcove.net/as a trusted script source. - For Embed Builder experiences (the Embed Experiences tab), your SharePoint admin must add both
https://players.brightcove.net/andhttps://*.ipx.bcvp0rtal.com/as trusted script sources.
See Section 5.4 for details.
Q: How many Brightcove accounts can I connect?
A: There is no hard limit. You can add as many Brightcove accounts as needed in the Connector Settings page. Each requires its own set of API credentials.
Q: Are my Brightcove API credentials secure?
A: Yes. API credentials are stored as encrypted secrets in Azure Key Vault. They are never sent to or exposed in the SharePoint client (browser). All Brightcove API calls are made server-side through the Proxy API, which authenticates requests using Microsoft Entra ID OAuth tokens.
Q: What happens if my Azure admin rotates the Key Vault or changes the Function App URL?
A: You'll need to update the Proxy API Base URL and/or Proxy API Resource in the Connector Settings page. Use the Test Connection button to verify the new configuration.
Q: Can multiple sites use the same Azure Function App?
A: Yes. One Function App + Key Vault deployment can serve multiple SharePoint sites. Each site adds the app independently and configures its own Connector Settings, but they all point to the same proxy. Account credentials in the Key Vault are scoped by tenant ID, so credentials are shared across sites within the same tenant.
10. Getting help
If you encounter issues not covered in this guide or the Installation Guide:
- Use the Copy Support Bundle feature in Connector Settings to capture diagnostic information.
- Contact your Brightcove Account Manager or CSM for migration and deployment assistance.
- Open a support case at Brightcove Support and include the support bundle output along with a description of the issue.